
Your new faucet installation is stalled because you’re staring at that flawless granite countertop, terrified one wrong move will trigger a spiderweb of cracks costing thousands to replace. You’ve watched YouTube tutorials where bits shatter and countertops splinter—but here’s the truth: drilling granite successfully hinges on three non-negotiable rules you’re probably ignoring. Skip the diamond bits, skip the water, or rush the speed, and you will ruin your countertop. Done right? You’ll create clean, professional holes for faucets, dispensers, or appliances in under 15 minutes. This guide reveals exactly how professional fabricators drill granite—without the $200/hour service call.
Why Standard Drill Bits Fail and Crack Granite Countertops
Granite’s extreme hardness (ranking 6-7 on the Mohs scale) makes it 3x harder than marble and nearly impossible to drill with conventional tools. When DIYers grab masonry or tile bits, two disasters unfold:
- Bit Glazing: Standard carbide bits overheat within seconds, causing granite dust to fuse onto the cutting edge. This “glazed” bit grinds instead of cuts, generating destructive heat that stresses the stone.
- Catastrophic Cracking: The brittle nature of granite means uneven pressure from a slipping bit creates micro-fractures. These spread silently until—crack—your countertop is ruined.
Pro Tip: Diamond-tipped bits are the only solution. The industrial diamonds bonded to the bit edge act like microscopic saws, grinding granite without generating excessive heat. For holes under 1/2″ (like screw anchors), use a solid diamond drill bit. For faucet holes (1-1/4″ or larger), a diamond hole saw (core bit) is mandatory—its hollow design removes dust efficiently and prevents overheating.
Your Granite Drilling Toolkit: No Substitutions Allowed

Diamond Bits and Drill Settings That Prevent Disaster
- Diamond Hole Saw: 1-1/4″ size for standard faucet installations (e.g., Moen 1580000).
- Diamond Drill Bit: 3/16″ for pilot holes or soap dispenser tubes.
- Variable-Speed Drill: Set to 300-500 RPM maximum. Critical: Disable any “hammer” function—percussive action cracks granite instantly.
- Water Delivery System: A spray bottle or plumber’s putty dam (see below).
Why Painter’s Tape and Putty Dams Save Countertops
Skip this step, and your bit will skate across polished granite, scratching the surface or drilling off-center:
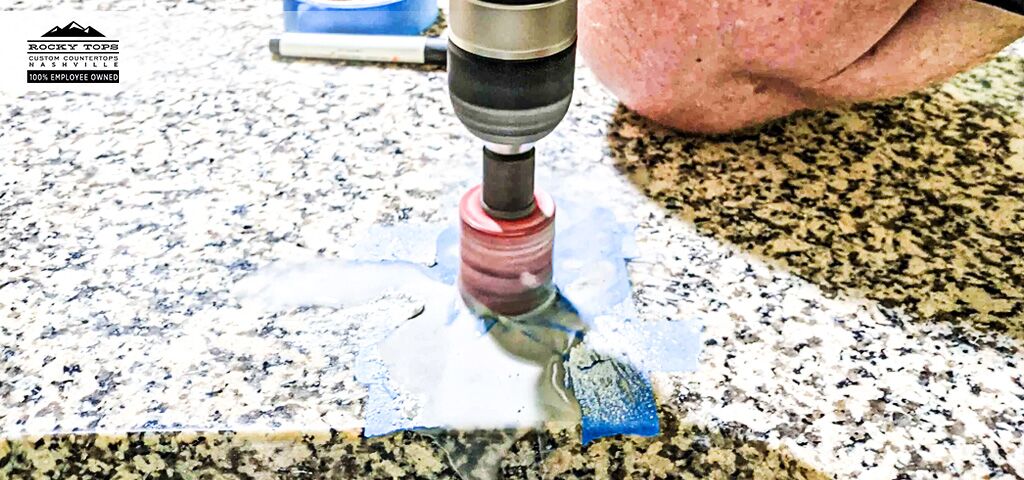
1. Apply 3 layers of 2-inch painter’s tape in a cross pattern over your mark. This creates “tooth” for the bit to grip.
2. Build a 1/2-inch-high putty dam around the tape using plumber’s putty. Fill it with water to create an instant cooling reservoir.
Visual Cue: If water pools evenly without leaking, your dam is sealed. Replenish every 30 seconds.
Step-by-Step Drilling: The 4-Minute Hole Technique
How to Start Without Slipping or Cracking
- Mark with Surgical Precision: Use a fine-tip grease pencil to dot the exact hole center. Confirm placement with a speed square against cabinet edges.
- Create the Witness Groove: Set drill to lowest speed. Rest the bit on the taped spot for 10 seconds without pressure. The diamond grit will etch a shallow guide ring.
- Apply Feather-Light Pressure: Press down with just enough force to feel the drill vibrate—never leaning into it. Think “holding a ripe avocado,” not “driving a nail.”
Water Management: The Make-or-Break Step
Why you’ll fail without this: Granite dust crystallizes at 300°F, glazing bits and heating stone to cracking point. Water cools the interface to 120°F.
| Method | When to Use | Pro Execution Tip |
|---|---|---|
| Spray Bottle | Solo drilling | Spray between 15-second drilling bursts—never directly on spinning bit (causes skidding) |
| Putty Dam | Deep/large holes | Fill dam with water before starting; pause every 20 seconds to top up |
| Helper + Drip | Critical installations | Use a syringe for precise water delivery to the bit’s contact point |
Breakthrough Protocol: Avoid Backside Chipping
As the bit nears the underside (you’ll feel resistance drop sharply):
– Reduce pressure by 50%
– Slow drill speed to 200 RPM
– Place scrap wood under the countertop where the bit exits. This supports the granite fibers, preventing blowout chips.
Time Estimate: 3-4 minutes for a 1-1/4″ faucet hole. Rushing adds zero time savings—only risk.
Critical Mistakes That Ruin Countertops (And How to Avoid Them)
The Speed Trap: Why 500 RPM Is Your Absolute Limit
Drilling at 800+ RPM (common with unregulated drills) generates heat faster than water can dissipate it. Result? The granite’s crystalline structure weakens, causing hairline cracks radiating from the hole. Fix: Use a drill with a torque clutch set to “high.” If your drill lacks RPM control, tape the trigger at 1/3 pull.
Pressure Pitfalls: When “Pushing Harder” Backfires
Excessive downward force:
– Compresses diamond grit against granite, creating friction heat
– Forces bits off-axis, drilling oval holes
– Test: Place your free hand on the countertop. If you feel vibration, you’re pressing too hard.
Why Dry Drilling Guarantees Failure
One minute of dry drilling:
– Glazes diamond bits permanently (requiring replacement)
– Heats granite to 400°F, creating thermal stress cracks
– Emergency Fix: If you accidentally drill dry, stop immediately. Soak the area with water for 5 minutes before resuming.
Post-Drilling Cleanup and Hole Finishing

Slurry Removal: Prevent Permanent Scratches
Granite slurry is liquid sandpaper. Leaving it dries into an abrasive film that scratches surfaces during installation. Do this:
1. Wipe the hole interior with a damp microfiber cloth while drilling (between water bursts).
2. Flush with soapy water after completion. Use an old toothbrush to scrub edges.
Smoothing Rough Edges in 60 Seconds
Minor chipping at the hole rim? Don’t panic:
– Wrap 600-grit wet/dry sandpaper around a chopstick
– Dip in water and rotate gently inside the hole (10 seconds max)
– Warning: Over-sanding enlarges the hole—stop when edges feel smooth
Sealing Exposed Granite: The Hidden Stain Risk
Factory-sealed granite has pores closed except where you drilled. Unsealed holes wick in coffee, wine, or oils:
1. Dry the hole completely with a hairdryer (5 minutes)
2. Apply 2 drops of penetrating granite sealer (e.g., Miracle 511)
3. Wipe excess after 3 minutes
When to Call a Professional (Before It’s Too Late)
Drill near these high-risk zones only with professional tools:
– Within 2 inches of sink cutouts (vulnerable stress points)
– Across visible seams (movement risks cracking)
– On leathered or flamed finishes (rough textures hide fractures)
DIY Green Light Zones:
– Center of large countertop expanses
– Small holes (≤1/2″) for dispensers
– Areas with full plywood substrate underneath
If you skipped practice on scrap granite, stop now. Find an offcut from a countertop installer (often free) and drill 3 test holes. This 20-minute investment prevents $3,000 regrets.
Final Checklist for Flawless Granite Drilling
Before touching that drill:
☑️ Diamond bits only (no masonry/tile bits)
☑️ Painter’s tape + putty dam applied
☑️ Drill set to ≤500 RPM, no hammer mode
☑️ Water source ready (spray bottle/dam)
☑️ Respirator + goggles worn (silica dust is carcinogenic)
Drilling granite isn’t about strength—it’s about restraint. Respect the stone’s hardness with diamond tools, honor its brittleness with patience, and protect your investment with constant cooling. One clean hole proves you mastered it; one crack proves you didn’t. When you hear that smooth grind-grind-grind instead of a screech, you’ll know you’ve drilled like a pro. For faucet installations, always test-fit your mounting hardware before final drilling—adjustments after the fact aren’t an option. If uncertainty lingers, a $150 pro visit beats a $3,000 replacement. But with this method? You’ve got this.


