
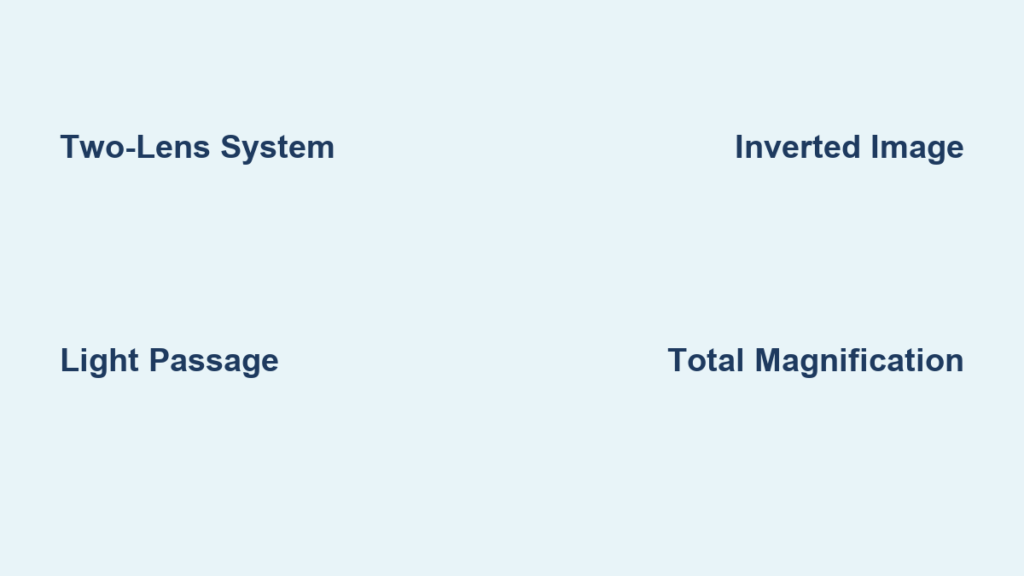
If you’ve ever examined a drop of pond water and marveled at the swirling microbes, or studied plant cells in biology class, you’ve likely used a compound microscope—the essential tool for viewing objects too small to be seen with the naked eye. But how does a compound microscope work? It’s not just a powerful magnifying glass. Instead, it uses a precise two-lens system, carefully controlled light, and mechanical stability to turn invisible details into sharp, highly magnified images.
At its heart, a compound microscope works by passing light through a thin specimen, which is then magnified first by an objective lens and further enlarged by an eyepiece lens. This dual-stage process allows total magnifications of 40X to 1000X or more, making it possible to see individual cells, bacteria, and even internal structures like nuclei. The term “compound” refers to this use of multiple lenses in series, distinguishing it from simple microscopes that rely on just one.
Understanding how a compound microscope works goes beyond turning knobs and focusing. It involves knowing how light interacts with the specimen, how lenses bend that light to form an image, and why what you see is upside down and backward. Whether you’re a student, teacher, or hobbyist, grasping these principles helps you get clearer images, troubleshoot focus issues, and make the most of this indispensable scientific instrument.
Core Components That Make It Work
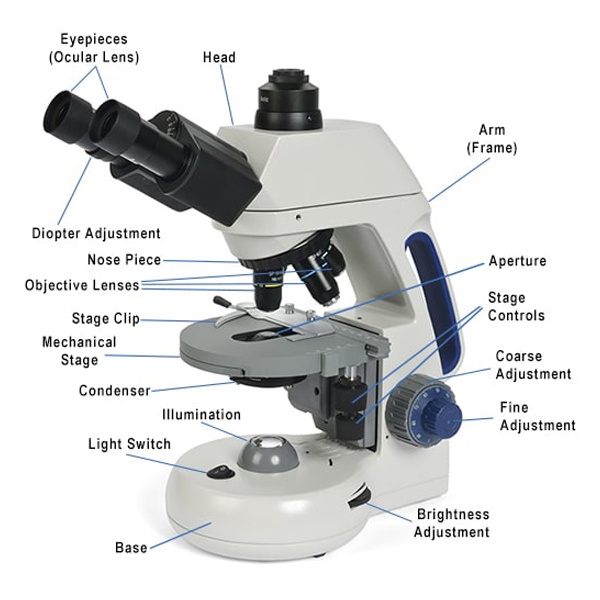
A compound microscope isn’t just a single lens on a stand—it’s a finely tuned system of mechanical and optical parts, each playing a critical role in image formation.
Mechanical Support System
The microscope’s frame ensures stability and allows precise adjustments.
- Base and Arm: The heavy U-shaped base keeps the microscope steady, while the curved arm provides a safe grip when carrying.
- Stage and Stage Clips: The flat stage holds the glass slide in place, and spring-loaded clips prevent it from shifting during focus.
- Body Tube and Nosepiece: The tube maintains the correct distance (standard 160 mm) between the objective and eyepiece. The rotating nosepiece holds multiple objectives and lets you switch magnifications quickly.
- Focus Knobs: The coarse knob moves the stage or tube rapidly for initial focusing. The fine knob makes tiny adjustments, essential for clarity at high magnifications.
Optical Components and Their Functions
These parts work together to illuminate and magnify the specimen.
- Illuminator (LED or Halogen): Located in the base, it provides bright, consistent light—modern replacement for older mirror-based models.
- Condenser and Iris Diaphragm: The condenser focuses light onto the specimen. The iris diaphragm controls the size of the light beam, affecting contrast and resolution.
- Objective Lenses (4X, 10X, 40X, 100X): Mounted on the nosepiece, these do the primary magnification. The 100X oil immersion lens requires a drop of oil to prevent light scattering and boost clarity.
- Eyepiece (Ocular Lens, usually 10X): This final lens magnifies the image formed by the objective. Some include a reticle for measuring cell sizes.
Two-Stage Magnification: How the Image Is Built
The real power of a compound microscope comes from its two-stage magnification process—no single lens does all the work.
Objective Lens Forms the First Image
The process starts when light from the illuminator passes through the condenser and into the specimen.
- The specimen absorbs, transmits, or bends light, creating contrast.
- This light enters the objective lens, which is positioned just above the slide.
- Because the specimen sits slightly beyond the focal point of the objective, it forms a real, inverted, and magnified image inside the body tube—called the intermediate image (I₁).
This image isn’t visible to your eye, but it’s the foundation for what you’ll eventually see.
Eyepiece Magnifies the Intermediate Image
Now the eyepiece takes over, acting like a magnifying glass for I₁.
- The intermediate image falls within the focal length of the eyepiece.
- The eyepiece produces a virtual, upright (relative to I₁), and further magnified final image (I₂) that appears about 25 cm away—the ideal viewing distance.
- Since I₁ was already inverted, the final image remains inverted and reversed left-to-right compared to the original specimen.
That’s why when you move the slide right, the image moves left. It’s normal—and something every microscope user learns to adapt to.
Total Magnification: A Simple Calculation
You don’t need advanced optics to figure out how much bigger your sample appears.
Multiply Objective and Eyepiece
$$
\text{Total Magnification} = \text{Objective Magnification} \times \text{Eyepiece Magnification}
$$
For example:
– 40X objective + 10X eyepiece = 400X total
– 100X oil lens + 10X eyepiece = 1000X
| Objective | Total Magnification (with 10X Eyepiece) |
|---|---|
| 4X (scanning) | 40X |
| 10X (low power) | 100X |
| 40X (high power) | 400X |
| 100X (oil immersion) | 1000X |
Start with low power to find your area, then switch to higher magnifications.
Physics Behind the Magnifying Power
Magnification isn’t magic—it follows laws of optics.
Objective Magnification
$$
m_0 = \frac{L}{F}
$$
Where:
– $ L $ = tube length (160 mm)
– $ F $ = focal length of the objective
A 40X objective has a very short focal length (~4 mm), while a 4X lens has a longer one (~40 mm).
Eyepiece Magnification
Depends on viewing style:
– Relaxed eye (image at infinity): $ m_e = \frac{25\,\text{cm}}{F_e} $
– Focused eye (image at near point): $ m_e = 1 + \frac{25\,\text{cm}}{F_e} $
Final Magnifying Power
- For relaxed viewing: $ M = \frac{L \cdot d}{F \cdot F_e} $
- For focused eye: $ M = \left(\frac{L}{F}\right)\left(1 + \frac{d}{F_e}\right) $
These formulas show that magnification depends on lens quality, tube length, and focal lengths—not just the numbers on the lenses.
Resolution vs. Magnification: Why Clarity Matters
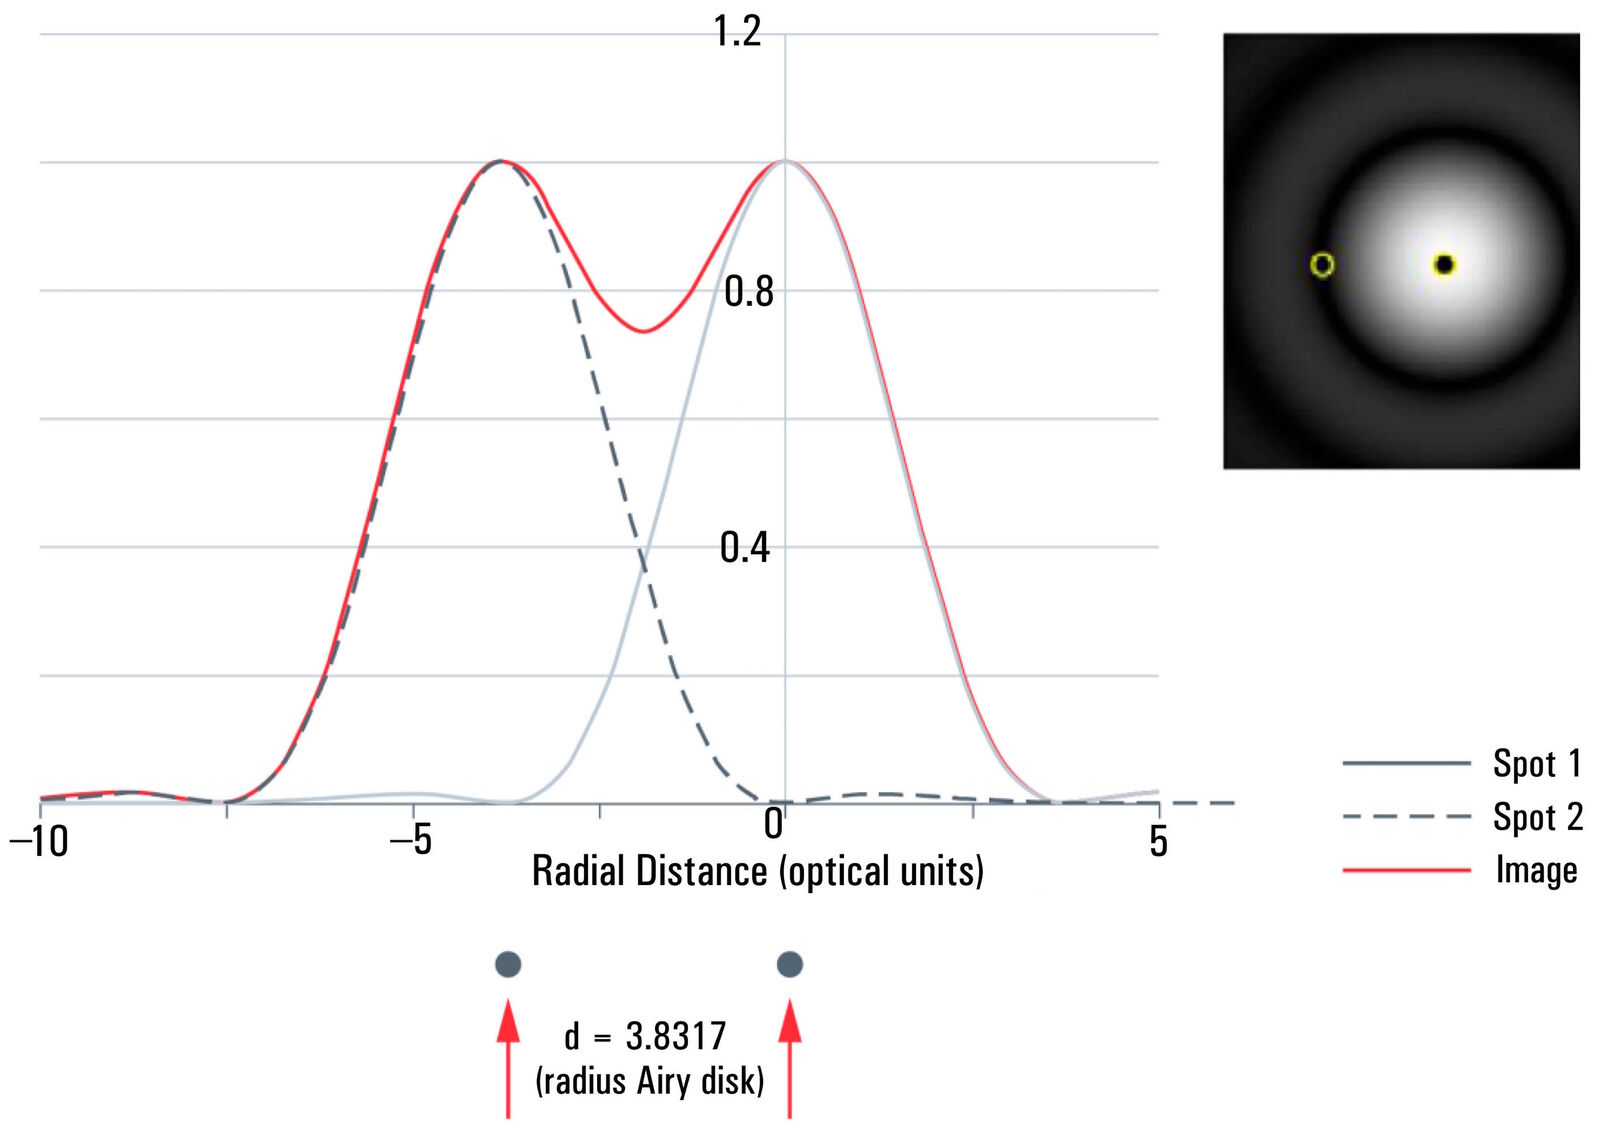
High magnification means nothing if you can’t see detail. Resolution—the ability to distinguish two close points—is just as important.
Abbe’s Resolution Formula
$$
\text{Resolution} = \frac{0.61 \lambda}{\text{NA}}
$$
Where:
– $ \lambda $ = wavelength of light (~550 nm)
– $ \text{NA} $ = Numerical Aperture
Smaller resolution = better detail.
Numerical Aperture (NA)
$$
\text{NA} = n \sin \theta
$$
- $ n $: refractive index (air = 1.0, oil = 1.5)
- $ \theta $: half-angle of light entering the lens
Oil immersion increases NA by replacing air with oil, reducing light bending and boosting resolution by up to 50%.
Why 1000X Is the Limit
With visible light, the best resolution is about 200 nm. Beyond 1000X, extra magnification just makes blurry images bigger—this is called empty magnification.
Electron microscopes go further by using shorter wavelengths, but compound microscopes remain ideal for live, stained, or transparent samples.
Light Control for Sharper Images
Magnification alone won’t give you a clear view. Proper lighting is key.
Iris Diaphragm Adjusts Contrast
Controls how much light enters the specimen.
- Open wide: More light, better resolution, but glare
- Closed down: Higher contrast, less glare, but reduced resolution
Best setting: Adjust until you see a sharp halo around particles—this means optimal contrast.
Condenser Focuses the Light Beam
Raise or lower the condenser to focus light directly on the specimen.
- Too high or low? Image looks uneven or hazy.
- Correct position? Bright, even illumination.
Advanced models use Köhler illumination for uniform lighting and maximum resolution.
Step-by-Step: How to Use a Compound Microscope
Knowing how it works helps, but proper technique ensures success.
1. Start with Low Power
- Place slide on stage, secure with clips.
- Rotate to 4X or 10X objective.
- Use coarse focus to bring specimen into view.
- Center the area of interest.
Low power gives a wide field—perfect for finding your target.
2. Move to High Power Safely
- Rotate to 40X objective (should stay in focus—thanks to parfocal design).
- Use fine focus only to sharpen.
- Never use coarse knob—risk of crashing the lens into the slide.
3. Use Oil Immersion Correctly
- Rotate nosepiece halfway between 40X and 100X.
- Place one drop of oil on the slide.
- Swing 100X lens into oil—do not touch the slide without oil.
- Focus with fine knob only.
After use, clean the lens with lens paper and cleaner—oil dries and damages glass.
4. Maintain Parfocality and Parcentricity
- Parfocal: Objects stay in focus when switching lenses.
- Parcentric: Objects stay centered.
These features save time and protect your slides.
Why the Image Is Inverted and Reversed
One of the most confusing things: everything is upside down and backward.
The Reason
- The objective lens creates a real, inverted image due to convex lens physics.
- The eyepiece magnifies this inverted image but doesn’t flip it back.
- Result: Final image is inverted and laterally reversed.
Try this: Move the slide right—the image moves left. Push it away—it comes toward you.
It’s normal. Just adjust your hand-eye coordination.
Key Applications in Science and Education
Despite digital advances, the compound microscope remains essential.
Biology and Education
- Study cells, mitosis, organelles, and protists.
- Standard in high school and university labs.
Medical Diagnostics
- Analyze blood smears, identify bacteria and parasites.
- Used in hematology and pathology.
Environmental Science
- Examine pond water, plankton, and soil microbes.
- Monitor water quality and biodiversity.
Materials Science
- Inspect thin sections of rocks, metals, and polymers.
- Study crystal structures and fractures.
Summary: How It All Comes Together
A compound microscope works through a coordinated system of lenses, light, and mechanics:
- Light travels from the base, through the condenser, and into the specimen.
- The objective lens forms a real, inverted, magnified image inside the tube.
- The eyepiece magnifies this image into a virtual one visible to your eye.
- Total magnification = objective × eyepiece (e.g., 40X × 10X = 400X).
- The final image is inverted and reversed, limited by resolution (~200 nm), not magnification.
By understanding how a compound microscope works, you gain better control, clearer images, and smarter troubleshooting. Whether you’re identifying a cell type or teaching students about life at the smallest scale, knowing the role of each lens, knob, and beam of light ensures you get the most out of every observation. With proper care and technique, this classic instrument will continue revealing the unseen for generations to come.


