You’re aiming at a distant buck across an open sage flat. Your rangefinder reads 720 yards. You dial the correction, squeeze the trigger, and miss. What went wrong? Chances are it wasn’t your shot. It was your range finder accuracy.
Modern rangefinders, especially those over $300 made in the last eight years, are engineered for extreme precision, typically within ±1 yard up to 1,200 yards. In controlled tests, many return readings within a fraction of a yard of the true distance. But real-world performance rarely matches lab conditions. The problem isn’t the device. It’s what the device is actually measuring. This guide breaks down the science and strategy behind true range finder accuracy, from technical limits to proven field techniques that ensure every reading is trustworthy.
Laser Accuracy: What Specs Really Mean
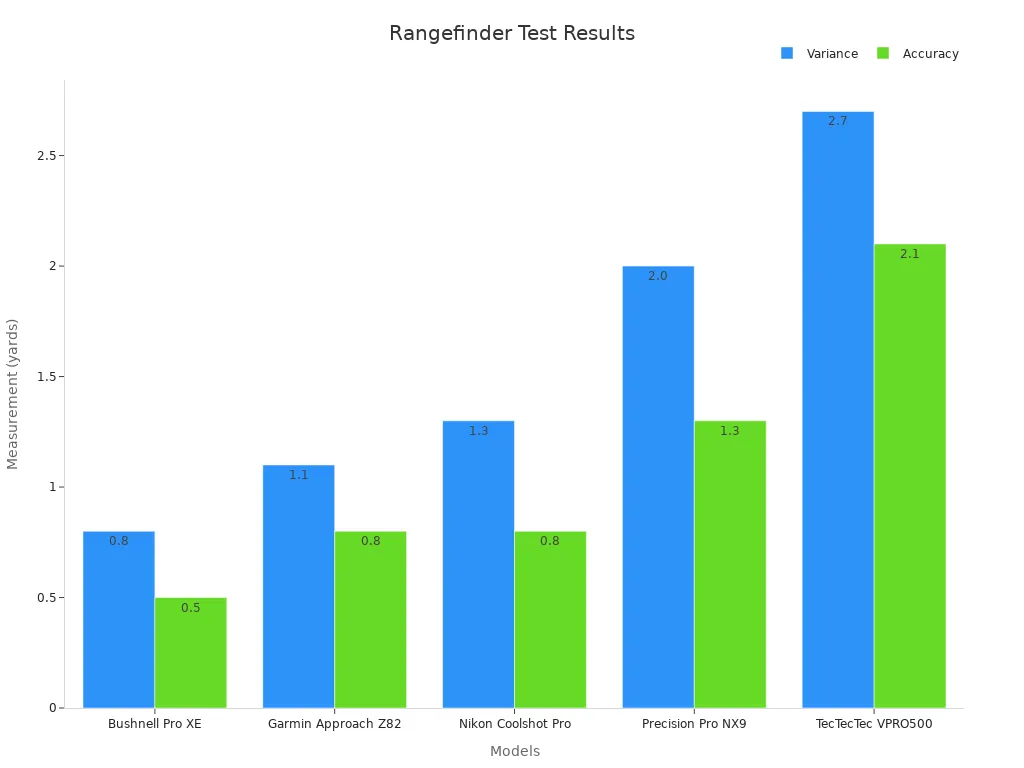
Manufacturers advertise ±1 yard accuracy, and high-end models deliver on solid, reflective targets under ideal conditions. But that number only tells part of the story. Understanding what influences real-world performance is key to trusting or questioning every reading.
Verified Performance Across Brands
Units like the Vortex Razor RF, Sig Fury HD Gen2, Leica Geovid, and Bushnell Elite 1 Mile+ consistently achieve ±1 yard accuracy on large, hard targets at 100 to 800 yards. In one test, a known 100-yard distance measured with a steel tape was confirmed by a quality rangefinder at 101 yards, demonstrating sub-yard precision.
However, older or budget models show wider variance. Some pre-Leica Bushnell units struggled past 150 yards, while military-grade units reliably ranged at 350+ yards. Today’s mid-tier ($300 to $500) consumer models now rival that performance.
Why Specs Don’t Tell the Whole Story
Two units with identical accuracy ratings can behave very differently in the field due to:
- Laser beam dispersion (width of the laser cone)
- Laser power output
- Target acquisition algorithms
A tighter beam allows you to isolate small targets behind brush. Higher laser power improves returns on low-reflectivity surfaces like fur or rock. These factors matter more than the ±1 yard spec when ranging a prairie dog at 600 yards through sagebrush.
Beam Dispersion: Hit the Target, Not the Brush
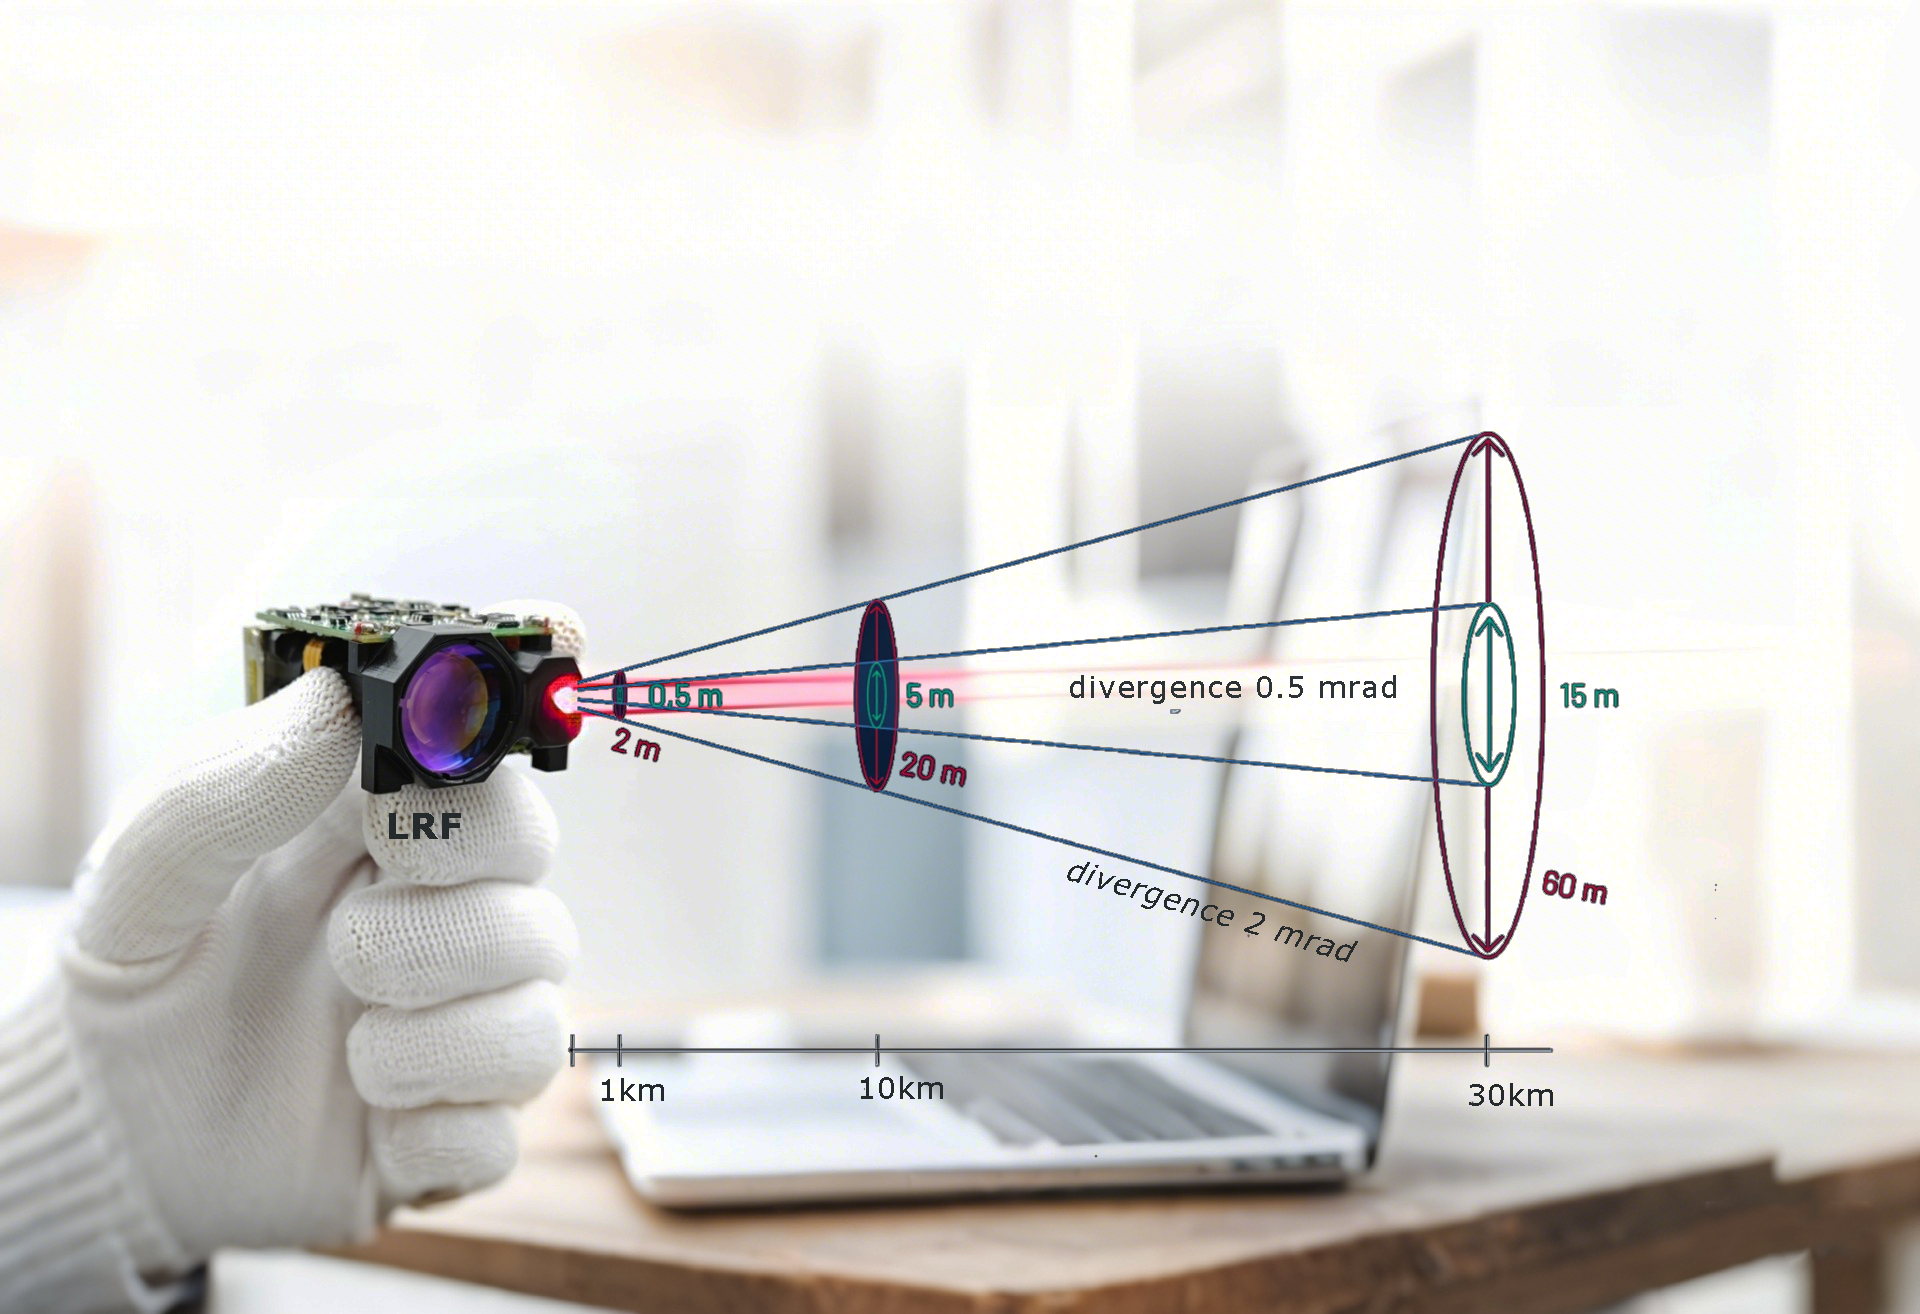
The width of your laser beam at distance determines how precisely you can isolate your target, especially when obstacles block the line of sight.
Narrow Beam vs. Wide Beam
At 500 yards, a high-end rangefinder might emit a beam only 1 to 2 feet wide. A lower-end model could spread to 3 to 4 feet. That difference determines whether you ping the animal or the branch above it.
Tight beam advantages:
– Shoot through small gaps in trees
– Range antlers without hitting the body
– Avoid foreground grass in open fields
Units like the Sig Sauer 2400 and Vortex Razor 14000 perform exceptionally well in wooded terrain due to tight beam control.
How to Use Beam Specs in Practice
When ranging through brush:
1. Identify the clearest gap in vegetation.
2. Hold steady and aim for the smallest visible part of the animal.
3. Use rapid fire mode (if available) to send multiple pulses and increase chance of clean return.
If your reading fluctuates wildly between 320, 580, and 220 yards, you’re likely bouncing off leaves, branches, and ground. Slow down. Find a better angle. Wait for the animal to move.
Laser Power: Penetrate Low-Contrast Targets
Even with perfect aim, low laser power can fail to return a signal from soft or dark targets. This is where higher-end models justify their price.
High Power for Tough Conditions
A prairie dog at 600 yards has minimal surface area and low reflectivity. A weak laser may not bounce back a usable signal, or worse, return a false one from the ground behind.
Higher-powered lasers (common in $500+ units) improve:
– First-pulse acquisition speed
– Reliability on small animals
– Performance in low light or haze
In side-by-side tests, premium units acquired targets faster and more consistently than mid-tier models under identical conditions.
Soft Target Ranging Tips
For animals like coyotes, prairie dogs, or dark-haired deer:
– Use the highest magnification setting to center the reticle.
– Wait for the animal to stand still. Motion reduces return quality.
– Pre-range key spots (burrows, ridgelines) so you have a baseline when the target appears.
User Error: The #1 Cause of Inaccuracy
Even the best rangefinder can’t fix poor technique. Misranging, which means measuring the wrong object, causes more misses than device malfunction.
Common Misranging Scenarios
- Foreground interference: Laser hits tall grass 10 yards in front of a deer.
- Background interference: Beam passes through a gap and reads a distant hillside.
- Target confusion: Ranging a rock next to, not behind, the animal.
These errors often go undetected because the device displays a valid number, just not the right one.
Stabilize for Consistent Reads
Hand shake introduces significant error, especially at long distances. A trembling hand can cause the beam to jump between target and background.
Stabilization methods:
– Rest elbows on a concrete bench, hood, or backpack
– Use a bipod or tripod for critical shots
– Practice breath control and trigger squeeze (yes, even with a rangefinder)
In testing, stabilized readings showed 98% consistency across 10 attempts. Handheld attempts varied by up to 40 yards on small targets.
Environmental and Target Challenges
Your surroundings and what you’re shooting at dramatically affect ranging success.
Flat Terrain, Few References
Sage flats and prairie dog towns offer few visual anchors. Without a rock, fence, or tree near the animal, it’s hard to judge if a 750-yard reading makes sense.
Solution: Pre-range likely ambush points. Mark distances to draws, gullies, and mounds. When an animal appears, compare its position to known zones.
Low-Contrast Targets
A dark mule deer against a shadowed hillside may not reflect enough laser energy. The device might default to a background return.
Pro tip: Aim for antlers, eyes, or the edge of the body where contrast is higher. These spots often return cleaner signals.
Verification: How to Trust Your Reading

Never rely on a single rangefinder reading, especially at long range. Use these field-proven methods to confirm accuracy.
Three-Point Verification Method
This technique confirms the target reading lies between foreground and background objects.
- Range the foreground: Point slightly below the animal (grasses, bushes, or ground immediately in front).
- Range the background: Aim just above or behind the animal (ridge, rock, or terrain feature).
- Range the target: Take 3 to 5 rapid readings on the animal itself.
Valid reading logic:
– If foreground = 680 yds
– Target = 705 yds
– Background = 730 yds
– The target reading is likely correct.
If the “target” reading matches the background, you’re not hitting the animal.
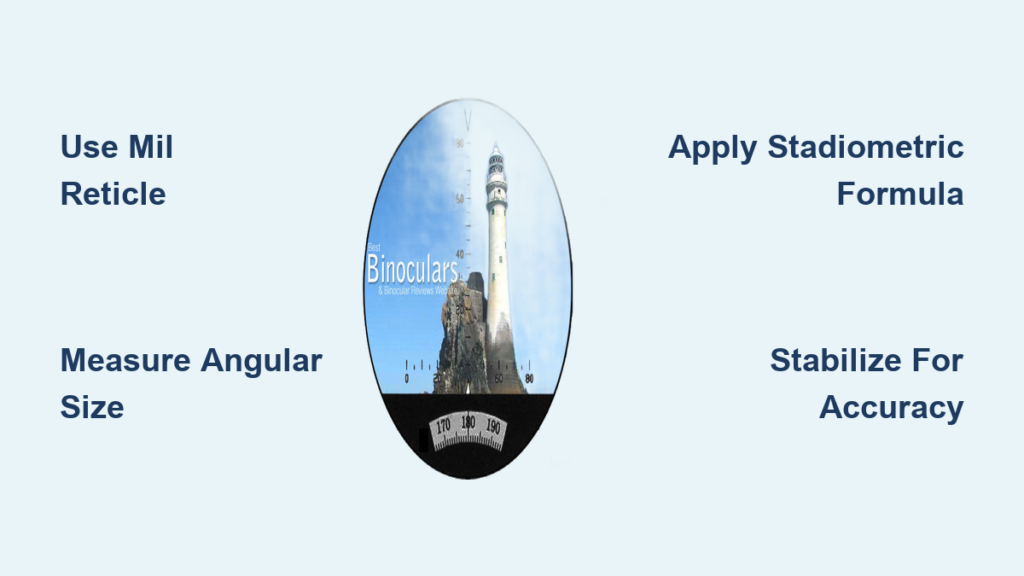
Cross-Check with Mil-Dot Reticle
Use your scope’s reticle to estimate target size and verify distance.
Example calculation:
– An average prairie dog is roughly 6 inches tall (about 0.5 mils at 1,000 yards).
– If your rangefinder says 800 yards but the dog spans 1.2 mils, the distance is likely shorter.
– Recalculate using: Distance (yds) = Target Size (in) / Mils × 27.77
– For 6″ at 1.2 mils: 6 / 1.2 × 27.77 ≈ 139 yards
This reveals a false long-range return, likely from a distant hillside.
Pre-Ranging: Set Up for Success
In static hunting situations, pre-range key locations before game arrives.
Build a Distance Map
- Identify likely animal paths, water sources, and bedding zones.
- Range each location and note distances.
- Use a notebook or voice memo to store data.
When a deer steps into a pre-ranged draw, you already know it’s 540 yards. No last-second guesswork required.
Competitive Edge
In long-range matches, top shooters pre-range all targets during walk-up. They don’t wait until the clock starts. This eliminates ranging errors under pressure.
Equipment Setup: Stability Is Non-Negotiable
Your best tool for accuracy isn’t the rangefinder. It’s a stable platform.
Use a Tripod for Critical Shots
Even experienced users benefit from a tripod:
– Eliminates hand shake
– Allows precise beam placement
– Enables side-by-side comparison with binoculars or scope
Compact hunting tripods (e.g., Vortex Spitfire, Joby GorillaPod) are lightweight and fast to deploy.
Resting Techniques
No tripod? Use what’s available:
– Elbows on ground: Lie prone and rest on forearms.
– Vehicle hood: Park legally and use the hood as a platform.
– Backpack stack: Build a stable rest with your pack and shooting pillow.
All reduce micro-movements that cause misreads.
Price vs. Performance: What’s Worth It?

Spending $1,000 doesn’t double accuracy. Know where to invest and where not to.
$300 to $500: Reliable for Most Hunters
Units in this range (e.g., Vortex 14000, Sig 1200) deliver ±1 yard accuracy on solid targets to 1,000 yards. They’re sufficient for 90% of hunting scenarios.
Best for:
– Open-country deer and elk
– Hunters who practice verification techniques
– Budget-conscious shooters
$800 to $1,500: Edge in Tough Conditions
High-end models (Leica Geovid, Sig 2400) offer:
– Tighter beam dispersion
– Higher laser power
– Faster processing for first-pulse reads
Worth it if:
– You hunt in dense brush
– You shoot small game at extreme range
– You compete in long-range events
The benefit isn’t better accuracy on easy targets. It’s reliability on hard ones.
Real-World Skill: Rangefinding Is Learnable
Veteran users agree that rangefinding is easier to master than wind reading. But it requires deliberate practice.
Practice Drills
- Target isolation: Range small objects (soda cans, fence posts) through simulated brush.
- Verification drills: Set up three stakes (front, target, back) and practice three-point checks.
- Speed tests: Range a target, move the device, and re-acquire in under 5 seconds.
Build Confidence
One experienced hunter noted: “I have no reason to suspect the range was wrong” when using a $400+ unit. That confidence comes from knowing the device works and knowing how to verify it.
Use Case Solutions: Match Tool to Terrain
Different environments demand different strategies.
Sage Flats and Prairie
Challenge: Small targets, few references, long sightlines.
Solution:
– Use high-power laser models
– Pre-range gullies and mounds
– Verify with foreground/background checks
– Cross-check with mil reticle
Wooded or Brushy Terrain
Challenge: Obstructions block line of sight.
Solution:
– Choose units with tight beam dispersion
– Squeeze the beam through gaps between branches
– Aim for high-contrast areas (antlers, eyes)
– Use tripod for stability
Nervous or Shaky Shooter
Challenge: Adrenaline causes tremors.
Solution:
– Rest elbows on solid ground
– Use tripod
– Take 3 to 5 rapid readings
– Focus on breathing to calm nerves
Long-Range Shots (>600 Yards)
Challenge: 25-yard error equals miss.
Solution:
– Mandatory three-point verification
– Pre-range likely spots
– Avoid single readings
– Confirm with mil estimation
Target Verification Doubt
Challenge: Suspicious reading.
Solution:
– Range a known object nearby
– Use mil-dot formula to check plausibility
– Wait for animal to move, then re-range from new angle
Frequently Asked Questions About Range Finder Accuracy
How accurate are modern rangefinders in real-world conditions?
Modern rangefinders over $300 made in the last eight years typically achieve ±1 yard accuracy on solid targets out to 1,200 yards. In controlled tests, some return readings within a fraction of a yard of true distance. Real-world performance depends heavily on target reflectivity, beam dispersion, and user technique.
What causes the most range finder accuracy errors?
User error, specifically misranging, causes more misses than device malfunction. This includes hitting foreground grass, background terrain, or objects next to the target instead of the target itself. Hand shake and unstable shooting positions also degrade accuracy significantly.
Does spending more money improve range finder accuracy?
Not necessarily. A $500 rangefinder delivers excellent accuracy on standard targets. Higher-priced models ($800+) offer tighter beam dispersion and more laser power, which helps on difficult low-contrast targets but doesn’t double accuracy on easy ones. The biggest gains come from user skill, not hardware.
How do I verify a rangefinder reading in the field?
Use the three-point verification method. Range the foreground object, then the background, then the target itself. If the target reading falls between the foreground and background distances, it’s likely correct. Taking 3 to 5 rapid readings and cross-checking with a mil-dot reticle adds further confidence.
Why does my rangefinder give different readings each time?
Fluctuating readings usually mean the laser is hitting different objects (leaves, branches, ground) rather than your intended target. Slow down, find a clearer angle, aim at the smallest visible part of the target, and use a stable rest to reduce hand shake.
Is a tripod really necessary for accurate ranging?
For long-range or difficult shots, yes. Stabilized readings showed 98% consistency across 10 attempts in testing, while handheld attempts varied by up to 40 yards on small targets. A tripod eliminates hand shake and allows precise beam placement on tiny targets.
Key Takeaways for Improving Range Finder Accuracy
Range finder accuracy depends on a system of equipment capability and user discipline. A $300 unit in skilled hands outperforms a $1,500 model in untrained ones. Master beam control, stabilize your platform, and verify every critical shot with the three-point method.
Start by practicing verification drills on known distances. Range a fence post at 100 yards, then at 300, then at 500. Note how your readings behave on different target sizes and backgrounds. With these techniques, your rangefinder becomes the most reliable tool in your pack.