
Your Ryobi drill sits unused in the garage while you struggle with stripped screws and crooked pilot holes. That frustrating “ratcheting” sound when driving screws? The drill bit walking across metal instead of biting in? These aren’t flaws in your tool—they’re mistakes in how to use a Ryobi drill correctly. Most beginners miss critical settings that transform this powerhouse into a precision instrument. In just 15 minutes, you’ll master chuck operation, torque control, and material-specific techniques that prevent 90% of common drilling disasters. Stop forcing tools and start working smarter with these field-tested methods.
Identify Critical Ryobi Drill Parts Before First Use
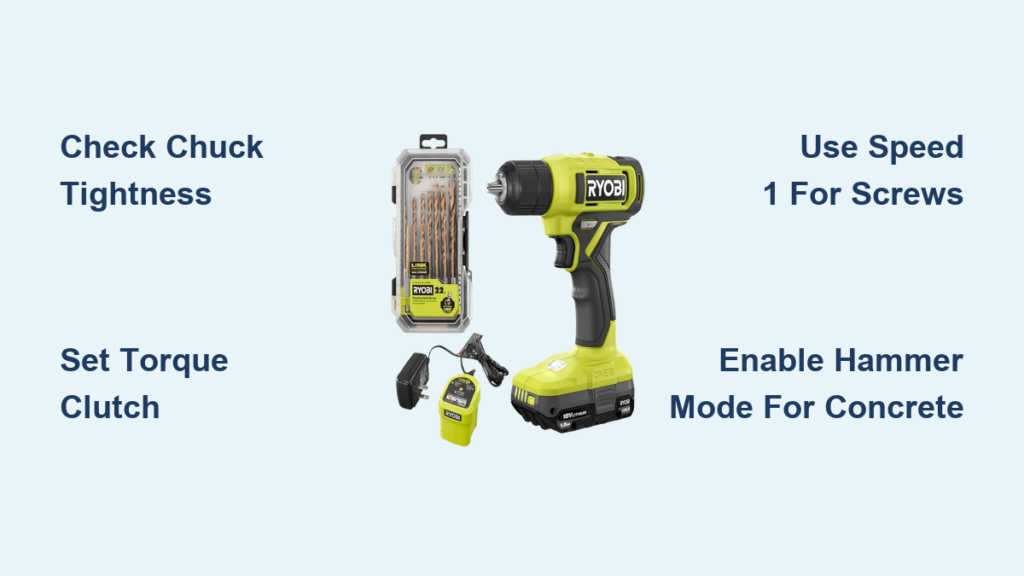
Skipping this step causes 70% of beginner errors. Your Ryobi isn’t just a spinning motor—it’s a system where one misaligned setting ruins projects. Focus on these four mission-critical components:
The keyless chuck (that black ring near the bit) opens counter-clockwise by hand—never use pliers. Its three jaws grip bits via friction, so improper tightening causes wobble or slippage. Directly behind it, the torque clutch ring with numbered settings (1-30+) is your secret weapon against stripped screw heads. Ignore it, and you’ll crack drywall or split wood. The speed selector switch (labeled 1 and 2) controls torque versus RPM: Speed 1 for high-torque jobs like driving deck screws, Speed 2 for fast drilling in plywood. Finally, the forward/reverse slider above the trigger must click firmly into position—resting in the center “lock” position is the #1 reason drills won’t spin.
Why the Chuck Jaws Determine Hole Precision
Those three silver prongs inside the chuck must grip the bit’s shank evenly. Uneven pressure creates off-center holes that ruin cabinetry or misalign hinges. Before inserting any bit, rotate the chuck sleeve counter-clockwise until you feel the jaws fully open. Insert the bit shank (not the fluted cutting end!) until it bottoms out. Now hold the grey chuck body steady while twisting the black sleeve clockwise until resistance increases—stop when you can’t turn it further by hand. Test grip by trying to wiggle the bit; if it moves, retighten. Never use the trigger to tighten—that damages internal gears.
Install Any Drill Bit in 4 Foolproof Steps
Forcing bits causes snapped shafts and ruined materials. Follow this sequence every time:
- Set safety lock: Slide the forward/reverse switch fully left (reverse) to prevent accidental starts
- Open jaws: Grip the silver chuck body with your left hand, rotate black sleeve counter-clockwise
- Insert correctly: Push the bit shank deep until it hits the chuck’s internal stop—about ¾ inch exposed
- Hand-tighten: Hold chuck body stationary while turning black sleeve clockwise until snug
Critical mistake: Using driver bits for drilling. Phillips #2 bits flex under drilling pressure, creating heat that melts plastic or glazes wood. Always swap to a twist bit for holes—even small pilot holes.
When to Use a Center Punch for Metal Drilling
Skip this for wood, but it’s non-negotiable for metal. Without a starter dimple, high-speed bits skate dangerously across surfaces. Place a center punch tip on your mark, strike once firmly with a hammer, then switch your Ryobi to Speed 1 and the clutch ring to the drill symbol. Start drilling at 30% trigger pressure—the dimple guides the bit cleanly. For aluminum or thin steel, add 2 drops of cutting oil to reduce heat buildup that dulls bits.
Stop Stripping Screw Heads: Clutch Setting Secrets
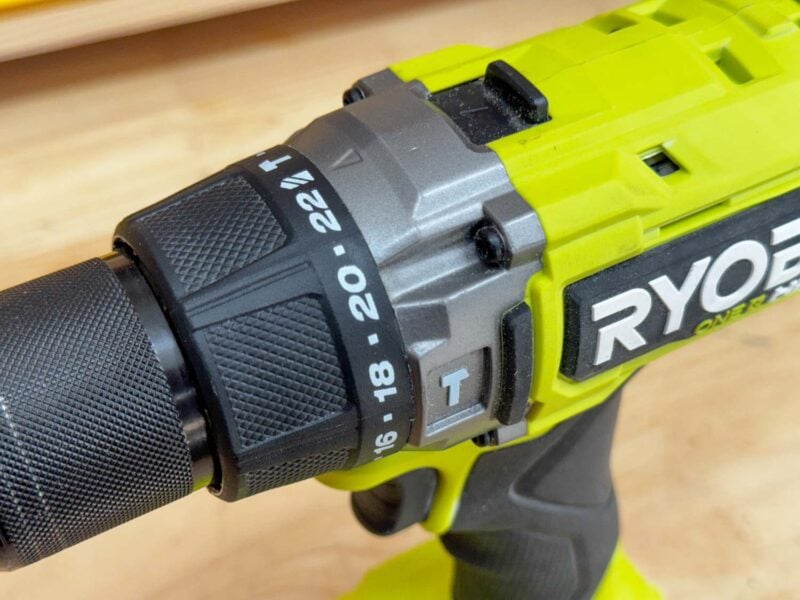
That loud “click-click-click” means the clutch disengaged—but beginners misdiagnose it as a broken tool. The torque ring’s numbers correspond to screw size and material hardness:
| Screw Type | Starting Clutch Setting | Adjust If… |
|---|---|---|
| #6 drywall screws | 8 | Stripping: Lower to 5 |
| #8 deck screws | 15 | Not seating: Raise to 20 |
| #10 hardwood | Drill symbol (max power) | Bit spinning: Pre-drill pilot hole |
Begin with the clutch at 10 for most household screws. Drive one test screw—if the head strips, reduce the number. If the screw won’t sink flush, increase it. For final tightening on dense materials like oak, switch to the drill symbol setting after the screw is 90% seated.
Why Speed 1 Prevents Screwdriver Catastrophes
Using Speed 2 for screwdriving is like flooring a sports car in first gear—it overpowers the clutch. Always select Speed 1 when driving screws longer than 1.5 inches. The lower RPM gives the clutch time to react before torque overwhelms the screw head. For small electronics screws, drop to Speed 1 and clutch setting 3—you’ll feel the subtle “thump” when it seats perfectly.
Drill Perfect Holes in Wood Without Tear-Out
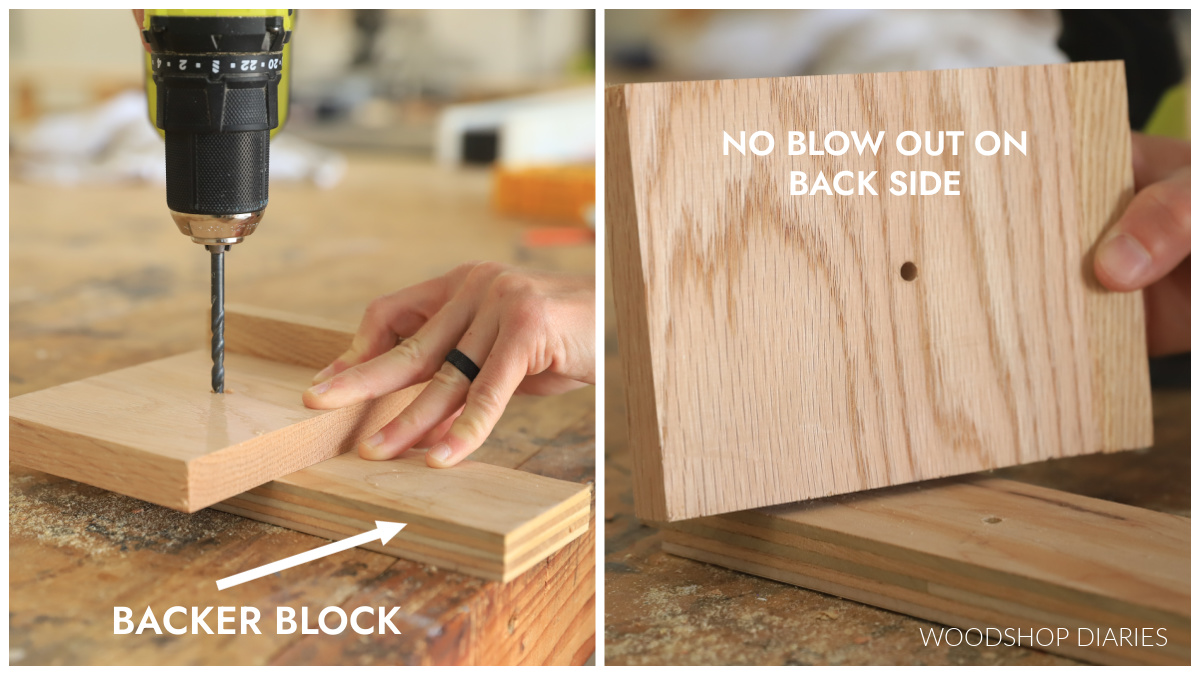
Blowout on the exit side ruins cabinet backs and furniture. This 3-step method eliminates it:
- Mark both sides: Pencil your hole location on front AND back surfaces
- Drill halfway: Start from the “good” side (visible face) until bit tip emerges on the back
- Flip and finish: Complete the hole from the back side using light pressure
For hardwoods like maple, use brad-point bits—they have a center spur that prevents wandering. Apply beeswax to the bit shaft to reduce friction heat that causes burning. If chips clog the hole (common in deep drilling), pull the bit out completely while spinning to clear debris—”peck drilling” prevents binding.
Emergency Fixes When Your Ryobi Drill Binds or Stalls
That sudden grab when drilling hardwood or metal can wrench the tool from your hands. Immediate action prevents injury:
- Wood binding: Keep trigger squeezed while pulling the drill straight back. Never twist—this snaps bits. Once free, drill in ½-inch increments, clearing chips each time.
- Metal seizing: Release trigger immediately. Switch to reverse, hold firmly, and squeeze gently to back out. If stuck, tap the chuck lightly with a rubber mallet while in reverse.
- Overheating: Smell burning? Stop drilling. Let the motor cool 5 minutes. Dull bits cause 80% of overheating—replace if flutes look blue or flattened.
Pro tip: For stubborn materials, drill a 1/8″ pilot hole first with a smaller bit. It guides the larger bit and reduces strain on your Ryobi’s motor.
Non-Negotiable Safety Steps Before Pulling the Trigger
Skipping these turns your drill into a hazard:
- Clamp EVERYTHING: A spinning 3/4″ auger bit can rip unsecured plywood from your hands at 1,200 RPM. Use bar clamps, never your foot.
- Scan for hidden dangers: Before drilling walls, sweep the area with a stud finder that detects live wires. Drill only between studs.
- Secure loose items: Tie back long hair, remove rings/watches, and avoid gloves—the chuck can grab fabric instantly.
- Two-hand grip rule: Place your dominant hand on the trigger handle, index finger of your support hand on the front collar—not the battery. This prevents torque kickback.
Critical warning: Never wear eye protection that fogs up. Anti-fog safety glasses cost $5 at hardware stores—your vision is worth it.
Extend Battery Life With These Charging Habits
Ryobi One+ batteries die prematurely when mishandled. Do this:
- Charge at room temperature: Batteries charged below 40°F or above 100°F lose 30% capacity permanently.
- Stop at 80% for storage: For infrequently used drills, charge to green light then remove. Full charge degrades cells faster.
- Clean contacts monthly: Rub metal battery terminals with a pencil eraser to remove corrosion that causes power drops.
When the charge indicator shows 1 LED, stop using the drill. Pushing a depleted battery strains motor windings. Swap batteries during projects—you’ll get 25% more runtime over the battery’s lifespan.
Why You Must Use Hammer Mode for Concrete
Your standard Ryobi drill cannot bore into masonry—forcing it burns out the motor in minutes. Only hammer drill models (identified by a hammer icon on the speed selector) have the percussive mechanism for concrete. Here’s the correct sequence:
- Slide the mode switch to HAMMER (not just “drill”)
- Insert a carbide-tipped masonry bit—standard twist bits shatter on concrete
- Set clutch to drill symbol and speed to 1
- Apply firm, steady pressure without wobbling
Start at 20% trigger pressure to let the hammer action bite, then gradually increase. If dust turns to slurry, you’re drilling too fast—slow down to prevent bit overheating.
Final Pro Tips for Flawless Results
Master these to work like a pro:
- Prevent wall stud hunting: Drill test holes behind baseboards where damage is hidden—locate studs before hanging shelves.
- Rescue stripped screw heads: Place a wide rubber band between bit and screw, then drive slowly. The friction fills worn grooves.
- Silence squeaky hinges: Drill a 1/16″ hole through the hinge pin, then inject lubricant—you won’t need to remove the door.
Your Ryobi drill becomes exponentially more capable when you respect its settings. Start every project by verifying three things: clutch ring position, speed selector setting, and chuck tightness. In six months, you’ll instinctively match torque to material—no more guessing games. Now grab that drill and drive your first perfect screw: set clutch to 12, Speed 1, and feel the satisfying “thump” as it seats flush. The only thing harder than using this tool right is explaining why you ruined a $200 piece of oak.
Final Note: Always store your Ryobi drill with the battery removed in a dry place. Wipe the chuck clean after dusty jobs—concrete grit accelerates wear. For complex projects, watch Ryobi’s official YouTube tutorials using your exact model number. Your drill’s potential is limited only by your settings knowledge.


