
Your drill bit skates across the smooth surface of your HardiePlank siding, leaving a jagged crack instead of a clean hole. You’re not alone—fiber cement board’s brittle composition turns simple drilling into a high-stakes game where one wrong move means wasted materials and dangerous silica dust. This concrete-like material demands specific techniques because standard wood or metal drilling methods will shatter it. In this guide, you’ll learn exactly how to drill flawless holes in fiber cement board for siding, backer boards, and fixtures while avoiding cracks, blowout, and health hazards. We’ll cover pro-tested bit selection, step-by-step drilling sequences, and critical dust control methods that make the difference between a professional finish and costly rework.
Essential Safety Gear for Drilling Fiber Cement Board Without Silica Dust Exposure
Fiber cement dust contains crystalline silica—a known carcinogen that causes irreversible lung damage. Skipping proper protection isn’t just risky; it’s dangerous. Before touching your drill, gear up with a NIOSH-rated N95 or P100 respirator (standard dust masks won’t cut it), safety goggles that seal around your eyes, and hearing protection. Work outdoors whenever possible, but if you’re indoors, position a HEPA-filtered shop vacuum nozzle directly at the drilling point. Mist the board lightly with water using a spray bottle before starting—this suppresses 90% of airborne dust without damaging the material. Never sweep or blow dust away; vacuum immediately after drilling to prevent lingering exposure.
Choose the Right Drill Bit: Carbide vs. Diamond for Fiber Cement Holes
Your drill bit determines success or disaster. Standard twist bits shatter fiber cement instantly, while carbide-tipped or diamond-coated bits slice cleanly through its abrasive matrix. Match your bit to hole size:
- For 1/4″ to 1″ holes: Use a carbide-tipped masonry bit (not for concrete) in a standard rotary drill—never engage hammer mode. The carbide tip withstands abrasion where steel bits dull in seconds.
- For 1″-3″ holes: Opt for a carbide-grit hole saw. Bi-metal or toothed hole saws fail catastrophically; the grit grinds rather than chips the material.
- For holes over 3″: Switch to a diamond-tipped hole saw or diamond blade on an angle grinder. Diamond stays sharper longer for large openings like vent ducts.
Pro tip: Test bits on scrap fiber cement first. If the bit smokes or creates coarse chunks instead of fine powder, it’s the wrong type. Replace dull bits immediately—forcing them causes cracks.
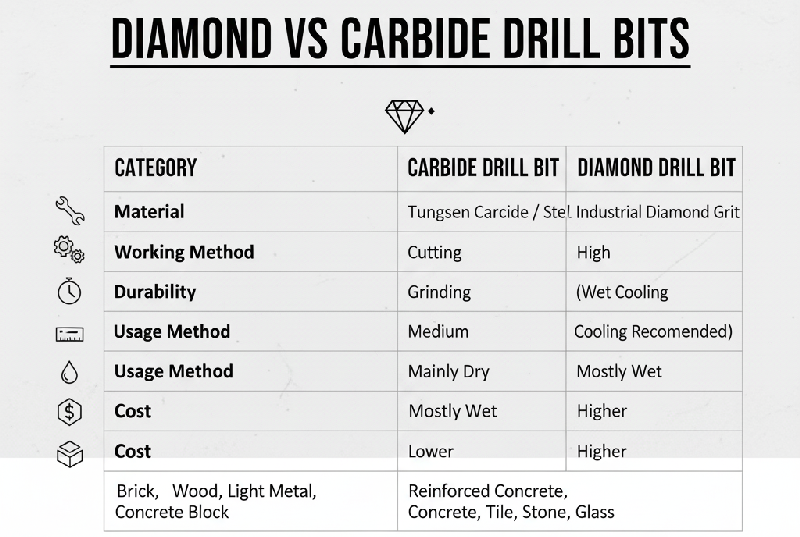
Why Carbide Outperforms Standard Masonry Bits on Fiber Cement
Fiber cement’s silica content is 2-3x more abrasive than standard concrete. Carbide-tipped bits feature tungsten carbide edges that resist wear, while standard masonry bits overheat and glaze over. Diamond grit bits excel for multiple large holes but cost 3x more—reserve them for professional projects. Always choose bits rated specifically for “fiber cement” or “cement board,” not generic masonry.
Drill a Perfect Hole in Fiber Cement: Step-by-Step Without Cracks
Follow this sequence to eliminate blowout and wandering bits. Total time: 3-5 minutes per hole.
Mark Your Spot with a Center Punch Dent
Skip pencil marks alone—they vanish under drill pressure. Instead, make a precise “X” with a carpenter’s pencil, then tap a center punch or nail into the intersection to create a 1/16″ deep dent. This anchor point stops bits from skating across the slick surface. For tile backer boards, use a fine-tip marker since pencil won’t show on smooth cement.
Secure the Board with Backer Support
Clamp the board to a stable work surface, but critical for installed siding: Place a scrap wood block tightly against the backside where you’ll drill. This support prevents “blowout”—ugly cratering when the bit exits. If working solo, wedge the wood block in place with a C-clamp. Never drill unsupported edges; fiber cement cracks easily within 2” of board ends.
Drill a 1/8″ Pilot Hole First
This pro step guarantees accuracy for holes over 1/4″. Use a carbide-tipped 1/8″ bit at low speed to drill completely through the board. The pilot hole guides larger bits perfectly, eliminating walking. For wall installations, drill from the inside out through sheathing first—this creates a clean exit point on the exterior siding.
Drill the Main Hole at Low Speed with Steady Pressure
Set your drill to 300-500 RPM—high speed generates heat that fractures cement. Insert your final-size bit into the pilot hole and apply firm, consistent downward pressure. For hole saws, pause every 10 seconds to clear dust buildup. You’ll know it’s working when fine gray powder (not chunks) emerges. If resistance increases, back out slightly to clear the flutes.
Drilling Fiber Cement Siding on Walls: Avoiding Hidden Wires and Pipes

Installed boards add hidden dangers. Skip this step, and you risk electrocution or flooding.
Locate Studs and Wires with Dual Detection Tools
Use a stud finder with both magnetic and AC wire detection (like Bosch GMS120). Scan horizontally and vertically around your target area. Mark all wires in red and studs in blue with painter’s tape. Critical: Verify with a non-contact voltage tester held against the board—stud finders miss live wires behind metal boxes.
Set a Depth Stop to Prevent Wall Damage
Measure your fiber cement board’s thickness (typically 1/4″-1/2″). Wrap masking tape around your drill bit at that depth plus 1/8″ for clearance. This stops drilling once you penetrate the board, avoiding pipes or wires behind it. For HardiePlank lap siding, drill only through the board—not into sheathing—to maintain weatherproofing.
Fix Common Drilling Mistakes: Stop Cracks and Blowout in Fiber Cement

These errors ruin projects daily—but they’re 100% preventable.
Why Your Hole Cracked (and How to Prevent It)
Cracks almost always come from drilling too fast. Fiber cement heats up rapidly at high RPMs, causing micro-fractures that spread. Solution: Drill at 400 RPM max and mist the hole with water every 15 seconds. If cracks appear, stop immediately—patch with exterior-grade caulk and restart 2″ away.
Eliminate Backside Blowout for Clean Exits
Blowout occurs when unsupported material shatters as the bit exits. Solution: Always use a backer board (as described earlier). For existing walls, drill the pilot hole from inside first, then finish the hole from outside—the pilot hole supports the exit side.
Critical Drilling Errors to Avoid with Fiber Cement Board
These mistakes endanger your health and project:
- Using hammer drill mode: The percussive action shatters cement instantly. Use rotary mode only.
- Skipping the respirator: Silica dust causes silicosis—irreversible lung scarring. No exceptions.
- Forcing a dull bit: Dull bits overheat and require excessive pressure, cracking the board. Replace bits after 10-15 holes.
- Drilling near edges: Maintain 2″ clearance from board edges to prevent splitting.
Pro Tips for Flawless Fiber Cement Drilling Results
Implement these field-tested techniques for professional outcomes:
Drill Large Vent Holes Without Exterior Cracks
For exhaust vents, drill a 1/8″ pilot hole from inside the wall through sheathing into the siding’s backside. Outside, use this pinpoint to center a hole saw. Cut the final hole from the exterior—this ensures the finished siding face remains pristine. Always install a PVC trim block behind vents for a flat mounting surface; nailing directly into lap siding causes leaks.
Control Dust with the 2-Hand Vacuum Method
Hold your drill in one hand and a HEPA vacuum hose in the other. Position the nozzle 1/2″ from the bit—the suction captures 95% of dust before it becomes airborne. For overhead drilling, tape the hose to a helper’s broom handle. No helper? Use a drill-mounted dust shroud ($15 at hardware stores).
Cool Bits During Extended Drilling
After 3-4 holes, dip carbide bits in water for 10 seconds. Heat buildup dulls edges rapidly. Diamond bits don’t need cooling but require slower speeds (200 RPM for 2″+ holes).
Finishing and Sealing Your Fiber Cement Drill Holes
Don’t skip this step—unsealed holes invite moisture damage. Lightly sand rough edges with 120-grit sandpaper wrapped around a block. For exterior applications or wet areas like showers, apply a bead of 100% silicone caulk around pipe penetrations. In siding, extend caulk 1/4″ beyond the hole onto the board face to shed water. Wait 24 hours before mounting fixtures to ensure full cure.
Drilling fiber cement board successfully hinges on three non-negotiables: carbide or diamond bits, painfully slow speeds, and relentless dust control. By starting with a pilot hole, supporting the backside, and respecting the material’s brittleness, you’ll achieve clean, crack-free holes every time. Remember—silica dust is invisible but deadly. If you take away one thing, let it be this: never drill without a P100 respirator and HEPA vacuum. Master these techniques, and you’ll tackle HardiePlank, HardieBacker, or any fiber cement project with confidence. For cutting large openings, switch to a multi-tool with carbide blades—but save that guide for your next project.


