
Imagine spotting a distant eagle circling high above a mountain ridge—its wings sharply outlined against the sky. Or reading a street sign from across the block without squinting. You can do all this with a device no bigger than a flashlight: a monocular. This compact, single-eye telescope brings faraway objects into clear view by using advanced optics in a pocket-sized package. But how does a monocular work? At its core, it uses a precise arrangement of lenses and prisms to gather light, correct image orientation, and magnify the scene—all within a folded optical path that keeps it small and portable.
Unlike binoculars, which use two barrels for depth perception, a monocular delivers a bright, upright image through one eye. This makes it ideal for hikers, travelers, low-vision users, and anyone who needs quick, powerful magnification without the bulk. Understanding how a monocular works isn’t just about curiosity—it helps you choose the right model and use it effectively. In this guide, you’ll discover the science behind monocular optics, how key features affect performance, and what separates a high-performing monocular from a cheap imitation.
Light Capture and Image Formation
Objective Lens Gathers Distant Light
The journey of an image begins at the objective lens, the large front lens of the monocular. This lens acts like a light bucket, collecting ambient light reflected from distant objects—whether it’s a bird in flight, a stage performer, or a trail marker on a hillside. The size of this lens, measured in millimeters (e.g., 30mm, 42mm), directly impacts how much light is gathered. Larger lenses capture more light, resulting in brighter, clearer images—especially crucial in low-light conditions like dawn, dusk, or under forest canopies.
As light passes through the objective lens, it converges to form a real image—but it’s upside down and reversed. Without correction, this would make the view unusable. That’s where the next component steps in.
Prisms Flip the Image Correctly
To make the image viewable, the monocular uses a prism system to flip it right-side up and front-to-back. This is known as erecting the image. Without prisms, you’d need a long, straight telescope tube—impractical for a pocket device. Instead, prisms fold the optical path, bending the light internally so the device stays short and compact.
This folding allows a powerful 8× magnification in a body just a few inches long. It also improves balance and handling, making the monocular easy to hold steady. The result? A clear, correctly oriented image in a device you can slip into your coat pocket.
Eyepiece Lens Delivers Magnified View
After the prism corrects the image, it travels to the eyepiece lens, the small lens closest to your eye. Think of this as a magnifying glass for the already-corrected image. The eyepiece enlarges the view, bringing distant details into focus. The magnification number—like 8×—tells you how many times closer the object appears.
For example, with an 8× monocular, a deer 80 meters away looks as if it’s only 10 meters away. This combination of light gathering, image correction, and magnification allows you to see clearly across vast distances—all through a device no bigger than a penlight.
Prism Types: Roof vs. Porro

Roof Prisms Enable Compact Design
Most modern monoculars use roof prisms, especially the Schmidt-Pechan design. These align the objective and eyepiece lenses in a straight line, resulting in a sleek, streamlined body. This makes roof prism monoculars more durable and easier to handle—ideal for outdoor use.
However, roof prisms introduce a challenge: phase shift. As light waves pass through the prism, they can become slightly misaligned at the microscopic level, reducing image contrast and sharpness. To fix this, manufacturers apply phase coatings—microscopic layers that realign the waves and preserve clarity.
Phase Coatings Boost Clarity
Only roof prism models need phase coatings. These invisible but essential layers ensure high resolution and vibrant images, especially in low light. Without them, even an expensive monocular can produce flat, lifeless views. Premium models combine phase-corrected roof prisms with fully multi-coated lenses to achieve up to 95% light transmission—delivering bright, sharp, true-color images.
Porro Prisms Offer Simpler Optics
Porro prisms use a Z-shaped light path, offsetting the lenses so the front is wider than the eyepiece. This design avoids phase shift, so no phase coatings are needed. Porro prism monoculars are optically simple and often cheaper.
But they’re also bulkier and more fragile due to protruding parts. While once common, Porro designs are now rare in modern compact models. You’ll mostly find them in budget or vintage optics.
Pro Tip: Choose a phase-coated roof prism monocular for the best blend of portability and image quality.
Key Specs: Magnification and Lens Size
Magnification: 8× Is the Sweet Spot
Monoculars are labeled like 8×30, where:
– 8× = magnification (how much closer objects appear)
– 30 = objective lens diameter in mm (how much light it gathers)
While 10× or 12× may sound impressive, they come with trade-offs:
– Narrower field of view
– Dimmer images
– More hand shake
At 12×, even small movements make the image jump—making it hard to hold steady. That’s why 8× is the most practical magnification. It offers a balanced view: close enough for detail, wide enough to track moving subjects, and stable enough for handheld use. Low-vision users often prefer 4× to 6× for easier targeting and wider viewing.
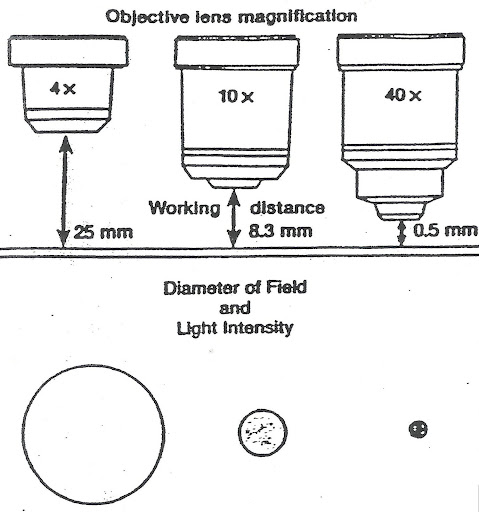
Objective Lens Size Affects Brightness
The second number (e.g., 42, 50) is the objective lens diameter. Larger lenses gather more light, producing brighter images in dim conditions—perfect for dawn, dusk, or indoor use.
For example:
– 8×20: Ultra-portable but dim in low light
– 8×42: Excellent brightness and detail, slightly heavier
– 7×50: Legendary for marine use—huge light-gathering power
But bigger lenses mean more weight and bulk. A 7×50 model may weigh 350g, while a 5×12 pocket model weighs under 100g. Choose based on your needs: portability vs. performance.
Rule of Thumb: For general use, 8×42 offers the best balance. For hiking or daily carry, 8×25 is ideal.
Optical Performance Factors
Exit Pupil: Match to Your Eye
The exit pupil is the bright circle you see when holding the monocular at arm’s length. It’s calculated by dividing the objective diameter by magnification. For example:
– 8×40 → 40 ÷ 8 = 5mm exit pupil
– 7×50 → 50 ÷ 7 ≈ 7.1mm
This number should match your eye’s pupil size for maximum brightness. But pupil size decreases with age:
– Age 20: ~8.0mm at night
– Age 60: ~4.1mm
– Age 80: ~2.5mm
So a 7×50 monocular’s 7.1mm exit pupil is wasted on older users. A 4× to 6× model with a 4–5mm exit pupil is often better.
Field of View: Wider Is Better for Scanning
Field of view (FOV) is how much you can see at a distance—usually in meters at 1000m. Lower magnification means wider FOV, helping you locate and track moving objects like birds or athletes. Contrary to myth, monoculars and binoculars of the same spec have identical FOV.
For scanning, choose a 5× or 6× model with a FOV over 120m @ 1000m.
Eye Relief: Critical for Glasses Wearers
Eye relief is the distance from the eyepiece to your eye where you see the full image. If too short, glasses wearers get a “tunnel” effect.
- <10mm: Too short for glasses
- 15–20mm: Comfortable
- ≥20mm: Ideal
High-end models like the Opticron 5×30 offer 25mm eye relief, perfect for low-vision or eyeglass users.
Close Focus: See Nearby Details
Close focus is the minimum distance a monocular can focus—ranging from 1 meter to 30cm. This lets you examine:
– Insects and flowers
– Artwork
– Menus or labels
Some “gallery scopes” are optimized for this, ideal for visually impaired users.
Focusing Systems: What Works Best
Body Focus Ring: Most Common
The body-mounted focus ring rotates the main barrel to adjust focus. Found on most quality models, it offers smooth, precise control.
Pros: Durable, compact
Cons: Requires two hands
Top Focus Wheel: Fast One-Handed Use
A top-mounted wheel (e.g., Bushnell 10×42HD) allows quick, one-handed focusing.
Pros: Fast, glove-friendly
Cons: Adds bulk
Eyepiece Focus: Fine Adjustment
A small ring near the eyepiece allows fine-tuning, often used with body focus.
Pros: Precise
Cons: Hard with gloves
Expert Note: High-quality monoculars favor smooth ring systems for reliability.
Lens Coatings: Why They Matter

Uncoated glass loses up to 5% of light per surface. With multiple lenses, this adds up. Coatings reduce reflections, boosting brightness and contrast.
| Coating Level | Light Transmission |
|---|---|
| Coated | ~80% |
| Fully Coated | ~85% |
| Multi-Coated | ~90% |
| Fully Multi-Coated (FMC) | 90–95% |
FMC is the gold standard, especially with phase coatings. Avoid budget models that claim “multi-coated” but lack full coverage.
Fixed vs. Zoom: Avoid Variable Magnification
Zoom Monoculars Sacrifice Quality
Budget “3× to 9×” zoom models often have:
– Blurry images
– Narrow FOV
– Poor light transmission
The specs are often exaggerated—e.g., “39×95” may refer to size, not power.
Fixed Magnification Wins
Fixed-power monoculars (e.g., 8×42) offer superior clarity and durability. True zoom exists in spotting scopes, not handheld monoculars.
Recommendation: Stick with fixed magnification.
Who Should Use a Monocular?
Outdoor Enthusiasts
For hikers and birders, a compact 8×25 or 8×42 offers:
– Lightweight portability
– Waterproof and fog-proof durability
– Bright, detailed views
Look for rubber armor, tripod compatibility, and nitrogen-purged housing.
Low-Vision Users
Monoculars help those with:
– Macular degeneration
– Strabismus
– Amblyopia
They aid in reading signs, menus, and whiteboards.
Recommended specs:
– 3× to 6×
– Long eye relief (≥20mm)
– Wide FOV
Safety Rule: Never use while walking. Follow stop, look, move.
Specialized Applications
- Marine: 7×50 for stability and low light
- Museums: “Gallery scopes” with close focus
- Surveillance: Compact, high-clarity models
- Image-Stabilized: Rare (e.g., Bresser 16×30)
Monocular vs. Binoculars vs. Telescopes
| Feature | Monocular | Binoculars | Telescope |
|---|---|---|---|
| Eye Use | One | Two | One |
| Depth Perception | No | Yes | No |
| Portability | ★★★★★ | ★★★☆☆ | ★☆☆☆☆ |
| Weight | Lightest | Moderate | Heavy |
| Best For | Quick viewing, mobility | Extended use, scanning | Astronomy, high detail |
Fact: A high-end monocular often matches half the optical quality of premium binoculars—but with unmatched portability.
Final Note: A monocular works by combining light-gathering optics, prism-based image correction, and magnification in a compact, one-eye design. Understanding how each component—from the objective lens to lens coatings—impacts performance helps you choose wisely and use it effectively. Whether you’re exploring nature, navigating with low vision, or traveling light, the right monocular brings the world into focus—literally and figuratively.


