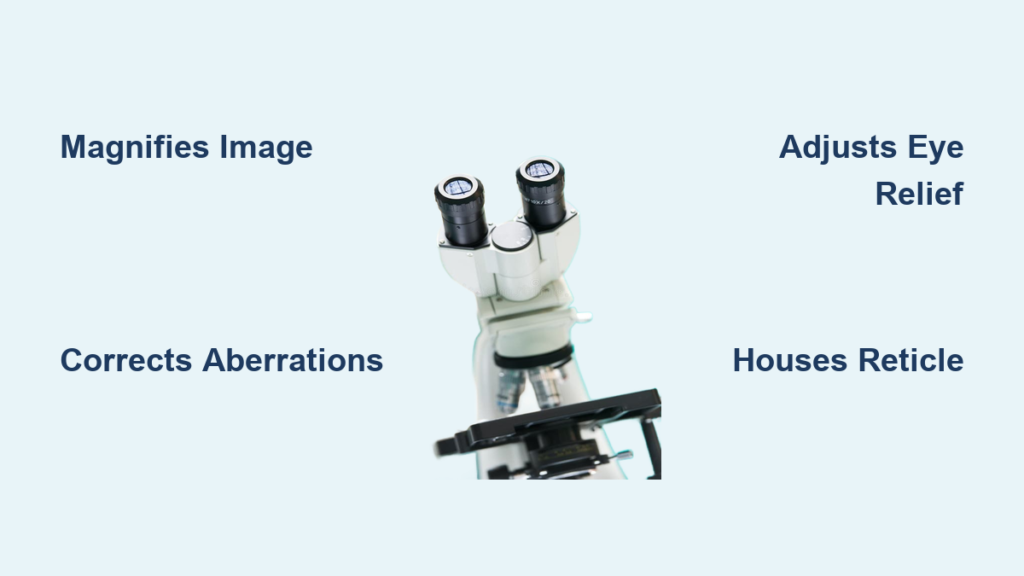
When you look through a microscope, the lens you peer into—the eyepiece—is far more than just a simple magnifier. It’s the final optical component in the imaging chain, responsible for making microscopic details visible and interpretable to the human eye. A precise eyepiece microscope definition refers to the ocular lens system mounted at the top of the microscope that magnifies the intermediate image formed by the objective lens. This two-stage process—objective lens first, then eyepiece—delivers the total magnification essential for applications ranging from classroom biology to advanced medical research.
But the eyepiece does more than enlarge. It corrects optical distortions, defines the field of view, enables measurements, and ensures comfortable viewing. Whether it’s a basic Huygenian design in a school lab or a high-precision Periplan model in a research facility, the eyepiece plays a crucial role in image clarity, usability, and analytical accuracy. Understanding its design, specifications, and compatibility is key to getting the most out of any microscope. This guide dives deep into what an eyepiece is, how it works, the different types available, and how to choose and maintain one for optimal performance.
Core Function of the Eyepiece
Magnifies Intermediate Image
The primary job of the eyepiece is to take the real, inverted image created by the objective lens and further magnify it into a virtual image your eye can clearly see. This intermediate image is already enlarged but too small for the human eye to resolve fine details. The eyepiece acts as a powerful magnifier, typically offering 10X magnification as standard. The total magnification of the microscope is calculated using a simple formula:
Total Magnification = Objective Magnification × Eyepiece Magnification
For example:
– A 10X eyepiece paired with a 40X objective produces 400X total magnification
– A 15X eyepiece with a 100X oil immersion objective yields 1,500X
This multiplication principle applies universally across compound microscopes. However, increasing magnification doesn’t always mean better viewing—beyond a certain point, you hit empty magnification, where the image grows larger but no new detail appears. That’s why matching the eyepiece to the objective’s resolving power is critical.
Enables Visual Clarity and Focus
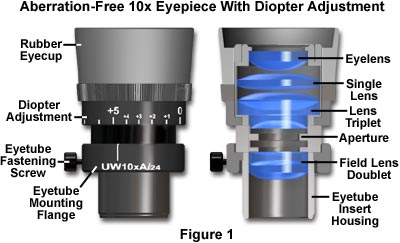
Beyond magnification, the eyepiece ensures the image is sharp, bright, and comfortable to view. Its optical design affects key factors like eye relief (the distance between your eye and the lens), field flatness, and contrast. Many eyepieces feature diopter adjustment rings, allowing users to fine-tune focus independently—especially helpful for those with vision differences between eyes or who wear glasses. By aligning the exit pupil with the observer’s iris, the eyepiece maximizes light transmission and reduces eye strain during extended use.
Eyepiece Anatomy: Key Components
Lens Elements and Barrel Design
An eyepiece is made up of multiple lens elements—usually two or more—housed in a precision cylindrical barrel. These lenses are arranged to correct optical flaws like chromatic and spherical aberrations. Common configurations include doublets (two lenses cemented together) or triplets, which improve image quality.
Inside, the field diaphragm (or field stop) defines the visible area of the image. Light outside this aperture is blocked, reducing glare and improving contrast. At this plane, a reticle (also called a graticule) can be inserted—a glass disc etched with scales, grids, or crosshairs for measurement. When properly focused, the reticle appears superimposed over the specimen, allowing for accurate quantification.
The barrel diameter is standardized: most microscopes use 23.2 mm or 30 mm, ensuring compatibility within brands. Always verify fit before swapping eyepieces.
Eyecup and User Comfort
The rubber or silicone eyecup helps position your eye correctly and blocks ambient light, enhancing image visibility. High-eyepoint models feature extended eyecups, marked with an H (e.g., SWH 10X H), and offer 20–25 mm of eye relief—ideal for spectacle wearers. These models let users see the full field without pressing their glasses against the lens, reducing discomfort during long observation sessions.
Common Eyepiece Optical Designs
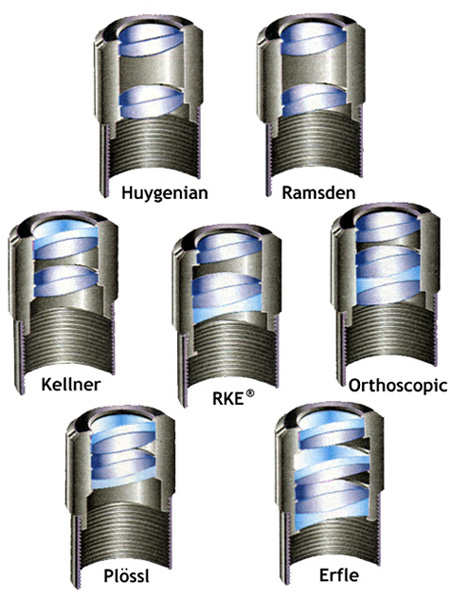
Huygenian: Basic Negative Design
The Huygenian eyepiece, developed in the 1660s, uses two plano-convex lenses:
– Field lens (lower)
– Eye lens (upper)
The curved surfaces face the specimen, and the focal plane lies between the lenses—making it impossible to insert a reticle. This design is best suited for low-power achromatic objectives (5X–40X) and is common in educational microscopes. However, it suffers from chromatic aberration and field curvature, limiting its use with high-performance objectives.
Look for a blue ring around the diaphragm to identify a simple Huygenian design.
Ramsden: Positive Design for Measurement
The Ramsden eyepiece, developed in 1782, features two plano-convex lenses with curved sides facing each other. The field diaphragm sits below the field lens, placing the focal plane outside the eyepiece—ideal for inserting reticles or micrometer scales.
Advantages:
– Suitable for photomicrography and polarized light work
– Better transverse chromatic correction than Huygenian
– Used in measurement-focused applications
Still, it shows some color fringing at the edges, especially with high-magnification objectives.
Kellner: Improved Achromatic Performance
The Kellner eyepiece upgrades the Ramsden design by replacing the eye lens with an achromatic doublet. This three-element system corrects transverse chromatic aberration and offers:
– Wider field of view (40–50°)
– Improved eye relief
– Sharper images
Commonly found in mid-range microscopes, Kellners deliver excellent performance for general lab use and are a significant upgrade over basic Huygenian types.
Advanced Eyepiece Types
Compensating Eyepieces for Color Correction
High-end objectives like apochromats correct most optical errors—but introduce residual chromatic differences of magnification. To counter this, compensating eyepieces add an equal but opposite chromatic error.
Marked with:
– C
– K
– Comp
– Plan-Comp
These must be matched to specific objective series. Mismatching causes visible color fringes—red on outer edges, blue on inner edges—degrading image quality.
Widefield and Super Widefield Options
Widefield (WH) and Super Widefield (SWH) eyepieces expand the observable area by up to 40%. They feature higher field numbers (FN), ranging from 14 mm to 26.5 mm. A larger FN means a broader visible field at any given objective power.
Example:
– SWH 10X H: FN = 22 mm, high-eyepoint
– 35 SWH 10X: FN = 26.5 mm, includes 35 mm photo mask
Ideal for surveying large specimens or digital imaging where frame coverage matters.
High-Eyepoint for Spectacle Wearers
High-eyepoint (H) eyepieces allow full field visibility without removing glasses. With eye relief of 20–25 mm, they reduce eye strain during extended sessions. Even non-spectacle users prefer them for comfort. Look for the H marking on the barrel.
Technical Specifications You Need to Know
Magnification Standards
Common eyepiece magnifications:
– 6.3X
– 8X
– 10X (most common)
– 12.5X
– 15X
– 20X
– 25X
Higher magnification doesn’t improve resolution unless paired with a high-NA objective. A 25X eyepiece with a low-NA 10X objective yields less detail than a 10X eyepiece with a 25X high-NA objective—even if both total 250X.
Field Number Determines Viewable Area
The field number (FN) is the diameter (in mm) of the fixed aperture inside the eyepiece. It directly affects how much of the specimen you can see.
Use this formula to calculate actual field diameter:
$$
\text{Viewfield Diameter} = \frac{\text{FN}}{M_O \times M_T}
$$
Where:
– $ M_O $ = Objective magnification
– $ M_T $ = Tube lens factor (usually 1.0 or 1.25)
Example:
SWH 10X eyepiece (FN = 26.5) + 40X objective + tube factor 1.25:
$$
\frac{26.5}{40 \times 1.25} = 0.53 \text{ mm}
$$
| Objective | Viewfield Diameter (mm) |
|---|---|
| 4X | 5.3 |
| 10X | 2.12 |
| 40X | 0.53 |
| 100X | 0.21 |
Higher FN = wider view. Choose based on need: detail (small field) vs. context (large field).
Avoiding Empty Magnification
Know the Useful Magnification Range
Magnification beyond the resolving power of the objective leads to empty magnification—bigger but blurrier images.
Use these guidelines:
– Minimum Useful Magnification: 500 × NA
– Maximum Useful Magnification: 1000 × NA
| Objective (NA) | Max Eyepiece Use |
|---|---|
| 40X (0.70) | 15X |
| 60X (0.95) | 15X–20X |
| 100X (1.42) | 20X–25X |
Even at 250X total magnification, a 25X objective (NA ≈ 0.65) resolves finer details than a 10X objective (NA ≈ 0.25) with a 25X eyepiece. Always prioritize objective NA over eyepiece power.
Measurement and Analysis Tools
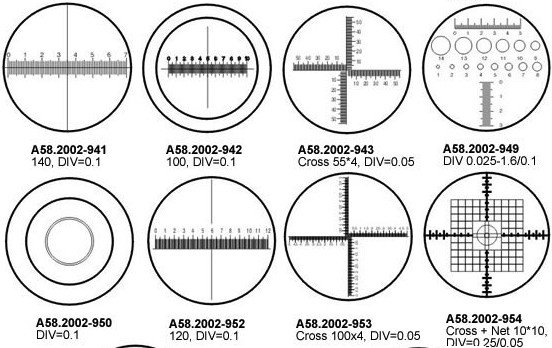
Reticles for Quantitative Work
A reticle is a glass disc etched with patterns inserted at the field diaphragm plane. It enables:
– Distance measurement
– Cell counting
– Alignment
– Photographic framing
Common types:
– CROSSWH 10X H: Includes crossline for teaching
– PSWH 10X: Finder eyepiece with photo mask
– 35 SWH 10X: Compatible with 35 mm photography
Reticles require calibration using a stage micrometer for each objective.
Filar Micrometers for Precision
A filar micrometer replaces the standard eyepiece and includes a movable hairline controlled by a calibrated screw. Each rotation (divided into 100 increments) corresponds to a known distance on the specimen.
Steps to use:
1. Insert filar micrometer
2. Calibrate with stage micrometer
3. Move hairline across feature
4. Read measurement from scale
Ideal for metallurgy, histology, and particle sizing.
Care and Maintenance Tips
Clean Lenses Properly
- Use lens cleaning solution and microfiber cloth
- Apply solution to cloth, not lens
- Wipe gently in circular motion from center outward
- Never use tissues or shirt fabric
Handle with Care
- Hold by the barrel only
- Avoid touching optical surfaces
- Replace caps when not in use
Store Safely
- Keep in protective case
- Store in dry, temperature-stable environment
- Prevent mold and coating degradation
Inspect Regularly
Check for:
– Haze or cloudiness (mold)
– Scratches or coating peeling
– Dirty or misaligned reticles
Clean or replace as needed.
The eyepiece is far more than a simple magnifier—it’s a precision optical component that shapes image quality, usability, and analytical capability. From basic Huygenian designs in school labs to advanced Periplan and digital models in research, understanding eyepiece types, specifications, and compatibility ensures optimal performance. Always match the eyepiece to your objective, avoid empty magnification, and maintain your optics properly. Whether you’re measuring cells, capturing images, or teaching students, the right eyepiece makes all the difference in clarity and accuracy.