
Accurately measuring the size of a specimen under a microscope is essential in biology, microbiology, and histology. Whether you’re identifying a bacterial cell, analyzing tissue structure, or preparing scientific illustrations, knowing how to calculate specimen size under microscope ensures your observations are meaningful and reproducible. Without accurate measurement, even the clearest image can mislead. This guide walks you through every reliable method—from quick visual estimates to precise digital calibrations—so you can confidently determine the dimensions of microscopic objects. You’ll learn to use field of view (FOV), eyepiece reticles, stage micrometers, and image analysis tools, while avoiding common errors that compromise accuracy.
Understand Total Magnification
Before measuring size, determine the total magnification of your microscope setup, as it directly affects how large a specimen appears.
Apply the Total Magnification Formula
Total Magnification = Ocular Lens Magnification × Objective Lens Magnification
Most ocular lenses are 10×. Multiply this by the objective lens (e.g., 40×) to get 400× total magnification. Always check the magnification values printed on both lenses—don’t assume.
Pro Tip: Changing eyepieces alters total magnification. A 15× eyepiece with a 40× objective gives 600×, not 400×. Always verify.
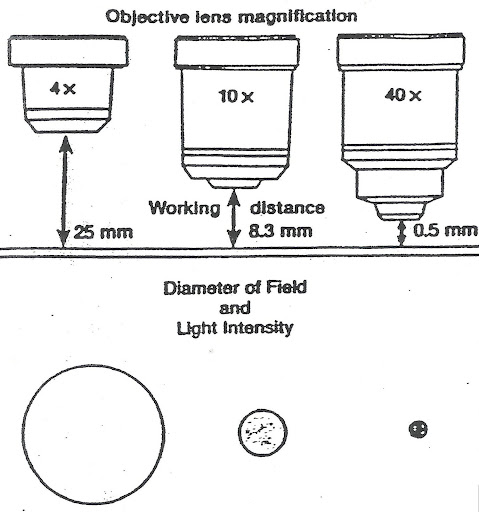
Measure the Field of View (FOV)
The field of view (FOV) is the diameter of the area you see through the microscope. As magnification increases, the FOV shrinks. Knowing FOV allows you to estimate specimen size based on how much space it occupies.
Use a Ruler to Measure Low-Power FOV
At low magnifications (4× or 10×), you can directly measure FOV using a clear metric ruler.
- Place the ruler on the stage.
- Focus using the 4× objective.
- Measure the visible width from edge to edge in millimeters.
- Convert mm to µm by multiplying by 1,000.
Example: 4.5 mm = 4,500 µm at 40× total magnification.
Limitation: This method fails at higher magnifications—FOV becomes too small to measure accurately with a ruler.
Calculate FOV Using Magnification Ratios
If you know the FOV at one magnification, use it to calculate FOV at others.
Unknown FOV = Known FOV × (Known Magnification ÷ Unknown Magnification)
Example:
FOV at 40× = 4,500 µm
Find FOV at 400×:
4,500 × (40 ÷ 400) = 450 µm
This method works well across objectives but assumes consistent optical design.
Use Eyepiece Field Number (FN) for Theoretical FOV
If your eyepiece is labeled “10×/22,” the “22” is the field number (FN)—the diameter in millimeters at the image plane.
FOV (µm) = (Field Number ÷ Objective Magnification) × 1,000
Example:
FN = 22, Objective = 40×
(22 ÷ 40) × 1,000 = 550 µmWarning: This is theoretical. Actual FOV may differ due to optical constraints. Always calibrate when precision is required.
Estimate Specimen Size Using FOV Fraction
Once you know the FOV, estimate size by judging how much of the field the specimen occupies.
Apply the Fractional FOV Method
Specimen Size = (Fraction of FOV) × FOV Diameter
- Focus on the specimen.
- Estimate if it spans ½, ⅓, or ⅒ of the FOV.
- Multiply by FOV in micrometers.
Example:
A paramecium fills half the FOV at 20×.
FOV = 1,150 µm → Size = 0.5 × 1,150 = 575 µmAccuracy: ±10%. Best for live, moving organisms like ciliates or amoebae.
Avoid Overestimation: A cell that spans “most” of the FOV is likely 60–70%, not 90%. Use reference objects when possible.
Calibrate for Precision with Reticle and Micrometer
For lab reports or research, use an eyepiece reticle and stage micrometer for micrometer-level accuracy.
Gather Calibration Tools
- Stage micrometer: Slide with 100 µm or 1 mm etched scale
- Eyepiece reticle: Glass disc with 100 divisions
- Retainer ring: Secures reticle in eyepiece
Follow Calibration Steps
Insert and Align the Reticle
- Place the reticle into one ocular lens.
- Secure it with the retainer ring.
- Insert the stage micrometer slide.
Align the Scales
- Start at 10× objective.
- Rotate the eyepiece until reticle lines align with micrometer lines.
Determine µm per Reticle Division
Count how many reticle divisions match a known distance on the micrometer.
Example: 10 reticle divisions = 100 µm → 1 division = 10 µm
Repeat this for each objective—magnification changes the conversion factor.
Calibration Table Example:
| Objective | Total Mag | µm per Reticle Division |
|———|———–|————————–|
| 10× | 100× | 10 µm |
| 40× | 400× | 2.5 µm |
| 100× | 1000× | 1 µm |Note: Recalibrate if you change eyepieces, objectives, or add camera adapters.
Measure Specimens After Calibration
- Switch to your specimen slide.
- Measure in reticle divisions.
- Multiply by µm/division.
Example:
Rotifer = 44 divisions at 10×
44 × 10 µm = 440 µmBest For: Fixed slides, histology, or stationary microbes.
Use Digital Imaging for Accurate Measurements

Modern microscopes often connect to cameras. Use image software to measure with pixel-level accuracy.
Calculate Size from Pixels
Actual Size (µm) = (Image Size in Pixels) × (µm per Pixel)
- Take a photo of a stage micrometer.
- Measure known distance in pixels.
- Calculate µm per pixel.
Example:
100 µm = 800 pixels → 1 pixel = 0.125 µm
Specimen = 600 pixels → 600 × 0.125 = 75 µmRecommended Software: ImageJ (free), Photoshop, or microscope-specific programs.
Add Scale Bars to Images
Scale bars are essential in scientific publishing—they remain accurate even if the image is resized.
Use ImageJ (Best Option)
- Open micrometer image.
- Set scale: Analyze → Set Scale → Enter known distance.
- Draw line on specimen → Measure.
- Add scale bar: Analyze → Tools → Scale Bar.
Advantage: Automatically adjusts scale if image is scaled.
Manual Method in Photoshop
- Measure specimen in pixels.
- Calculate scale bar length:
Pixels = (Desired µm) ÷ (µm per Pixel) - Draw line and label (e.g., “50 µm”).
Tip: Use Alt+230 (Windows) for “µ”.
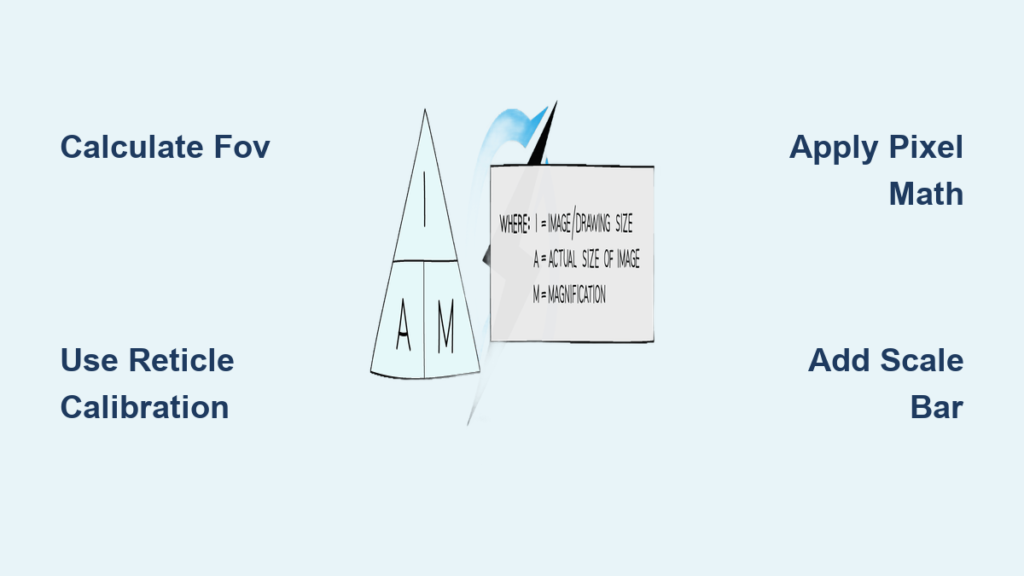
Solve for Actual Size Using Image and Magnification

When given image size and magnification, use the core formula.
Apply the Basic Equation
Actual Size = Image Size ÷ Magnification
Convert all units to micrometers first.
Example:
Red blood cell image = 3 mm = 3,000 µm
Magnification = 400×
Actual size = 3,000 ÷ 400 = 7.5 µm
Matches known human RBC size—validates the method.
Derive Magnification from a Scale Bar
If only a scale bar is given:
Magnification = Image Size of Bar ÷ Actual Size Represented
Example:
Scale bar = 2 cm (20,000 µm), represents 1 µm
Magnification = 20,000 ÷ 1 = 20,000×
Now measure a bacterium:
– Image length = 7.6 cm = 76,000 µm
– Actual size = 76,000 ÷ 20,000 = 3.8 µm
Key Rule: Always convert everything to micrometers before calculating.
Avoid Common Measurement Errors
Even small mistakes lead to wildly incorrect results.
Don’t Misuse Field Number
❌ Wrong: FOV = FN ÷ Total Magnification
✅ Right: FOV = FN ÷ Objective Magnification
Using total magnification underestimates FOV by 10×—a critical error.
Avoid Uncalibrated Estimates
Guessing FOV without measurement leads to inaccuracies.
Real Case: A student reported yeast cells as 0.6 µm—biologically impossible. The real size is ~7 µm. The error came from unverified theoretical FOV.
Fix: Always calibrate with a stage micrometer before publishing.
Prevent Slide Damage
At high power, never use coarse focus.
- Focus at low power first.
- Center specimen.
- Switch to high power and use fine focus only.
Risk: Crashing the objective into the slide can destroy both.
Apply Best Practices for Reliable Results
Start at the Lowest Magnification
Begin with the 4× objective to:
– Locate the specimen quickly
– See a wider context
– Avoid collisions
Keep Calibration Records
Label your microscope or tape a printed table with:
– FOV values per objective
– Reticle calibration (µm/division)
– Date of last calibration
Pro Tip: Keep a logbook for shared microscopes.
Handle Moving Specimens Carefully
For live organisms:
– Gently press coverslip to slow movement
– Use filter paper to wick excess fluid
– Avoid fixatives if observing natural behavior
Trade-off: Fixation preserves shape but may shrink cells.
Compare Methods and Choose Wisely
| Method | Accuracy | Best Use Case |
|---|---|---|
| Fractional FOV | ±10% | Quick classroom estimates |
| Ruler Measurement | Moderate | Low-power FOV check |
| FOV Ratio Method | Good | Interpolating across objectives |
| Theoretical FOV | Variable | Rough planning only |
| Reticle + Micrometer | High | Lab reports, precise work |
| Digital Pixel Analysis | Very High | Research, publications |
| Scale Bars | Essential | Scientific imaging |
Rule of Thumb:
Use visual estimation for learning. Use calibrated tools for documentation.
Know Typical FOV and Specimen Sizes
Use this reference to validate your measurements.
| Objective | Total Mag | FOV (µm) | Example Specimens |
|---|---|---|---|
| 4× | 40× | 4,000–5,000 | Worms, large protozoa |
| 10× | 100× | 1,800–2,300 | Paramecium (~200 µm) |
| 20× | 200× | ~1,150 | Rotifers, algae |
| 40× | 400× | 400–560 | Human cells (RBCs: 7–8 µm) |
| 100× | 1000× | 180–200 | Bacteria (1–5 µm) |
Note: Values vary by microscope. Calibrate your own system.
Final Recommendations
- Students: Master FOV estimation and magnification math.
- Educators: Pre-measure FOVs and provide charts.
- Researchers: Calibrate with stage micrometer; use ImageJ.
- Publishers: Always include scale bars—never rely on magnification labels.
By mastering how to calculate specimen size under microscope, you turn observation into accurate science. Start with estimation, advance to calibration, and always verify your tools—because in microscopy, seeing isn’t enough. You must measure.


