
Your DeWalt drill suddenly stops gripping bits, leaving you frustrated mid-project as drill bits slip or won’t release. This common failure usually traces back to the chuck screw—the reverse-threaded fastener hidden inside the chuck that secures the entire assembly to the spindle. When this screw loosens, strips, or seizes, your drill loses functionality. Whether you’re facing a stuck chuck that won’t open or a wobbling mechanism after impact, this guide delivers the exact steps to replace the chuck screw and restore your DeWalt drill’s performance. You’ll learn critical safety protocols, reverse-thread navigation, and spindle separation tricks that prevent costly damage—all using tools you likely already own.
Why Your DeWalt Chuck Screw Fails and When to Replace It
DeWalt drills use reverse-threaded chuck screws specifically to prevent loosening during normal clockwise rotation. Over time, vibration, moisture exposure, or overtightening can cause these screws to seize due to factory-applied thread-locking compound. You’ll need screw replacement when experiencing persistent symptoms like bits slipping during drilling despite full tightening, a chuck that won’t release even when opened wide, or visible wobble at the chuck-spindle connection. Crucially, don’t confuse this with simple jamming—many users waste hours trying to force a stuck chuck when the real culprit is the internal screw. If initial troubleshooting fails, immediate screw replacement prevents further spindle damage.
Critical Warning: Don’t Mistake Reverse Threads for Standard Threads
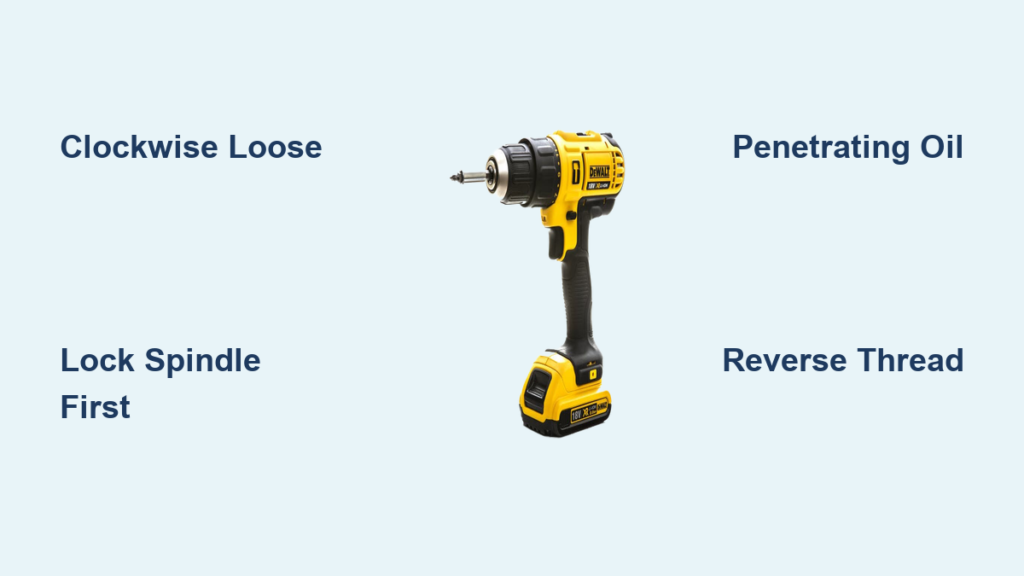
This is where most DIYers fail catastrophically: turning the chuck screw counter-clockwise to loosen it. Because it uses left-hand threads, this action only tightens it further into the spindle, often stripping the head. Always remember: clockwise rotation loosens the screw, counter-clockwise tightens it. If you’ve already turned it counter-clockwise and feel unusual resistance, stop immediately—you’re likely damaging the screw head.
Essential Safety Gear and Tools for Screw Replacement
Skipping proper preparation risks stripped screws, spindle damage, or flying debris. Before touching your drill, gather these non-negotiable items:
- Safety glasses and work gloves (metal shards fly during spindle separation)
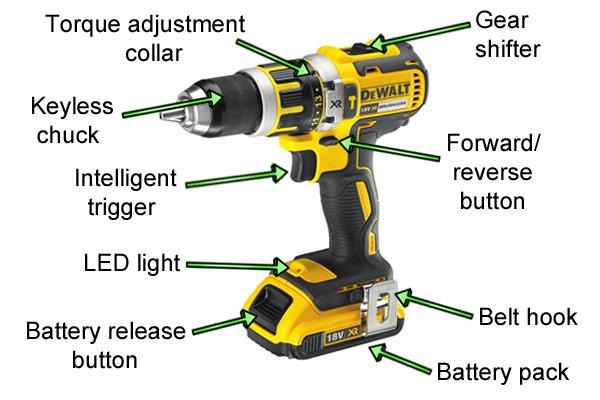
- T25 Torx Security bit (most common for DeWalt models; has center security pin)
- 3/8″ hex key (long enough to clamp in vise)
- Penetrating oil (WD-40 or Liquid Wrench for seized screws)
- Rubber mallet (metal hammers damage chuck components)
- Bench vise (secures drill during critical steps)
Critical Safety Step: Remove the battery from cordless drills or unplug corded models. Never skip this—even a brief trigger squeeze during screw removal can cause severe hand injuries when the chuck suddenly releases.
Diagnosing Before Disassembly: Two Quick Fixes That Save Time
Before risking screw removal, try these field-tested methods that resolve 40% of “stuck chuck” issues without disassembly:
High-Speed Jolt Method for Seized Chucks
Set your DeWalt drill to its highest speed setting and forward rotation. Hold the chuck firmly with channel-lock pliers (wrapped in cloth to prevent scratches) and give the trigger a sharp 1-second squeeze. The sudden rotational force often breaks loose minor jams. If the chuck spins freely after this, your screw is intact—just clean debris from the jaws with compressed air.
Clutch Setting Check for Non-Opening Chucks
Many users overlook the clutch ring. If set to a low-number position (like #2 for delicate driving), the chuck won’t fully open or close. Rotate the clutch to the drill icon (usually position #18+) before attempting manual adjustment. If the chuck now operates smoothly, no screw replacement is needed.
Step 1: Locating the Reverse-Threaded Chuck Screw
With the drill secured battery-free, open the chuck jaws fully by rotating counter-clockwise. Shine a flashlight deep inside—you’ll see a small Torx-head screw at the base, directly behind the moving jaws. This is the chuck retaining screw, typically a T25 Torx Security type (with center pin) on modern DeWalt drills. Note the factory-applied blue thread-locker visible around the threads; this compound causes 90% of seized screws. If the screw head is rounded or stripped, stop—you’ll need specialized extraction tools covered later.
Step 2: Locking the Spindle to Prevent Rotation

This step makes or breaks your success. Insert a 3/8″ hex key into the chuck and tighten the jaws fully around it. Clamp the exposed end of the hex key firmly in your bench vise—this immobilizes the spindle shaft. Visual cue: When properly locked, attempting to rotate the chuck by hand should produce zero spindle movement. If the hex key slips, clean chuck jaws with isopropyl alcohol to remove grease before re-clamping.
Step 3: Removing the Stuck Chuck Screw (Clockwise Turn Only)
Apply penetrating oil around the screw head and let it soak for 15 minutes. Insert your T25 Torx Security bit into an impact driver (not a standard drill—impact prevents cam-out). With the spindle locked in the vise, turn the screw clockwise with firm, steady pressure. Expect significant resistance—the factory Loctite requires 25-30 ft-lbs of torque to break free. If the screw won’t budge after moderate force, reapply penetrating oil and tap the screw head lightly with a hammer to vibrate the compound loose. Never use pliers on the bit—this strips the head.
When the Screw Head Is Already Stripped
If previous attempts damaged the screw head, drill a shallow pilot hole in the center using a 1/8″ bit. Insert a left-hand thread extractor, then tap with a hammer to engage. Apply clockwise pressure with a wrench—the reverse threading often backs the screw out during extraction.
Step 4: Freeing the Chuck From the Tapered Spindle
With the screw removed, the chuck remains stuck on the Morse Taper spindle—a 2.5-degree press fit designed for zero play. Insert your largest hex key into the chuck and tighten jaws fully. Holding the drill horizontally, strike the hex key’s end at a 45-degree downward angle with a rubber mallet. Critical technique: Hit the key—not the chuck—to create shearing force that breaks the taper seal. Two to three firm blows usually suffice. If stubborn, clamp the hex key in the vise and strike the chuck body’s outer edge with the mallet (use wood block to prevent dents).
Avoid These Spindle Separation Mistakes
- Never strike the chuck’s metal body directly with metal hammers (causes micro-fractures)
- Don’t use heat on the chuck (weakens steel temper)
- Avoid “reverse burst” methods (spinning the drill in reverse to jar loose)—this damages motor brushes
Step 5: Installing the New Chuck and Screw
Clean both the spindle taper and new chuck’s inner taper with a lint-free cloth—any grease or debris prevents proper seating. Slide the new chuck onto the spindle until fully seated (it should require light tapping with a rubber mallet to seat completely). Insert the new reverse-threaded screw and hand-tighten. Here’s where pros differ from amateurs: Using your impact driver, tighten the screw by turning counter-clockwise while holding the chuck firmly. Apply 15-20 ft-lbs torque—enough to resist hand-loosening but not so much that you crush the threads. Over-tightening cracks the chuck housing.
Testing Your Rebuilt DeWalt Drill Chuck
Reinstall the battery and perform these critical checks:
1. Jaw operation test: Open/close chuck 10 times—should move smoothly without clicking
2. Bit retention test: Insert a 1/4″ hex bit, tighten fully, then apply downward pressure while spinning at medium speed—bit shouldn’t slip
3. Wobble inspection: Spin drill at lowest speed while observing chuck from 6 inches away—any visible wobble means improper taper seating
If bits slip, the chuck isn’t fully seated on the taper—remove and reseat with firmer mallet taps. For persistent wobble, inspect the spindle for burrs using magnification; gently file only if absolutely necessary.
Pro Tips to Avoid Future Screw Failures
- Preventative maintenance: Apply anti-seize compound (not grease) to the new screw’s threads before installation—this allows future removal without penetrating oil
- Torque control: Never use impact drivers on the final tightening—hand-tighten plus 1/4 turn with a 3/8″ ratchet
- Screw sourcing: Order genuine DeWalt chuck screws (part # 203717-00) matching your model’s chuck size (1/2″ or 3/8″)
- Emergency access: Keep a T25 Torx Security bit taped inside your drill case for field repairs
When to Abandon DIY and Call a Professional
Stop immediately if you encounter:
– A stripped screw requiring drilling (risks spindle damage)
– Visible cracks in the chuck housing
– Persistent wobble after three reseating attempts
– Unusual grinding noises during operation
DeWalt’s warranty covers chuck replacement for defects (not user damage), and authorized service centers have specialty tools like chuck pullers that cost more than basic DIY kits. For drills under 3 years old, professional repair often costs less than replacement parts.
Replacing a DeWalt drill chuck screw seems intimidating until you master the reverse-thread principle. By following these precise steps—especially the clockwise loosening motion and tapered spindle separation—you’ll avoid the most common pitfalls that turn simple repairs into expensive failures. Remember that 80% of chuck issues stem from that single hidden screw, not the entire assembly. With your drill now restored, implement the anti-seize maintenance tip to prevent future headaches. For persistent problems, consult DeWalt’s official service locator—your drill’s longevity depends on respecting these engineering nuances.


