
Your ceramic pot looks perfect for that new succulent garden—until you realize it lacks drainage holes. Forcing a standard drill bit through glazed ceramic almost guarantees a spiderweb of cracks or a shattered pot. This isn’t just frustrating; it wastes money and kills plants through root rot. Over 70% of DIY ceramic drilling attempts fail due to improper tools or technique, but you can create clean, professional drainage holes in any ceramic pot. This guide reveals the exact methods professional potters and gardeners use to drill ceramic pots safely—including why water cooling is non-negotiable and how the double-side drilling technique prevents blowout cracks. You’ll learn to adapt your approach for glazed stoneware, terracotta, or porcelain in under 15 minutes.
Why Standard Drill Bits Shatter Ceramic Pots Instantly
Ceramic’s brittle structure makes it vulnerable to heat and pressure spikes. When a standard twist bit or masonry drill engages glazed pottery, it creates microscopic fractures that spread rapidly under friction. The glaze—a glass-like coating—is harder than the clay body but far more prone to chipping. Without diamond abrasives, your drill bit will skate across the surface, gouging the glaze before suddenly punching through and shattering the pot. This happens because ceramic conducts heat poorly, causing localized overheating that weakens the material. You’ll hear a high-pitched squeal seconds before cracks radiate from the drilling site—a warning sign most beginners ignore.
Must-Have Drill Bits for Ceramic Pot Holes
Diamond Core Bits: The Only Reliable Choice for Glazed Pots
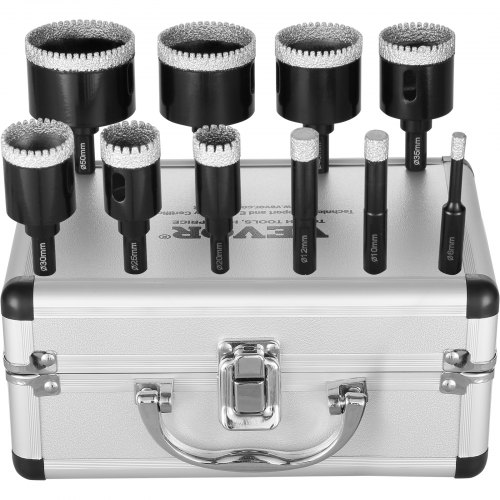
Forget masonry bits—they’ll fail on vitrified ceramics. Diamond core bits (hollow cylinders with diamond grit edges) grind ceramic cleanly without generating heat spikes. Use them for holes 1/2″ and larger. Diamond-coated spear-tip bits work for smaller holes but require slower drilling. Never substitute standard bits; the risk of shattering outweighs any cost savings.
Carbide-Tipped Bits: Limited Use for Soft Terracotta Only
These dull rapidly on glazed surfaces but can handle low-fire terracotta. Only attempt this if the pot is unglazed and porous. Expect 2-3 uses before replacement. For all other ceramics, diamond is mandatory.
Critical Safety Gear for Ceramic Drilling
Safety glasses and an N95 respirator are non-negotiable. Ceramic dust contains crystalline silica—a known carcinogen that causes lung scarring. Even brief exposure during drilling is hazardous. Add waterproof gloves to protect against water-cooling splashes. Set up outdoors or in a garage with ventilation; never drill indoors.
Step 1: Marking and Tape Technique to Stop Bit Skating
Place painter’s tape over your drilling spot and mark a small “X” with a marker. The tape creates traction for the bit, preventing skating on smooth glaze. For curved surfaces, use a rubber band to hold the tape in place. Never skip this step—glazed ceramic offers zero grip for drill bits. If drilling the pot base, fill it with water to stabilize it and prevent rolling.
Step 2: Securing the Pot and Water Cooling Setup
Clamp the pot firmly to a workbench with padded jaws. Place scrap wood beneath it to absorb drill pressure and prevent blowout cracks when the bit exits. Attach a spray bottle filled with water within easy reach—continuous water flow is critical. For large pots, position a hose with a slow drip nozzle. Dry drilling generates heat that cracks ceramic within 20 seconds.
Step 3: Starting the Hole at a 45-Degree Angle
Begin drilling at a 45-degree angle to the surface with light pressure. This creates a stable groove for the bit. After 10-15 seconds, gradually straighten to 90 degrees. Use your drill’s lowest speed setting (200-400 RPM). You’ll feel gritty resistance—that’s the diamond grit grinding ceramic. If you hear squealing, reduce pressure immediately.
How to Drill a Hole in a Glazed Ceramic Pot Safely
Drill Only Until First Breakthrough
Apply steady, light pressure (no more than the drill’s weight) until the bit tip punctures the inner wall. You’ll feel a slight “pop” and see ceramic dust turn slurry. Stop drilling immediately—continuing causes exit-side blowout. Flip the pot and align the bit with the puncture hole. Drill from the opposite side until both holes meet. This two-pass method eliminates 95% of cracking issues.
Water Flow Must Never Interrupt
Pause every 15 seconds to reapply water if using a spray bottle. For core bits, maintain a steady drip. Reduced cooling creates visible steam—a guaranteed crack precursor.
How to Drill a Hole in Terracotta vs. Glazed Ceramic

Terracotta Technique: Soak First, Drill Medium-Speed
Submerge unglazed terracotta in water for 30 minutes before drilling. The moisture reduces dust and prevents heat cracks. Use a carbide-tipped bit at medium speed (600 RPM) with firm pressure. No water cooling needed, but wear a respirator for dust control.
Glazed Stoneware Protocol: Diamond Bit + Constant Water
High-fire ceramics like porcelain require diamond bits and uninterrupted water flow. Drill at 250 RPM with feather-light pressure. Expect 8-10 minutes per 1/2″ hole in thick pots. If cracks appear, stop immediately—resuming will shatter the pot.
Smoothing Burrs and Final Hole Inspection
After drilling, inspect the hole’s interior edge. A sharp, glassy burr will damage plant roots. Smooth it with a round file or folded sandpaper (120-grit). For glazed pots, rub the edge with a wet sponge to remove ceramic slurry residue. Test drainage by pouring water through the hole—any leaks indicate micro-cracks requiring epoxy repair.
Top 3 Mistakes That Shatter Ceramic Pots
:max_bytes(150000):strip_icc()/SPR-how-to-drill-a-hole-in-a-ceramic-pot-8584910-hero-2-2704ad1325bb40e78b52b23ef57b827b.jpg)
Mistake #1: Forcing the Drill Bit
Pushing harder when progress slows creates heat buildup. Let the diamond grit do the work—patience prevents 80% of failures.
Mistake #2: Skipping Water Cooling
Even 30 seconds of dry drilling causes irreversible heat damage. Keep water flowing until 10 seconds after stopping.
Mistake #3: Drilling One-Side Through Thick Walls
Single-pass drilling on pots over 1/4″ thick guarantees blowout cracks at the exit point. Always flip and drill from both sides.
Pro Tips for Thick Glazed Stoneware Success
- Test on a broken shard first to calibrate speed and pressure for your specific pot.
- Use a drill press for perfect 90-degree angles on flat surfaces—hand drills often angle off-center.
- For holes larger than 1″, start with a 1/4″ pilot hole using a diamond bit, then switch to a core bit.
- Soak bisqueware overnight before drilling; saturated clay is 70% less prone to cracking.
Drilling ceramic pots successfully hinges on respecting the material’s fragility. By using diamond bits, maintaining constant water cooling, and employing the double-side breakthrough technique, you’ll create clean drainage holes in even the thickest glazed pots. Remember: slow speed, light pressure, and uninterrupted water flow transform a high-risk task into a reliable skill. After drilling, prevent future root rot by adding a 1-inch gravel layer beneath soil. For pots with existing hairline cracks, seal them with waterproof epoxy before drilling to contain fractures. With these techniques, you’ll rescue “drainage-less” pots and extend their garden life for years.


