

Achieving a sharp, clear image under a compound microscope is more than just turning a knob—it’s a precise process that combines technique, safety, and understanding of optical principles. Whether you’re a student examining cheek cells or a lab technician identifying bacteria, knowing how to focus a compound microscope correctly ensures accurate observations and protects expensive equipment from damage. Without proper focusing, even the most powerful microscope delivers blurry, misleading, or invisible results. This guide walks you through every step—from initial setup to oil immersion—so you can confidently bring any specimen into crisp detail.
Mastering microscope focus isn’t guesswork. It follows a strict sequence: start low, center your specimen, increase magnification gradually, and use the right focus knob at the right time. You’ll learn how to avoid common pitfalls like cracked slides, lens crashes, and disappearing images. We’ll also cover lighting adjustments, slide preparation, and post-use care to keep your microscope in peak condition. By the end, you’ll have a repeatable workflow that works every time—no frustration, no guesswork.
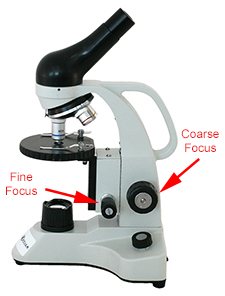
Set Up the Microscope on a Stable Surface
Before inserting a slide, ensure your microscope is positioned for safe and stable use.
Place the instrument on a flat, sturdy table away from vibrations, foot traffic, or direct sunlight. Glare from windows can interfere with viewing, and movement can throw off focus during observation. Always carry the microscope with one hand on the arm and the other under the base to prevent drops or jostling.
Plug in the power cord and turn on the illuminator. Check that light shines up through the stage by looking down from above—this confirms the light path is clear. Set the intensity to medium brightness initially; too much light at low power can wash out contrast. If your model has an adjustable condenser, raise it close to the stage for optimal illumination.
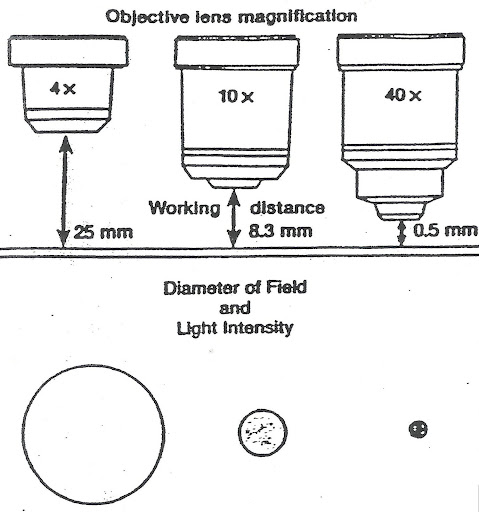
Next, rotate the nosepiece to click the 4X objective (scanning lens) into place over the stage. This lens offers the widest field of view, making it ideal for locating specimens. Never skip this step—starting at high magnification is the most common cause of focusing failure.
Load and Center the Slide Correctly
A poorly mounted slide leads to blurry images, air bubbles, or lens damage—especially with oil immersion.
For beginners, use a pre-made, stained slide. For live or temporary samples, prepare a wet mount:
– Place a drop of water or saline on a clean slide.
– Add your specimen (e.g., pond water, onion cells, cheek swab).
– Hold a cover slip at a 45-degree angle and gently lower it to prevent air bubbles.
Once ready, place the slide on the stage and center the specimen over the light path. Secure it with stage clips, ensuring they hold the slide firmly without applying excessive pressure that could crack the glass. If using oil immersion later, confirm the cover slip is facing up—this prevents oil from contaminating the slide or stage.
Focus at Low Magnification Using Coarse Adjustment
Starting at 4X is non-negotiable—it protects your lenses and makes finding the specimen possible.
Look from the side and use the coarse focus knob to raise the stage (or lower the objective, depending on design) until the 4X lens is about 5 mm from the slide. Never let them touch. If your microscope has a rack stop, this limits how close the lens can get.
Now, look through the eyepiece and slowly turn the coarse knob to lower the stage. Keep turning—sometimes several rotations—until the specimen comes into rough focus. You may see shadows, streaks, or模糊 shapes at first; that’s normal.
Once visible, use the fine focus knob to sharpen the image. Turn it gently—small adjustments make a big difference. Use the mechanical stage controls to move the slide and center the area you want to examine. Only after this should you consider increasing magnification.
Switch to 10X and 40X with Fine Focus Only
After initial focus, move to higher magnifications—but never use the coarse knob again.
Rotate the nosepiece to click the 10X objective into place. The image should remain roughly in focus due to parfocality—a design feature where objectives stay aligned when switched. If blurry, use only the fine focus knob to sharpen it.
Repeat the process for the 40X objective. At this power, the working distance is less than 0.5 mm, meaning the lens is extremely close to the slide. Any use of the coarse knob risks a lens-slide collision, which can chip glass or destroy the objective.
As magnification increases, adjust the iris diaphragm to improve contrast. Slightly closing it enhances detail in transparent specimens like protozoa or unstained cells. Too much closure reduces light; too little causes glare. Balance is key.
Apply Oil and Use the 100X Objective Safely
For 1000X total magnification, immersion oil is required—never skip this step.
After focusing clearly at 40X, rotate the nosepiece halfway between the 40X and 100X positions. Place a small drop of immersion oil directly on the cover slip over your specimen. Use only microscope-grade immersion oil—substitutes like mineral oil degrade lens performance.
Slowly rotate the nosepiece to lower the 100X objective into the oil. It should make smooth contact—do not force it. Once engaged, use only the fine focus knob to sharpen the image. Even a slight turn of the coarse knob can cause catastrophic damage.
Adjust the light and diaphragm as needed. The oil reduces light refraction, increasing resolution and clarity—especially for bacteria, cell organelles, or fine structural details.
Clean the Lens and Store the Microscope Properly
Post-use care prevents damage and ensures readiness for next time.
After observation, rotate back to the 4X objective. This protects the 100X lens from accidental contact. Carefully wipe oil from the 100X lens and slide using lens paper only—never tissue, cloth, or fingers. Wipe in a gentle circular motion to avoid scratches.
Turn off the illuminator, unplug the microscope, and lower the stage to its lowest position. Remove the slide and store it properly. Wipe the stage with a dry, lint-free cloth.
Finally, cover the microscope or store it in a dust-free cabinet. Avoid humid areas to prevent mold growth on lenses. Regular maintenance ensures longevity and consistent performance.
Optimize Lighting for Maximum Clarity
Good illumination is as important as focusing—it directly affects contrast and detail.
At 4X and 10X, open the iris diaphragm fully to allow maximum light. At 40X and 100X, partially close it to boost contrast. Use the condenser to focus light precisely on the specimen—raise it near the stage for high power.
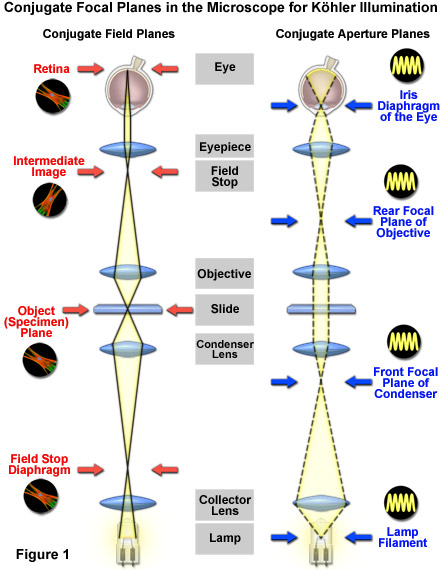
For advanced users, Köhler illumination provides even lighting and sharper images. It involves aligning the light source, focusing the condenser, and matching aperture settings. While not needed for classroom use, it’s essential for research or publication-quality imaging.
Avoid These 4 Critical Focusing Mistakes
Even experienced users make errors that ruin results or damage equipment.
1. Using coarse focus at high power – This is the top cause of lens damage. At 40X and above, only use the fine knob.
2. Skipping magnification levels – Jumping from 4X to 100X makes finding the specimen nearly impossible. Always progress: 4X → 10X → 40X → 100X.
3. Not centering the specimen – High-magnification fields are tiny. If your target isn’t centered at 10X, it will vanish when you switch to 40X.
4. Forgetting the cover slip with oil immersion – The 100X lens is designed to work through a cover slip. Without it, oil seeps into the lens, causing permanent damage.
Troubleshoot Common Focusing Problems
Quick fixes save time and prevent frustration.
- No image visible? Check: Is the light on? Is the nosepiece clicked? Is the slide centered? Restart at 4X.
- Blurry or hazy view? Likely causes: dirty lens (clean with lens paper), air bubbles (remake slide), or incorrect focus (refocus with fine knob).
- Image disappears at higher power? Return to 10X, center the area, then switch up.
- Only half the field visible? The objective isn’t fully engaged—rotate until it clicks.
Final Note: Mastering how to focus a compound microscope ensures clear, accurate observations and protects expensive equipment. Always start at low power, use coarse focus only at 4X and 10X, and rely on fine adjustments at higher magnifications. With proper lighting, clean optics, and step-by-step progression, you’ll achieve sharp, detailed images every time—whether you’re in a classroom or a clinical lab.


