
Your binoculars show double images, headaches plague your birdwatching trips, or distant details remain frustratingly blurry. These common frustrations almost always trace back to one overlooked step: failing to set your binocular diopter correctly. Unlike the central focus wheel that adjusts for distance, the diopter compensates for differences between your eyes—like how one eye might need stronger correction than the other. Skip this calibration, and you’re fighting a losing battle against eye strain and fuzzy images. The good news? Properly setting your binocular diopter takes just one minute and transforms your viewing experience from mediocre to magical. In this guide, you’ll master the exact steps to achieve perfect, merged 3D vision tailored to your eyes—plus avoid the critical errors 90% of beginners make.
Most users treat the diopter like an afterthought, randomly twisting it until “something looks okay.” But here’s the reality: a misadjusted diopter forces your eyes to constantly compensate, causing fatigue during extended use. Military spotters and professional ornithologists reset their diopter before every session because it’s that crucial. Once calibrated to your unique vision, you’ll instantly notice sharper details, reduced eye strain, and the ability to track fast-moving subjects with ease. Forget generic “how to use binoculars” advice—this is the precise method that turns casual viewers into clear-sighted experts.
Why Your Left and Right Eyes Need Separate Diopter Calibration
Binoculars aren’t one-size-fits-all optical devices—they’re precision instruments requiring personalization for your eyes. The diopter adjustment exists solely to correct two critical variables: differences in your eyes’ visual acuity (like one eye being nearsighted while the other isn’t) and microscopic variations between the binoculars’ optical tubes. Think of it as customizing eyeglass lenses for each eye, but built directly into your binoculars. Crucially, this setting has nothing to do with focusing on near or far objects—that’s the central wheel’s job. Once dialed in for your vision, your diopter should never change again. You’ll use only the central focus wheel for all distance adjustments, knowing both barrels instantly sync to your eyes’ unique needs. Skip this step, and you’re essentially forcing mismatched lenses onto your eyes, causing headaches and blurred vision within minutes.
Selecting the Ideal Diopter Calibration Target
Your choice of target makes or breaks diopter accuracy—yet most users grab whatever’s nearby. Avoid bland walls, blank skies, or moving birds; these provide zero visual reference for sharp focus. Instead, find a flat, high-contrast object with fine detail exactly 15–30 feet (4.5–9 meters) away. Ideal options include:
– A printed newspaper headline on a fence
– Brickwork patterns with visible mortar lines
– Tree branches against a bright sky showing individual leaves
– Distant signage with small text
This mid-range distance is critical because extreme close-ups or infinity views exaggerate optical flaws. At 20 feet, your eyes work similarly to how they do when viewing birds or wildlife, creating real-world calibration. Never use moving targets—swaying branches or cars introduce false blur that ruins your setting. If you’re indoors, tape a detailed magazine page to a window facing outside light for optimal contrast.
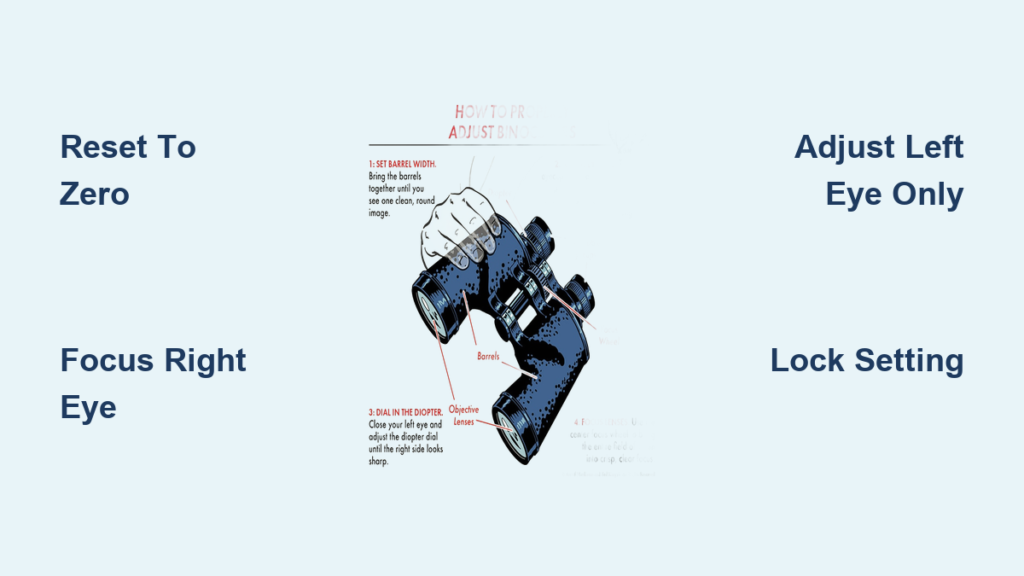
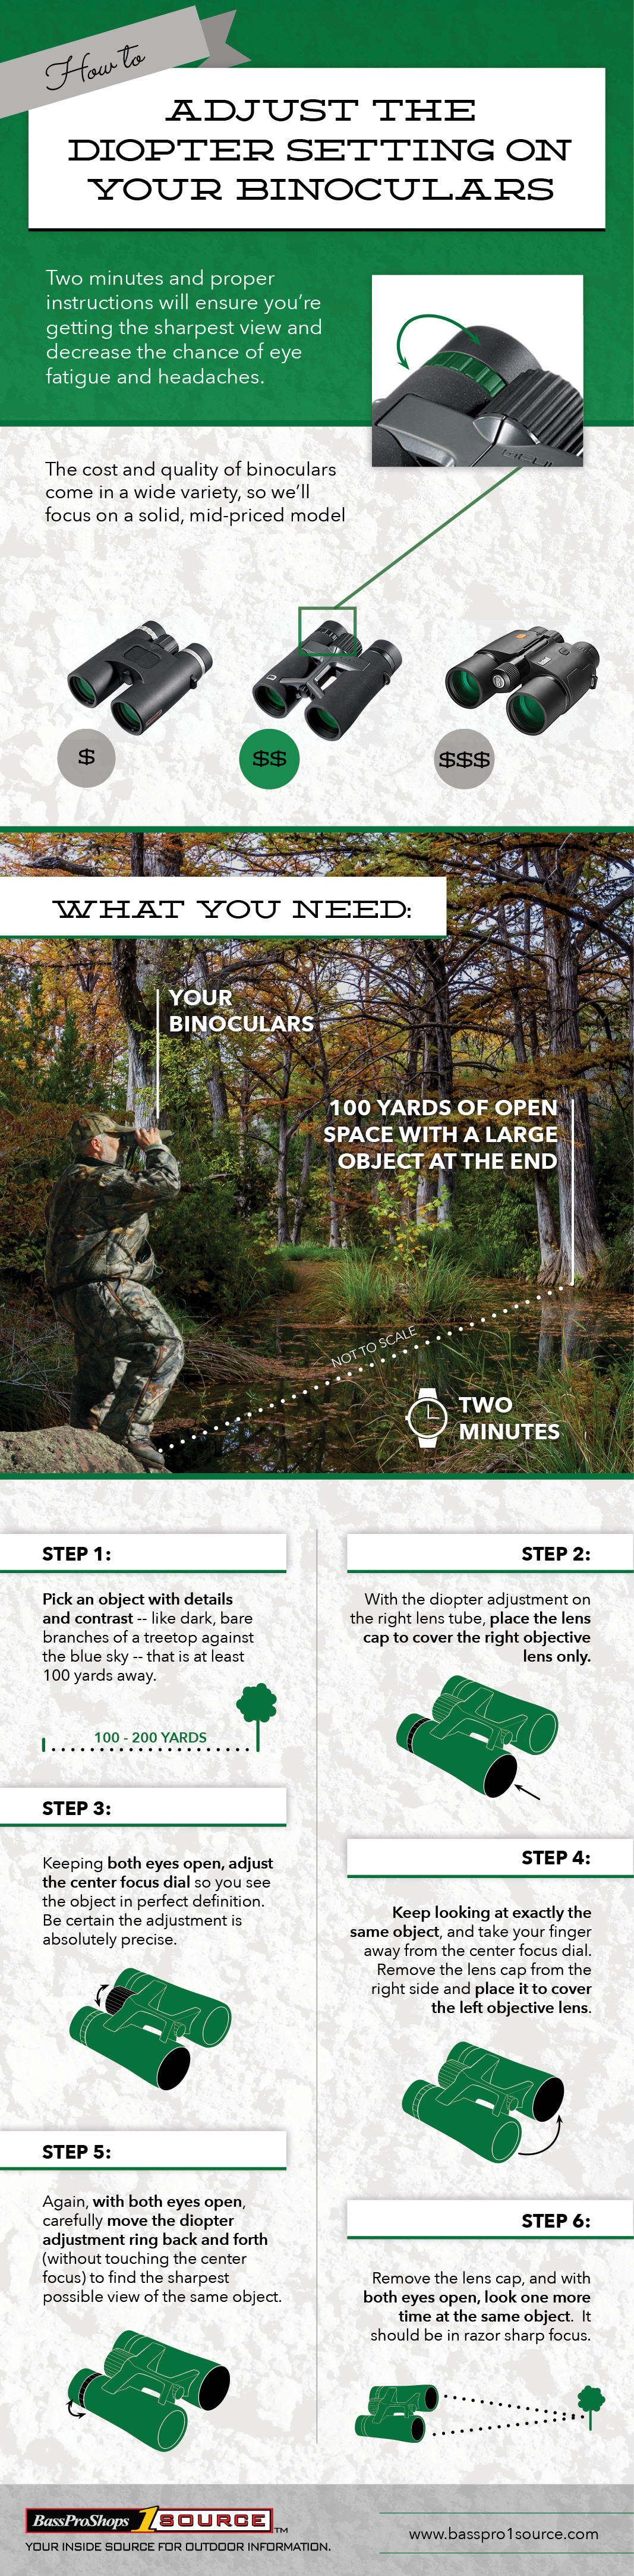
Step 1: Reset Diopter to Zero Before Calibration
Before adjusting, locate your diopter control—it’s usually a ring around the left eyepiece or a separate knob marked with “+” and “-” scales. Many models have a “0” center point. Twist this to the “0” position now. This neutral starting point ensures you’re not fighting previous incorrect settings. Next, cover your right lens with the lens cap or your palm—no peeking! Using only your left eye, turn the central focus wheel until your target’s details snap into sharp clarity. This step isolates your left eye’s native focus. If you wear prescription glasses for distance vision, keep them on now and throughout the process. Skipping this reset causes compounding errors; it’s why most users redo this step three times before getting it right.
Step 2: Focus Right Eye Using Central Wheel Only
With your left lens still covered, uncover the right barrel. Look exclusively through the right eyepiece at the same target. Do not touch the diopter ring yet. Rotate the central focus wheel until the image is perfectly sharp for your right eye. This is your baseline focus. Hold your binoculars steady against your brow bone to prevent hand shake—rest elbows on a table if possible. At higher magnifications (like 10x), tiny adjustments matter; turn the wheel in slow, quarter-turn increments. If the image won’t sharpen, you’ve likely chosen a poor target. Switch to something with finer details immediately. This step takes 10 seconds but is non-negotiable for accuracy.
Step 3: Adjust Diopter for Left Eye Only
Here’s where 95% of users mess up: keep the central focus wheel untouched. Cover your right lens again, then look through the left eyepiece. The image will likely appear blurry—this is normal. Now, slowly rotate only the diopter ring (not the central wheel!) until your target snaps into sharp focus for your left eye. For most people, this requires turning the diopter toward “-” (minus), but some need “+”. The key is achieving equal sharpness in both eyes without readjusting the central wheel. If you accidentally move the central focus, restart from Step 1. This precision calibrates the diopter to your eyes’ exact difference, eliminating double vision permanently.
Step 4: Lock and Confirm Your Personal Diopter Setting
Once your left-eye image is sharp, uncover both lenses. You should see a single, crisp, 3D image. If not, repeat Steps 2–3. Many binoculars feature a locking ring or scale—engaging this prevents accidental bumps during hikes. Note your exact setting (e.g., “-2”) if scales exist; this is vital for multi-user households. To verify, check focus at varying distances: point at a nearby bush, then a distant tree. Both should snap into clarity using only the central wheel. If distant objects blur, your diopter is still off—revisit Step 3. Properly set, this calibration lasts years unless your vision changes or binoculars suffer impacts.
Why 15–30 Feet Is the Goldilocks Zone for Diopter Setup
Setting diopter at extreme distances guarantees failure. Close objects (under 10 feet) exaggerate minor optical flaws, while infinity views (mountains, stars) mask subtle blur. The 15–30 foot sweet spot mirrors real-world viewing conditions for wildlife or sports. At this range, your eyes accommodate similarly to mid-distance observation, revealing true focus mismatches. Temperature matters too: avoid calibration in freezing cold or direct sun, as lens materials expand/contract. If testing shows inconsistent results, move to a shaded area with a 20-foot target—you’ll immediately see cleaner focus.
Top 4 Diopter Mistakes That Cause Blurry Vision
Mistake 1: Using the central focus wheel during left-eye adjustment
This is the cardinal sin. If you touch the central wheel while adjusting the diopter, you invalidate the entire process. The central wheel is for distance; the diopter is for eye differences. Keep them separate!
Mistake 2: Skipping the reset to “0”
Starting from a random diopter position compounds errors. Always begin at neutral.
Mistake 3: Forgetting to lock the setting
Without locking, pocket storage or glove compartment bumps shift your calibration. Engage locks immediately after verification.
Mistake 4: Calibrating while squinting or blinking
Hold binoculars firmly against your brow, eyes wide open. Squinting artificially sharpens images, leading to false settings.
Fixing “My Diopter Won’t Stay Set” Immediately
If your diopter drifts after calibration, first check for a locking mechanism—many users miss tiny set-screws near the diopter ring. Tighten these with a coin if loose. If no lock exists, apply a tiny dot of removable glue (like Loctite Blue) to the ring’s edge—this prevents slippage without permanent damage. For sudden focus shifts during use, verify you aren’t pressing the diopter ring with your nose while viewing. High-magnification binoculars (12x+) are especially prone to accidental bumps; cup your hands around the barrels for stability. If problems persist, your diopter mechanism may need professional servicing—don’t force adjustments.
Pro Tips for Families Sharing Binoculars
When multiple people use one pair, record each user’s diopter setting (e.g., “Dad: -1.5, Mom: +0.5”). For binoculars without scales, place colored nail polish dots at personal settings. Before handing off binoculars, always reset to “0” first—never adjust directly from one user’s setting to another’s. Teach kids to cover the wrong lens with their palm (not fingers) to avoid smudges. In groups, designate a “diopter captain” to verify settings before hikes; this prevents constant readjustment frustration. Remember: your setting is as unique as a fingerprint—never assume others see the same clarity you do.
When to Reset Your Diopter: Vision Changes & Extreme Conditions
Your perfect diopter setting isn’t forever. Reset immediately if:
– You get new glasses/contacts with changed prescriptions
– You experience significant eye strain after 20+ minutes of use
– Binoculars endure temperature swings (e.g., moving from freezing car to warm cabin)
– You drop binoculars onto hard surfaces
Vision naturally shifts with age—recheck settings yearly after age 40. For professional use (hunting, surveillance), reset diopter at the start of each session. Never adjust diopter for different distances; if you find yourself doing this, your initial calibration was flawed. Start over with a detailed 20-foot target.
Final Note: With your binocular diopter perfectly calibrated, you’ve unlocked crystal-clear viewing that transforms every outdoor adventure. Remember: this setting is your personal optical fingerprint—once dialed in, lock it, record it, and never touch it again except for vision changes. For immediate clarity on your next hike, spend 60 seconds verifying your setting against a detailed target before leaving home. Share this guide with fellow enthusiasts; most never realize why their binoculars “just don’t feel right.” Your eyes will thank you with strain-free hours of breathtaking detail.


