
Your auger drill bit suddenly struggles to bite into wood, forcing you to lean in with excessive pressure while producing rough, splintered holes. Instead of replacing the $30 bit, you could revive its performance in 10 minutes with simple hand tools. Learning how to sharpen an auger drill bit properly transforms frustrating drilling sessions into smooth, precise work—saving money while delivering professional results. Dull bits don’t just waste effort; they cause tear-out, overheating, and dangerous kickback. This guide reveals the exact hand-sharpening techniques professional woodworkers use to maintain razor-sharp edges. You’ll discover why standard drill bit sharpeners fail auger bits and how to perfectly restore the lead screw, cutting lips, and spurs for self-feeding action that glides through hardwood like butter.
Essential Hand Tools for Sharpening Auger Drill Bits
Skip power grinders that remove excessive metal and alter critical angles. Hand-sharpening preserves your bit’s factory geometry while giving you complete control. Start by gathering these non-negotiable tools before touching your bit:
- Bench vise with protective jaws (rubber or wood-lined) to clamp the shank without marring surfaces
- Mill bastard file (medium cut, 8–10″) for initial shaping of cutting lips
- Fine flat file (8″ mill file) for refining cutting edges without over-removing material
- Small round or half-round file (6–8″) specifically for lead screw threads and flute cleaning
- Fine sharpening stone (600–800 grit) or diamond file for final honing
- Safety glasses and cut-resistant gloves—metal filings fly unpredictably during sharpening
Critical mistake to avoid: Never use coarse files or grinders on the delicate spurs. A 100-grit wheel will obliterate the precise 30–35° cutting angle in seconds. Your fine flat file should feel like sharpening a chisel—light, controlled strokes only.
Secure and Inspect Your Auger Bit for Hidden Damage
Identify Where Sharpening Is Actually Needed
Clamp the bit’s shank vertically in your vise using wooden blocks to prevent slippage. Now conduct a damage triage with these checks:
- Run a finger along the cutting lips (never across—this risks cuts) to detect nicks or rolled edges. Dull spots feel smooth; sharp edges catch slightly.
- Examine the lead screw under bright light. Damaged threads won’t self-feed—instead, the bit skates across wood surfaces.
- Check spurs for symmetry using a magnifying glass. Uneven spurs cause tear-out on one side of the hole.
- Inspect flutes for packing—sawdust buildup indicates poor chip ejection, often from dull cutting edges.
Pro tip: If the bit wobbles when spinning it in the vise, discard it immediately. Bent shanks cannot be safely sharpened and will drill oval holes.
Sharpen the Lead Screw for Reliable Self-Feeding Action
Restore the Center Point That Pulls the Bit Forward
A blunt lead screw forces you to muscle the bit into wood, causing tear-out and overheating. Follow these precision steps:
- Select a small round file matching the thread groove diameter (typically 1/8″ for 3/8″–1/2″ bits).
- Insert the file into the thread spiral, aligning it with the existing thread angle (approximately 20°).
- File only the leading edge of each thread using 3–5 light strokes per revolution. Never file the trailing edge—it destroys the self-feeding geometry.
- Rotate the bit 90° and repeat until all quadrants feel uniformly sharp. Test by gently pressing the tip into scrap wood—it should bite immediately without slipping.
Warning: Over-filing rounds the screw tip, eliminating self-feeding. Stop when the point pierces wood fibers cleanly. If threads are stripped, replacement is the only solution.
Perfect the Cutting Lips to Shear Wood Fibers Cleanly
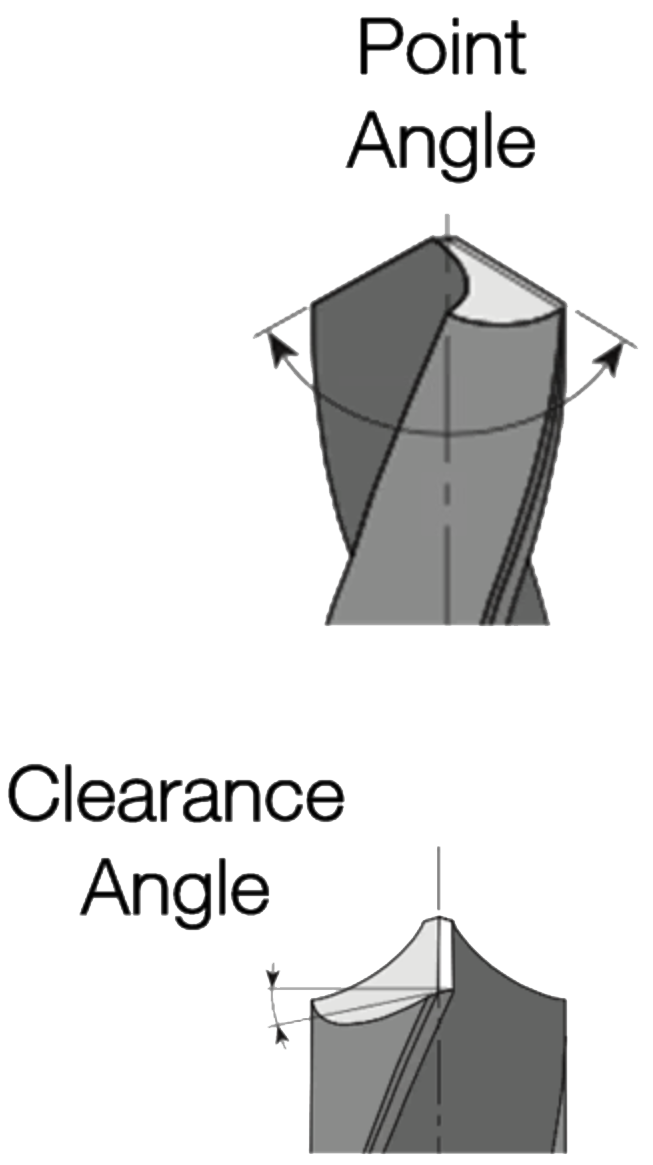
Maintain the Critical 25–30° Bevel Angle
The cutting lips (chisel edges) do 80% of the work. Incorrect angles cause burning or poor chip formation. Here’s the foolproof technique:
- Position the bit horizontally in your vise with the cutting lip facing up.
- Lay your fine flat file perfectly flat on the lip’s top surface—this preserves the factory bevel.
- File away from the cutting edge using 5–7 consistent strokes per lip. Count strokes to ensure both lips receive equal treatment.
- Check sharpness by holding the bit toward light—the edge should reflect no light when properly sharpened.
Key insight: Hardwoods require a steeper 30–35° angle for durability, while softwoods cut best at 20–25°. Match your original bit’s angle—never guess. If the lip’s bevel looks uneven, use your mill bastard file first to re-establish symmetry before fine-tuning.
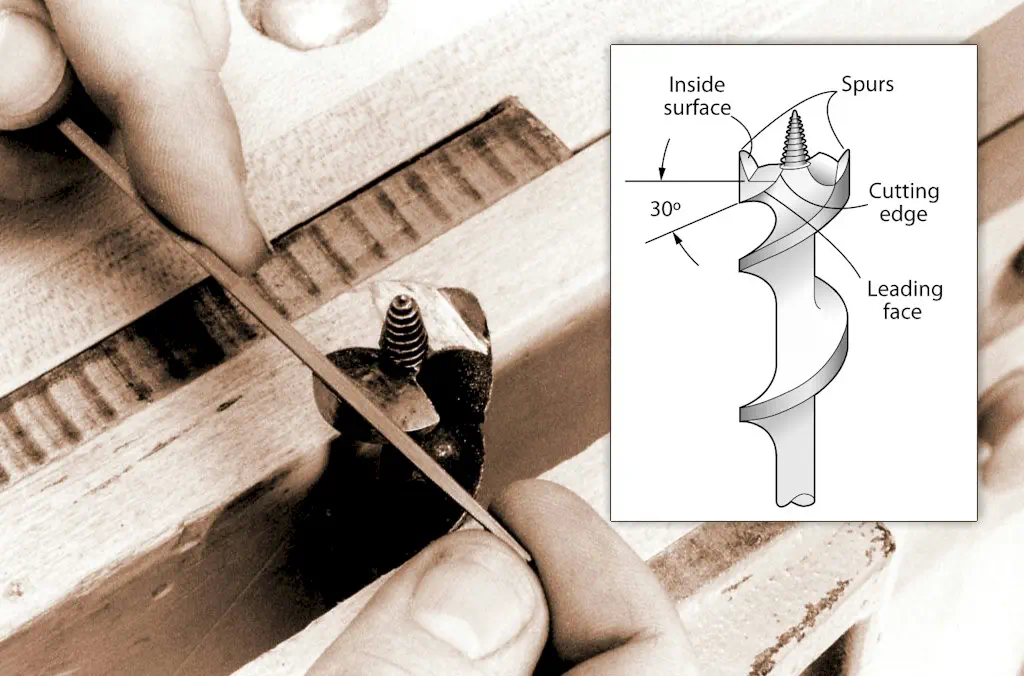
Sharpen the Spurs to Eliminate Hole Tear-Out
Create Sharp Points That Score Wood Fibers
Dull spurs cause ragged hole edges by tearing rather than cutting wood fibers. Revive them with surgical precision:
- Isolate one spur by rotating the bit in your vise.
- Use a sharpening stone or fine needle file on the inside curve of the spur only. The outside edge must remain untouched to maintain clearance.
- Maintain the original curved profile—file in the direction of the curve using feather-light pressure.
- Repeat on the opposite spur with identical stroke counts. Test symmetry by comparing both spurs under magnification.
Why this matters: Spurs must protrude 1/32″ beyond the cutting lips to score the hole perimeter before the lip shears it out. Over-sharpening reduces this critical offset, causing tear-out. Stop when the spur tip cleanly pierces paper.
Dress the Flutes for Efficient Chip Removal
Clear Nicks That Cause Binding and Overheating
Clogged flutes force you to withdraw the bit repeatedly, worsening hole quality. Smooth them with 30-second maintenance:
- Insert a small round file into the flute spiral.
- Gently follow the flute’s curve to remove burrs—use 2–3 strokes max per section.
- Wipe with emery cloth for final polishing. Shiny flutes eject chips faster.
Note: Never reshape the flute geometry. This step only removes debris-causing imperfections. If flutes are severely packed, clean them with a wire brush before sharpening.
Test Your Sharpened Auger Bit on Scrap Wood
Validate Performance Before Critical Projects
Don’t assume sharpness—prove it with these tests:
- Self-feeding test: Apply minimal downward pressure. A sharp bit should pull itself in within 2 rotations.
- Chip inspection: Look for continuous spiral shavings—not fine dust (sign of dullness).
- Hole quality check: The exit hole should show no tear-out, and walls must feel smooth to the touch.
- Temperature test: Drill for 10 seconds. The bit should remain cool enough to touch—overheating means incorrect angles.
Redo immediately if: The bit wanders on startup (lead screw issue) or produces uneven chips (asymmetric lips).
Prevent Rust with Proper Auger Bit Storage Techniques
Extend Bit Life After Every Sharpening Session
Post-sharpening care prevents rapid dulling:
- Wipe with a cloth dampened in mineral spirits to remove metal particles.
- Apply a light coat of 3-in-1 oil to cutting edges and flutes—never use WD-40 (it attracts dust).
- Store vertically in a dedicated bit rack with foam separators to protect spurs.
- Never toss bits loosely into toolboxes—contact with other metal chips the delicate edges.
Pro tip: Place silica gel packets in your bit case to combat humidity. Rust on flutes increases friction, accelerating dulling during use.
When to Replace Your Auger Drill Bit for Good
Recognize Irreparable Damage Before Wasting Time
Sharpening has limits. Replace bits showing:
- Excessive shortening: After 5–6 sharpenings, the cutting lips become too short to clear the hole, causing binding.
- Bent lead screws: Attempting to straighten them weakens the metal, leading to breakage.
- Cracks at the shank-flute junction: Visible under magnification, these worsen with each use.
- Asymmetric wear: If one spur is significantly shorter, rebalancing requires removing too much material.
Cost analysis: A $35 bit sharpened 8 times costs $4.38 per use. Replacement becomes economical when sharpening takes longer than 15 minutes with diminishing results.
A razor-sharp auger bit transforms your drilling experience—reducing physical strain while delivering camera-ready holes. By mastering these hand-sharpening techniques, you’ll extend each bit’s life 5–8× beyond its factory lifespan. Remember: the lead screw must bite instantly, spurs should score cleanly, and cutting lips need mirror-smooth edges. Test every sharpened bit on scrap wood before critical projects, and always store bits coated in light oil. Within minutes, you’ll drill faster, cooler, and with professional precision. For severely damaged bits or high-volume needs, professional sharpening services restore geometry with precision grinders—but for most DIYers, these hand methods deliver flawless results every time. Keep your auger bits sharp, and they’ll repay you with years of splinter-free performance.


