
You’ve just unboxed your first microscope, eager to see what’s hiding in a drop of pond water or the cells in an onion peel. But where do you start? With so many knobs, lenses, and terms like “100x oil immersion,” it’s easy to feel overwhelmed. The good news: anyone can master microscopy with the right foundation. This beginner-friendly guide cuts through the jargon and gives you everything you need to confidently choose, use, and maintain a microscope—starting today.
Microscopes reveal a hidden universe invisible to the naked eye, from living bacteria and cheek cells to intricate insect wings and mineral crystals. Whether you’re a student, parent, hobbyist, or curious learner, understanding how microscopes work and how to use them properly transforms casual viewing into real discovery. In this guide, you’ll learn the differences between compound and stereo microscopes, how to set up your scope, prepare slides, troubleshoot common problems, and avoid costly mistakes—like using coarse focus at high power or cleaning lenses with the wrong cloth.
Let’s dive into the world of magnification and start exploring what’s just beyond sight.
Choose the Right Microscope Type for Your Needs
Pick a Compound Microscope for Cellular Detail
If you want to see plant cells, bacteria, or blood under high magnification, a compound microscope is your best choice. These scopes use transmitted light—shining up through thin, prepared slides—to show internal structures at 40x to 1000x magnification. They’re perfect for biology labs, school projects, or studying pond life.
Compound microscopes deliver sharp, two-dimensional images and typically come with multiple objective lenses: 4x (scanning), 10x (low power), 40x (high dry), and 100x (oil immersion). The 100x lens requires immersion oil to reduce light refraction and increase resolution. Because compound scopes invert the image, moving the slide right makes the image move left—this is normal and expected.
Be cautious of models advertising “2500x” magnification. True optical limits cap useful magnification at around 1500x. Higher claims usually rely on digital zoom, not optical clarity, and won’t reveal more detail.
Use a Stereo Microscope for 3D Inspection of Larger Objects
Need to examine a bug, coin, circuit board, or rock? A stereo microscope gives you a three-dimensional, upright view at lower magnification (10x–100x). Unlike compound scopes, stereo models use top-mounted lighting to reflect off surfaces, making them ideal for opaque, solid objects.
These scopes offer a long working distance—plenty of space under the lens for tweezers or tools. That’s why they’re also called dissection or inspection microscopes. Many have zoom features, letting you smoothly adjust magnification like a camera lens.
For beginners exploring everyday items or doing small repairs, a stereo scope is intuitive, forgiving, and instantly rewarding.
Know When to Consider Other Microscope Types
While compound and stereo scopes cover most beginner needs, other types exist for specialized uses:
- Inverted microscopes: View live cells in petri dishes (light from below, lenses above)
- Metallurgical microscopes: Inspect metal surfaces with reflected light only
- Digital microscopes: Output images to a screen—great for classrooms or sharing
- Foldscopes: Paper-based, portable, and ultra-affordable for field use
- Electron microscopes: Reveal viruses and subcellular structures—but cost tens of thousands and aren’t for beginners
Stick with compound or stereo models to start. You can always upgrade later.
Understand Key Microscope Parts and Their Functions
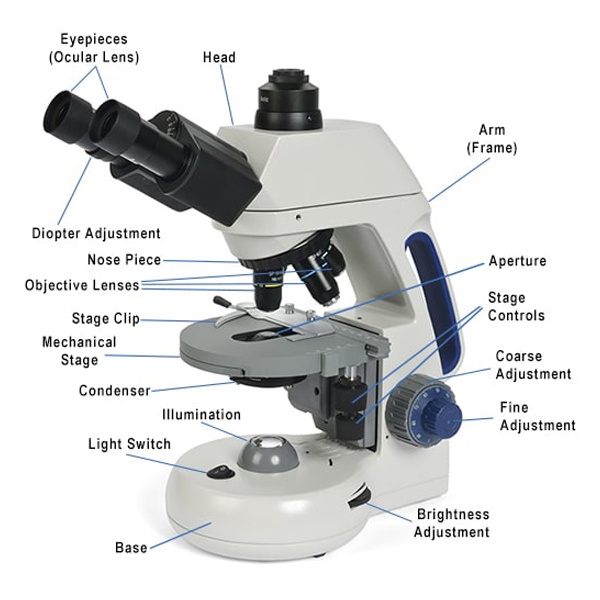
Master the Objective Lenses for Clear Imaging
The objective lenses are the heart of your microscope. Mounted on a rotating nosepiece, they come in standard magnifications: 4x (scanning), 10x (low power), 40x (high dry), and 100x (oil immersion).
Each lens has a color ring for quick identification:
– Red = 4x
– Yellow = 10x
– Blue = 40x
– White or black = 100x
Higher magnification means less depth of field and a smaller field of view. Always start with the 4x lens to find your specimen before switching to higher powers.
Look for achromatic lenses—they correct color distortion. Avoid scopes with low Numerical Aperture (N.A.) objectives; they deliver blurry images no matter how well you focus.
Use Eyepieces Correctly to Reduce Eye Strain
The eyepiece (ocular) is where you look. Most are 10x, but some go up to 20x. Never assume higher magnification is better—25x eyepieces often cause eye strain and reduce image brightness.
Binocular models let you adjust interpupillary distance to match your eyes. Many also have diopter adjustment on one eyepiece to correct vision differences between eyes.
Use both eyes when viewing. Closing one eye increases fatigue and reduces comfort during long sessions.
Adjust the Condenser and Diaphragm for Optimal Contrast
The condenser sits below the stage and focuses light through the specimen. A good condenser moves up and down via a rack-and-pinion knob, allowing precise control.
Cheap scopes often have fixed condensers—limiting your ability to optimize light and contrast. If yours is adjustable, raise it all the way up for best results.
The iris diaphragm, part of the condenser, controls how much light enters. Close it slightly to increase contrast when viewing transparent samples. Open it fully for darker or stained specimens.
Set Up Proper Illumination for Sharp Images
Your scope’s light source makes or breaks image quality. LED lighting is best: cool, long-lasting, and dimmable. Avoid halogen or tungsten bulbs—they generate heat, which can damage live specimens.
Always start with medium brightness. Too much light washes out details. Too little makes specimens hard to see.
If your scope has bottom and top lights (common in stereo models), use:
– Bottom light for transparent slides
– Top light for solid, opaque objects
Focus Without Breaking the Slide
Two focus knobs control the stage:
– Coarse focus: Moves the stage quickly. Use only with 4x and 10x objectives
– Fine focus: Makes tiny adjustments. Use for 40x and 100x
Never use coarse focus at high power. You risk crashing the lens into the slide—damaging both.
On compound scopes, turning the coarse knob raises or lowers the stage. On inverted models, the objective moves instead.
Set Up and Use Your Microscope the Right Way
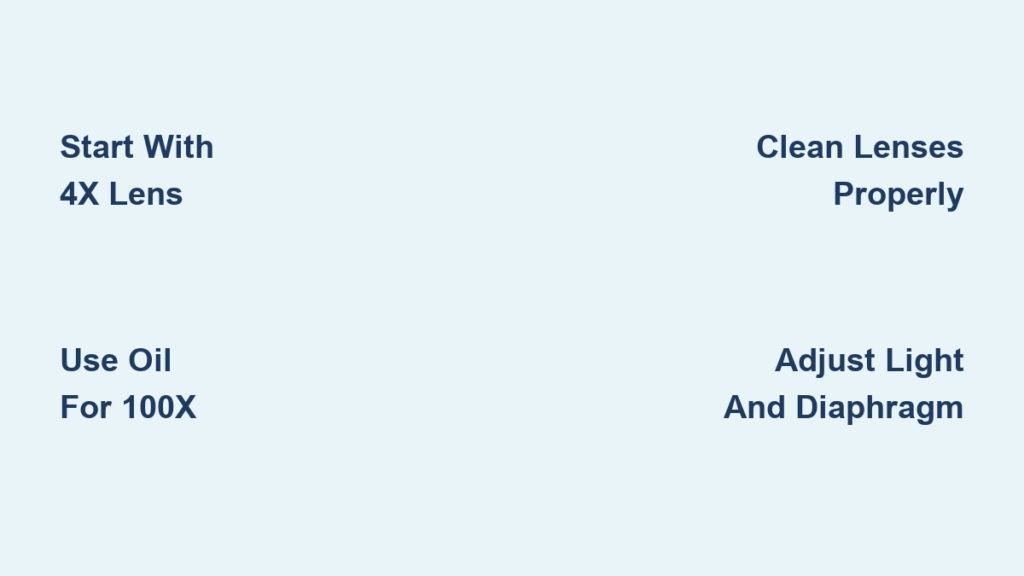
Start Every Session with the 4x Objective
Always begin your session with the 4x (scanning) objective in place. It offers the widest field of view, making it easier to locate your specimen.
Here’s why this matters: if you start at 40x, you might be staring at a blank slide, unable to find anything. The 4x lens acts like a map—helping you navigate to the right spot before zooming in.
Rotate the nosepiece until it clicks into place. You should hear and feel the alignment.
Follow a Step-by-Step Focusing Procedure
Follow this sequence every time you view a new slide:
- Raise the stage to its highest position (or lower the head, if inverted)
- Place the slide on the stage and secure it with clips
- Look from the side and lower the stage until the 4x lens is close—but not touching—the slide
- Look through the eyepiece and slowly turn the coarse focus to raise the stage until the image appears
- Use fine focus to sharpen the details
- Adjust light and diaphragm for best contrast
Once clear, center your specimen and switch to higher objectives.
Switch Objectives Safely to Avoid Damage
After focusing at 4x:
– Rotate to 10x, refocus with fine knob only
– Then to 40x, fine-focus again
– For 100x (oil immersion):
– Apply a drop of immersion oil directly on the slide
– Rotate the 100x lens into the oil
– Focus only with the fine knob
Never use coarse focus past 10x. And never let the 100x lens touch a dry slide—it’s fragile and expensive to replace.
Calculate Total Magnification Easily
Total magnification = eyepiece magnification × objective magnification
Example:
– 10x eyepiece × 40x objective = 400x total magnification
Stereo scopes with zoom:
– 10x eyepiece × 2x zoom objective = 20x
Write this down and keep it near your workspace until it becomes second nature.
Prepare and Handle Slides Like a Pro
Make Dry Mounts for Solid Samples
For non-liquid specimens like hair, dust, or fabric fibers, use a dry mount:
1. Place the sample directly on a clean slide
2. Add a coverslip if desired (protects the lens)
3. View under the microscope
No liquids needed. This is the quickest way to start exploring.
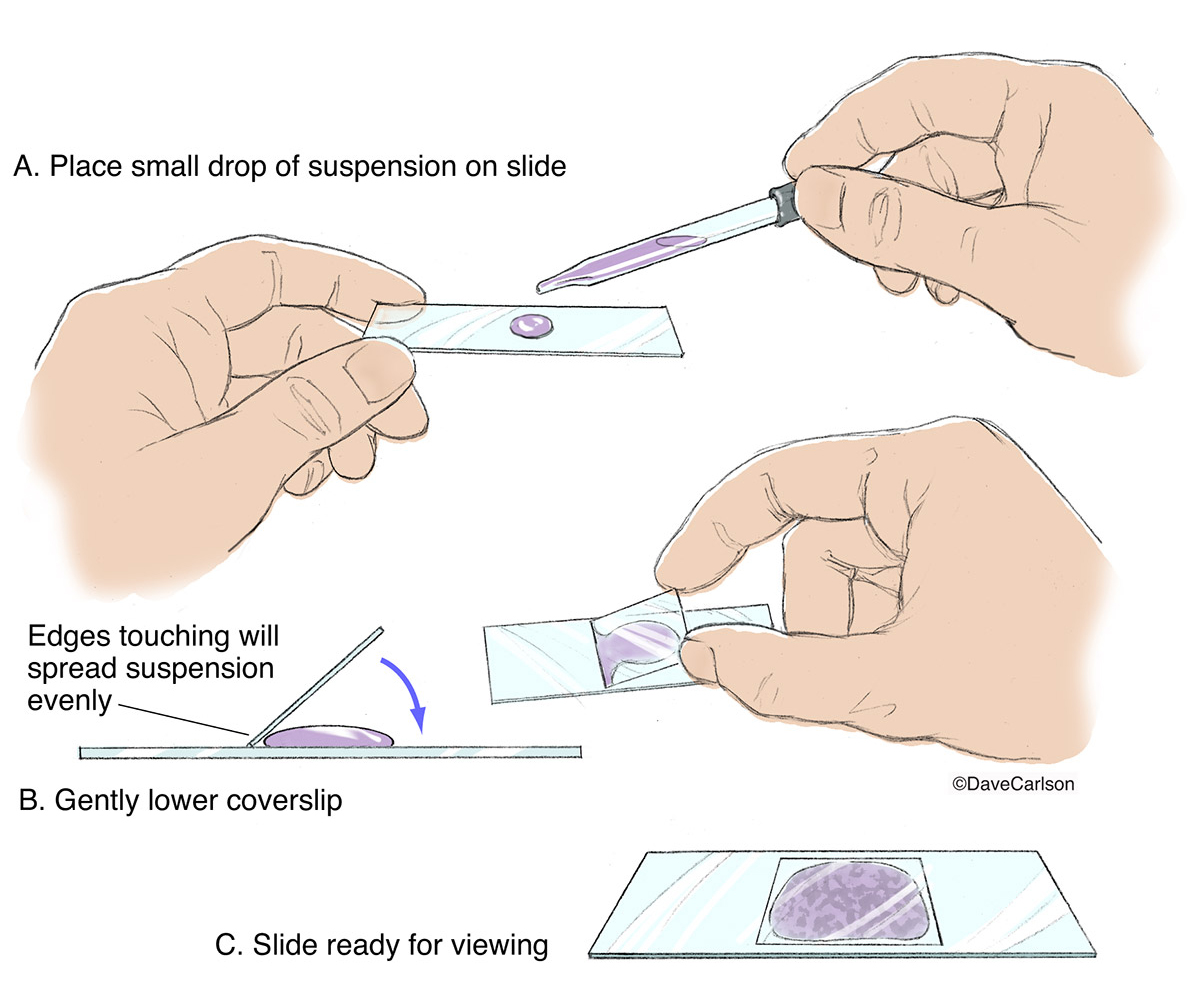
Create Wet Mounts for Live Specimens
For pond water, cheek cells, or live microorganisms, use a wet mount:
1. Place a drop of liquid on the slide
2. Hold the coverslip at a 45-degree angle
3. Gently lower it to avoid air bubbles
4. Use a paper towel to wick away excess fluid
Wet mounts let you watch movement—like paramecia swimming or cytoplasm streaming in plant cells.
Stain Specimens for Better Contrast
Clear cells are hard to see. Staining adds contrast and reveals structures:
– Methylene blue: Highlights nuclei in animal cells
– Iodine (Lugol’s solution): Shows starch in plant cells
– Eosin Y: Colors cytoplasm pink
Apply a small drop before adding the coverslip, or let it seep in from the edge using a paper towel.
Always wear gloves and avoid skin contact. Dispose of biohazardous materials properly.
Use Coverslips Properly to Protect Your Microscope
Coverslips:
– Protect the objective lens from contamination
– Flatten specimens for even focus
– Prevent drying (especially for live samples)
Use #1.5 thickness (0.17 mm) for high-magnification work. Thicker or thinner coverslips can degrade image quality at 40x and above.
Troubleshoot Common Microscope Problems Fast

Fix “No Image” Issues in Seconds
If you see darkness or nothing at all:
– Ensure the 4x objective is in place
– Check that the light is on and bright enough
– Verify the slide is centered over the light path
– Open the iris diaphragm
– Raise the stage while looking from the side
Restart the focusing process from the beginning. Most “no image” cases are solved by going back to 4x and starting over.
Clear a Blurry Image at High Power
Blurry at high power? Likely causes:
– Dirty lens: Clean with lens paper and cleaner
– No immersion oil: Required for 100x
– Wrong focus: Use only fine focus at 40x and above
– Specimen not flat: Use a proper coverslip
Never use your shirt, tissue, or cotton swab on lenses. Only use microscope lens paper and approved cleaner.
Stop Slide Movement Problems
If the slide won’t move:
– You’re not using the mechanical stage knobs
– The slide is stuck under the clips instead of on the stage
Mechanical stages let you glide the slide smoothly in X and Y directions. Manual stages require hand movement—less precise but functional.
Ensure the slide rests flat on the stage, not jammed under metal clips.
Reduce Eye Strain and Double Vision
Seeing double or feeling eye fatigue?
– Adjust interpupillary distance until you see one circle, not two
– Calibrate the diopter by focusing with one eye, then the other
– Take breaks every 10–15 minutes
Proper setup prevents headaches and makes viewing comfortable.
Maintain Your Microscope for Long-Term Use
Clean Lenses the Right Way
Fingerprints or oil on lenses ruin image quality. Clean only when necessary:
1. Blow off dust with a blower brush
2. Moisten lens paper with lens cleaning solution (never spray on lens)
3. Wipe gently in a circular motion from center outward
Never touch lenses with your fingers. Skin oils degrade anti-reflective coatings over time.
Store Safely After Every Use
Follow these shutdown steps:
– Rotate to the 4x objective
– Lower the stage to the bottom
– Turn off and unplug the light
– Wrap the cord neatly
– Cover or store in a case
This prevents dust buildup and protects the most delicate parts.
Prevent Common Damage
Avoid these mistakes:
– Using coarse focus at high power
– Letting the 100x lens touch a dry slide
– Storing with a slide on the stage
– Using household cleaners on lenses
A well-cared-for microscope lasts decades.
Capture and Share What You See
Attach a Smartphone Easily
Want to photograph your findings? The simplest way is a smartphone adapter:
– Clip it over the eyepiece
– Align your phone’s camera
– Use the phone’s zoom and focus
Many affordable holders work with any phone. Look for adjustable models with rubber grips.
Upgrade to a Microscope Camera
For better quality, use a dedicated microscope camera:
– Plugs into trinocular port or eyepiece
– Connects via USB to a computer
– Records photos and video
Software lets you measure, annotate, and stitch images for larger views.
Improve Photo Quality
Tips for sharper images:
– Use LED lighting with steady brightness
– Focus carefully with the fine knob
– Reduce room glare (turn off overhead lights)
– Capture video of moving specimens
– Use image stacking software for depth
Even basic setups can produce stunning results with practice.
Build Your Microscopy Kit and Start Exploring
Gather Essential Accessories
Start with these tools:
– Blank glass slides and coverslips
– Pipettes and eyedroppers for liquids
– Tweezers and dissecting needles
– Absorbent paper (blotting paper)
– Lens cleaning kit
– Stains: methylene blue, iodine
– Petri dishes and sample vials
Keep everything in a dedicated box for easy access.
Try Beginner-Friendly Activities
Jump into microscopy with these fun projects:
– Cheek cells: Swab inside your mouth, stain with methylene blue
– Onion cells: Peel thin layer, stain with iodine
– Pond water: Drop sample on slide, watch for paramecia
– Hair comparison: View human vs. animal hair
– Tardigrades: Soak moss in water, search for “water bears”
– Snowflakes: Catch on a chilled slide, view before melting
Each teaches you something new about focus, contrast, and specimen behavior.
Join a Microscopy Community
Connect with others:
– YouTube channels: Search “beginner microscopy” for tutorials
– Reddit (r/microscopy): Share images, ask questions
– Facebook groups: Find local hobbyists and experts
– Educational sites: Access free lesson plans and guides
Communities help you grow faster and stay inspired.
Final Note: Microscopy is a gateway to wonder. With the right start—choosing the correct scope, using proper technique, and preparing simple slides—anyone can explore a world invisible to the naked eye. Avoid marketing hype, stick to reliable methods, and let curiosity lead the way. Your journey into the microscopic universe begins now.


