
Your vintage Minolta binoculars suddenly feel unstable when adjusting eye width, or the focus wheel has turned into an immovable brick. That sinking feeling hits when your trusted optical companion—whether it’s a rugged J-835, classic ZCF, or Standard series—starts failing. These precision instruments suffer predictable age-related issues that can transform your favorite field companion into a frustrating paperweight. This Minolta binocular repair guide tackles the exact problems plaguing owners of these iconic Japanese optics, from the notorious “floppy hinge” plague to seized focus mechanisms. You’ll learn which repairs you can safely DIY with basic tools, when to call a specialist, and whether fixing your vintage pair makes financial sense.
Essential Tools and Safety Steps Before Minolta Binocular Repair

Skipping proper preparation risks permanent damage to delicate internal optics. Before touching a single screw, gather these specialized tools and set up your workspace correctly.
Must-Have Tools for Minolta Repairs:
– JIS Precision Screwdrivers (Not Phillips!): Minolta’s Japanese manufacturing requires Japanese Industrial Standard (JIS) drivers. Standard Phillips bits will strip screw heads instantly—especially critical for the central hinge screw on J-Series models. A #000 or #00 JIS bit is essential.
– Multi-Arm Spanner Wrench: Needed for objective lens cells and internal retaining rings. Regular pliers will scar soft aluminum housings.
– Optical Cleaning Kit: Use a blower bulb and anti-static brush before applying lens tissue with optical-grade cleaner (isopropyl alcohol only—never acetone on cemented elements).
– Specialized Lubricants: High-viscosity silicone grease (like Molykote 44) for helicoid threads and light instrument oil for pivot points. Avoid petroleum-based greases that attract dust.
Critical Workspace Setup:
Work on a non-slip mat under bright, shadow-free lighting. Organize screws in a segmented tray labeled by disassembly step. Take reference photos before removing each component—prism orientation mistakes cause irreversible collimation issues. Always wear nitrile gloves to prevent skin oils from etching lens coatings. Never work on carpeted surfaces where static electricity can damage optical coatings.
Diagnosing Your Minolta’s Specific Failure Symptoms
Accurate diagnosis prevents unnecessary disassembly. Match your symptoms to these common Minolta failure patterns:
Why Your Minolta Hinge Feels Loose or “Floppy” When Adjusting Eye Width
This classic failure—especially on 8×32 J-835 and 9×35 J-835 models—occurs when the central hinge’s Belleville washers lose tension or the friction spring deforms. Test by gently squeezing the barrels together while adjusting interpupillary distance. If the hinge collapses without resistance, the internal tension mechanism has failed. DIY viability: Beginner-friendly fix if only minor screw tightening is needed.
Stiff or Seized Focus Wheel: Hardened Grease Alert
When turning the focus wheel requires excessive force or produces gritty resistance, hardened factory grease has gummed up the helicoid threads. This is universal across ZCF series and Standard models. Check for uneven resistance—if it sticks in one position but moves freely elsewhere, grit has contaminated the mechanism. DIY viability: Intermediate repair requiring full focus assembly disassembly.
Double Vision or Unmergable Images: Collimation Failure
If you see two overlapping images or experience severe eye strain, the prisms are misaligned. This often stems from impacts to Porro prism models like the 7×50 ZCF. Critical warning: Do not attempt DIY fixes—improper adjustment permanently ruins optical alignment. Professional only.
Internal Fungus or Haze on Optics
Yellowish spots or cloudy patches visible through the eyepiece indicate internal fungal growth, common in humid climates. On Minolta Standard series, this often appears near the prism cement lines. If the haze remains after external cleaning, moisture has breached the seals. DIY viability: Advanced repair only for accessible lens surfaces—prism fungus requires professional disassembly.
Step-by-Step Minolta Binocular Repair Procedures
Tighten Your Minolta’s Floppy Hinge in 3 Minutes Flat
This is the most common DIY repair for J-Series models suffering from unstable eye width adjustment.
- Locate the Hidden Tension Screw: Peel back the rubber armor at the central hinge pivot point. On most Minoltas, a single large screw sits beneath a rubber cap—often near the focus wheel housing.
- Apply Precise Tightening: Insert your JIS screwdriver and turn clockwise in 15-degree increments. Test hinge tension after each quarter-turn. Stop immediately if resistance increases—over-tightening cracks the magnesium housing.
- Troubleshoot Stripped Screws: If the screw spins freely, the internal spring washer is broken. You’ll need to disassemble the hinge (advanced) or source a replacement tension spring from donor binoculars.
Fix a Seized Minolta Focus Wheel Without Professional Help

Restore smooth focusing to ZCF and Standard series models by cleaning and re-lubricating the helicoid mechanism.
- Disassemble the Housing: Carefully remove rubber armor to expose chassis screws. Note screw lengths—shorter screws typically secure the hinge assembly. Lift the chassis halves apart to reveal the focus gear mechanism.
- Clean Degraded Lubricant: Dab hardened grease from helicoid threads using isopropyl-soaked cotton swabs. For stubborn deposits, use a wooden toothpick to avoid scratching metal threads. Never use metal tools near optical surfaces.
- Re-lubricate Strategically: Apply a rice-grain-sized dab of high-viscosity silicone grease to the focus shaft threads. Rotate the focus wheel to distribute evenly—excess grease attracts dust. Reassemble while testing smoothness after each step.
Safely Clean Internal Minolta Lenses (Advanced)
Only attempt this if fungus is visible on accessible lens surfaces—not on prisms.
- Document Every Component: Photograph prism orientations before removal. Porro prisms (in ZCF models) have precise angular alignments—reversing them causes total optical failure.
- Clean Accessible Surfaces Only: Use the blower bulb first, then a soft brush in one direction only. For stubborn fungus, apply lens cleaner to tissue—not directly on optics—and wipe radially from center outward.
- Critical Prism Warning: Never touch roof edges on Porro prisms—the micro-ridged surface is easily damaged. If haze appears between cemented prism layers, professional recementing is required.
Why Collimation Requires Professional Minolta Binocular Repair
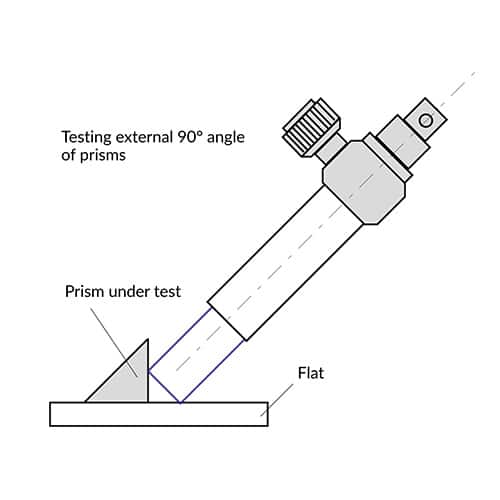
That double-vision problem? Don’t reach for the screwdriver. Collimation demands specialized equipment most hobbyists lack:
- The 3-Stage Professional Process: Technicians use an autocollimator to mechanically align barrels, then adjust prism set screws while viewing a 30m+ target until images merge perfectly. Final verification requires extended viewing tests.
- Why DIY Fails: Minolta’s prism alignment tolerances are sub-millimeter. One misadjusted screw creates permanent image doubling. On ZCF models, internal shims require microscopic thickness adjustments impossible without calibration tools.
- Cost Reality: Professional collimation costs $100-$250—often exceeding the $50-$150 market value of common vintage Minoltas unless it’s a rare 7×50 IF model.
When to Skip Minolta Binocular Repair and Call a Professional
Stop immediately if you encounter these red flags during diagnosis:
– Visible double vision indicating prism misalignment
– Broken focus mechanism gears (common in abused J-835 models)
– Fungus growing between cemented prism layers
– Any internal lens coating damage or etching
These require optical workshop conditions—dust-free environments, collimation telescopes, and prism alignment jigs. Attempting repairs without these tools turns a $100 binocular into $0 scrap.
Is Repairing Vintage Minolta Binoculars Worth the Cost?
Before investing time or money, run this cost-benefit analysis:
DIY Repair Value:
Tightening a floppy hinge or cleaning focus grease costs nothing beyond basic tools. For common models like the Standard 7×50, these fixes add years of use for under $20 in lubricants. Always start with these low-risk repairs.
Professional Repair Economics:
– Full service (collimation + focus repair + resealing): $150-$250
– Collimation only: $100-$180
– Compare to current market value:
• Standard J-835: $60-$120
• ZCF 10×50: $80-$150
• Rare 7×50 IF: $200-$400
Repair Only Makes Sense If:
1. You own a high-end model like the multi-coated 7×50 IF
2. The binoculars have sentimental value (e.g., military-issue)
3. You’re restoring as a hobby—not for functional use
For most vintage Minoltas, a $100 professional repair exceeds the instrument’s market value. However, that satisfying click when your DIY hinge fix stabilizes the barrels? Priceless. Focus on simple tension adjustments and focus mechanism cleaning—these deliver 90% of the usability restoration with minimal risk. When double vision strikes or internal fungus spreads, respectfully retire your Minolta to the display shelf and invest in modern optics with better warranties.


