
You’ve experienced it before: excitedly unpacking new binoculars only to discover blurry edges, frustrating hand shake, or a field of view too narrow to track that elusive warbler. A poor binocular purchase can ruin your birding trip, hunting expedition, or stargazing session. This binocular purchase guide cuts through the marketing jargon to give you the exact specifications and features you need for your specific activity—whether you’re scanning for birds at dawn, tracking game across open fields, or following fast-paced sports action. By the end of this guide, you’ll know precisely which magnification, lens size, and optical features will deliver crisp, bright images for your intended use.
Why 8×42 Binoculars Provide the Perfect Balance for Most Outdoor Activities
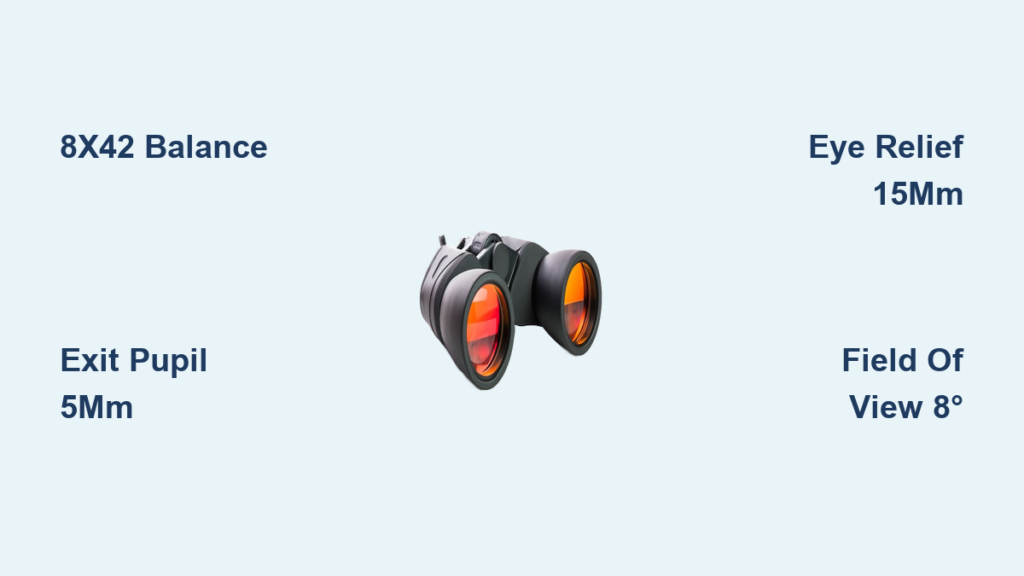
When you’re overwhelmed by choices at the optics counter, reach for an 8×42 model first—it’s the sweet spot for 90% of outdoor enthusiasts. These binoculars deliver a stable image even with less-than-perfect technique, making them ideal for extended viewing sessions where fatigue sets in. Unlike higher magnification models that amplify every hand tremor, 8x power keeps your subject steady while providing enough “reach” for most wildlife observation.
How Magnification Impacts Stability: Why 8x Beats 10x for Handheld Use
Don’t fall for the magnification trap—higher numbers aren’t automatically better for handheld viewing. While 10x binoculars bring subjects 25% closer than 8x models, they also magnify hand shake by 25%, creating a frustratingly shaky image that makes tracking moving subjects difficult. For most adults without rock-steady hands or a tripod, 8x represents the practical limit for comfortable handheld use. If you insist on 10x power, expect to spend significantly more on image-stabilized models or accept that you’ll need to brace against a tree or rest your elbows on your knees for a clear view.
Objective Lens Size: Why 42mm Outperforms 50mm for Daily Field Use
Larger objective lenses (the front lenses) gather more light, but that 50mm model adds nearly 30% more weight than its 42mm counterpart. For all-day carrying during hikes or birding expeditions, the 42mm size strikes the ideal balance between light-gathering capability and portability. The difference in low-light performance between 42mm and 50mm is noticeable only during the final minutes of twilight—when most users have already packed up anyway. Unless you’re exclusively observing in extremely low light (like deep-forest birding at dawn), the 42mm size delivers superior comfort without sacrificing meaningful optical performance.
How to Calculate Your Perfect Exit Pupil Size for Low-Light Conditions
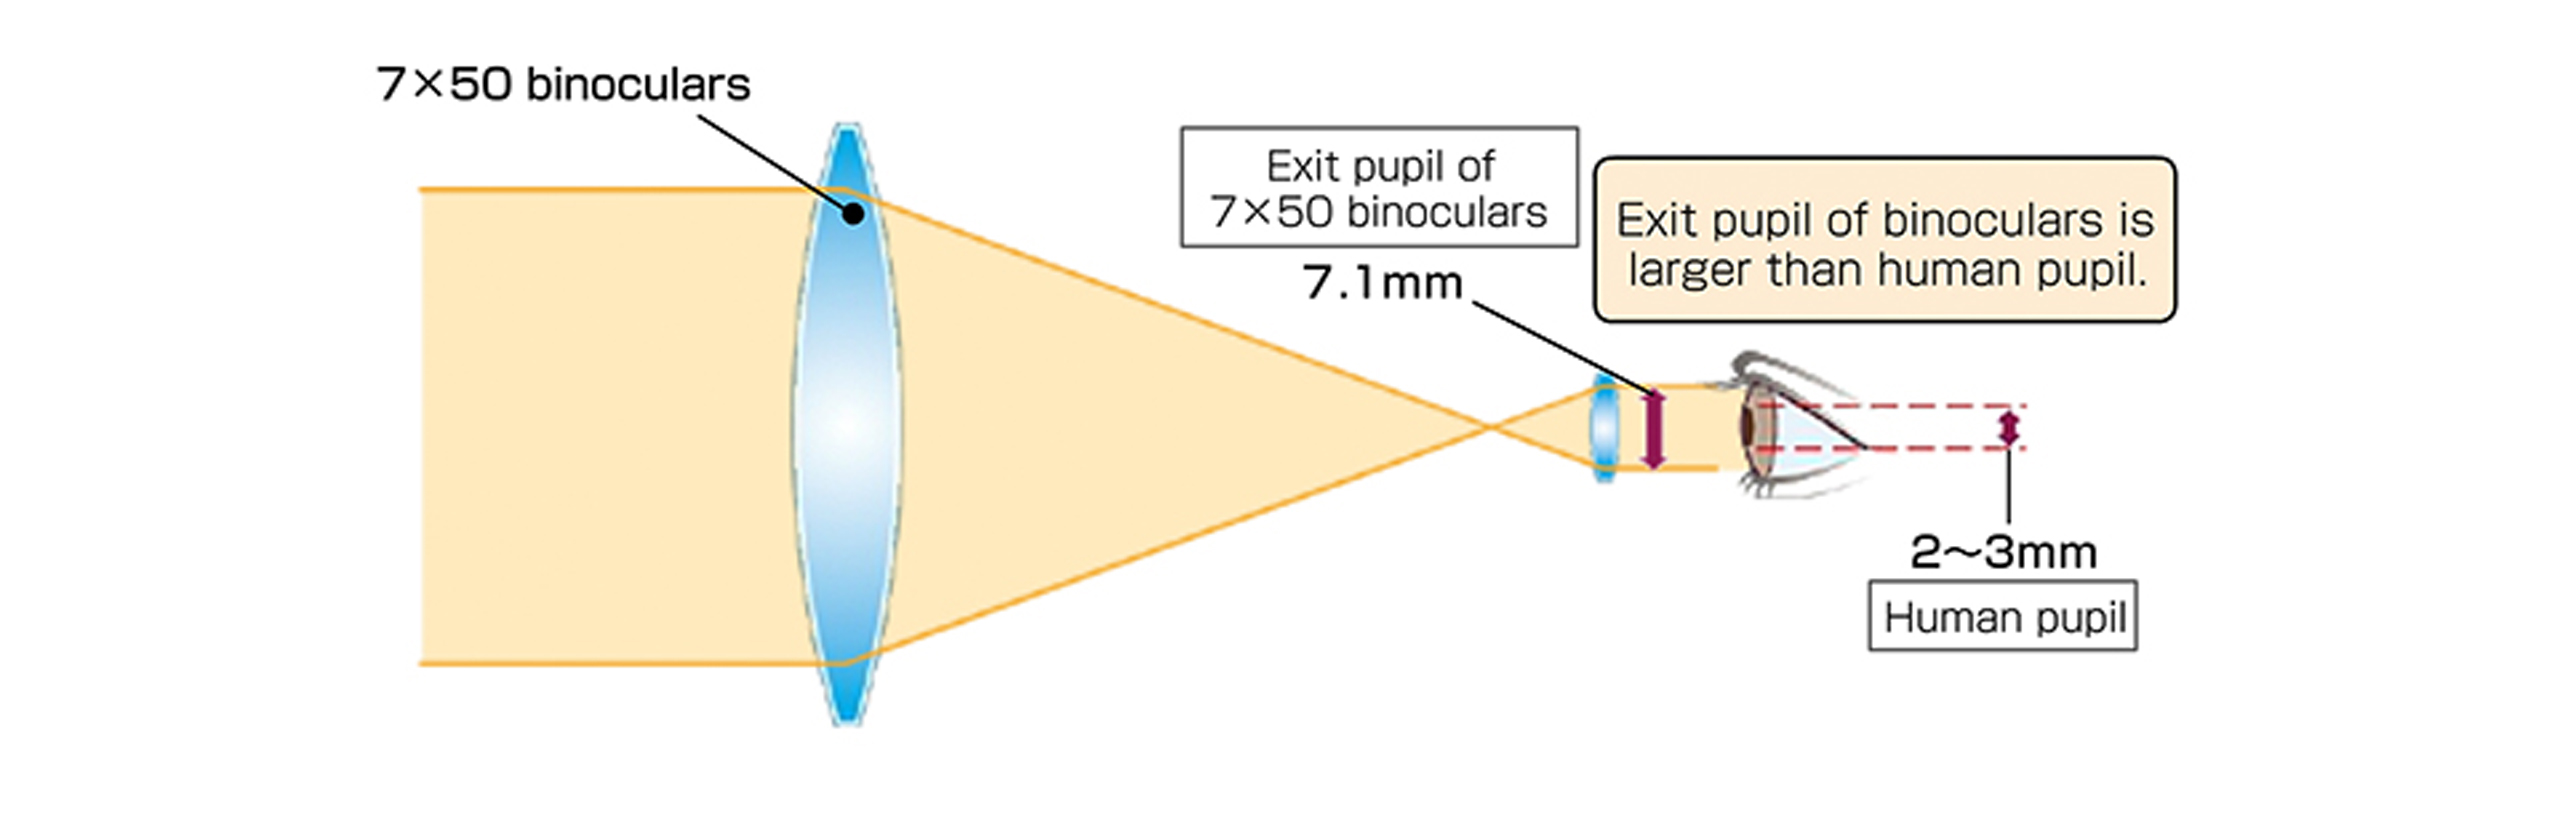
Your exit pupil size determines how bright your binocular image appears in challenging light. Calculate it simply: divide the objective lens diameter by the magnification (42 ÷ 8 = 5.25mm). This number represents the diameter of the light circle entering your eye. Understanding this specification prevents frustrating dim views during dawn or dusk observation when your pupils have dilated to 5-7mm.
Why 5mm Exit Pupil Is Your Low-Light Sweet Spot
When your pupils dilate to 5mm in low light, a binocular with a 5mm exit pupil delivers maximum brightness. Larger exit pupils (like the 7mm from 7×50 binoculars) waste light because your pupils can’t open wide enough to use it all. Smaller exit pupils (3.3mm from 10×32 models) deliver dimmer images that strain your eyes. For versatile performance across lighting conditions, target an exit pupil between 4-5mm—this means 8×42 (5mm), 10×42 (4.2mm), or 7×35 (5mm) configurations will serve most users best.
Birding Binoculars vs. Hunting Binoculars: 4 Critical Differences You Can’t Ignore

The perfect binoculars for spotting songbirds in dense foliage differ significantly from those needed for glassing open terrain for big game. Understanding these differences prevents costly mistakes that could ruin your next expedition.
Field of View Requirements for Tracking Moving Birds vs. Stationary Game
Birders need wide fields of view (8°+) to track fast-moving subjects through branches, while hunters benefit from narrower fields that provide more magnification for distant identification. Look for specifications like “420 feet at 1000 yards” or “7.5°” in the product details—higher numbers mean wider views. For serious birding, prioritize models with 8°+ apparent field of view; hunters targeting distant game can accept narrower 6-7° fields for the extra magnification.
Close Focus Distance: Why Birders Need 6 Feet While Hunters Need 20+
If you’ve ever tried to observe a butterfly or detailed flower up close, you know why close focus matters. Most hunting binoculars focus no closer than 15-20 feet—perfect for distant game but useless for close-up nature study. Dedicated birding models often focus as close as 4-6 feet, letting you examine plumage details without disturbing your subject. Check this specification carefully if you plan to observe insects, flowers, or other nearby subjects.
The Critical 15mm Eye Relief Minimum for Eyeglass Wearers
If you wear glasses, ignore this specification at your peril—insufficient eye relief forces you to remove your glasses or see only a “kidney bean” view through the eyepieces. Eye relief measures how far your eye can be from the eyepiece while still seeing the full field of view. Most quality binoculars provide 15-18mm, but premium models reach 20-22mm for comfortable viewing with thick lenses.
How to Test Eye Relief Before You Buy: The Eyeglass Wearer’s Checklist
When testing binoculars with your glasses on:
1. Position your eyes at normal viewing distance
2. Look for the full circular field of view—no dark crescents at the edges
3. Adjust the twist-up eyecups to their highest position
4. Check if you can maintain this position comfortably for 30 seconds
5. Verify the focus remains sharp across the entire field
If you see dark edges or must press the eyecups uncomfortably against your glasses, the eye relief is insufficient for your needs.
Budget Binoculars That Deliver Premium Performance Under $200
You don’t need to mortgage your house for decent optics. Several entry-level models deliver surprisingly good performance for beginners or casual users who don’t need cutting-edge technology.
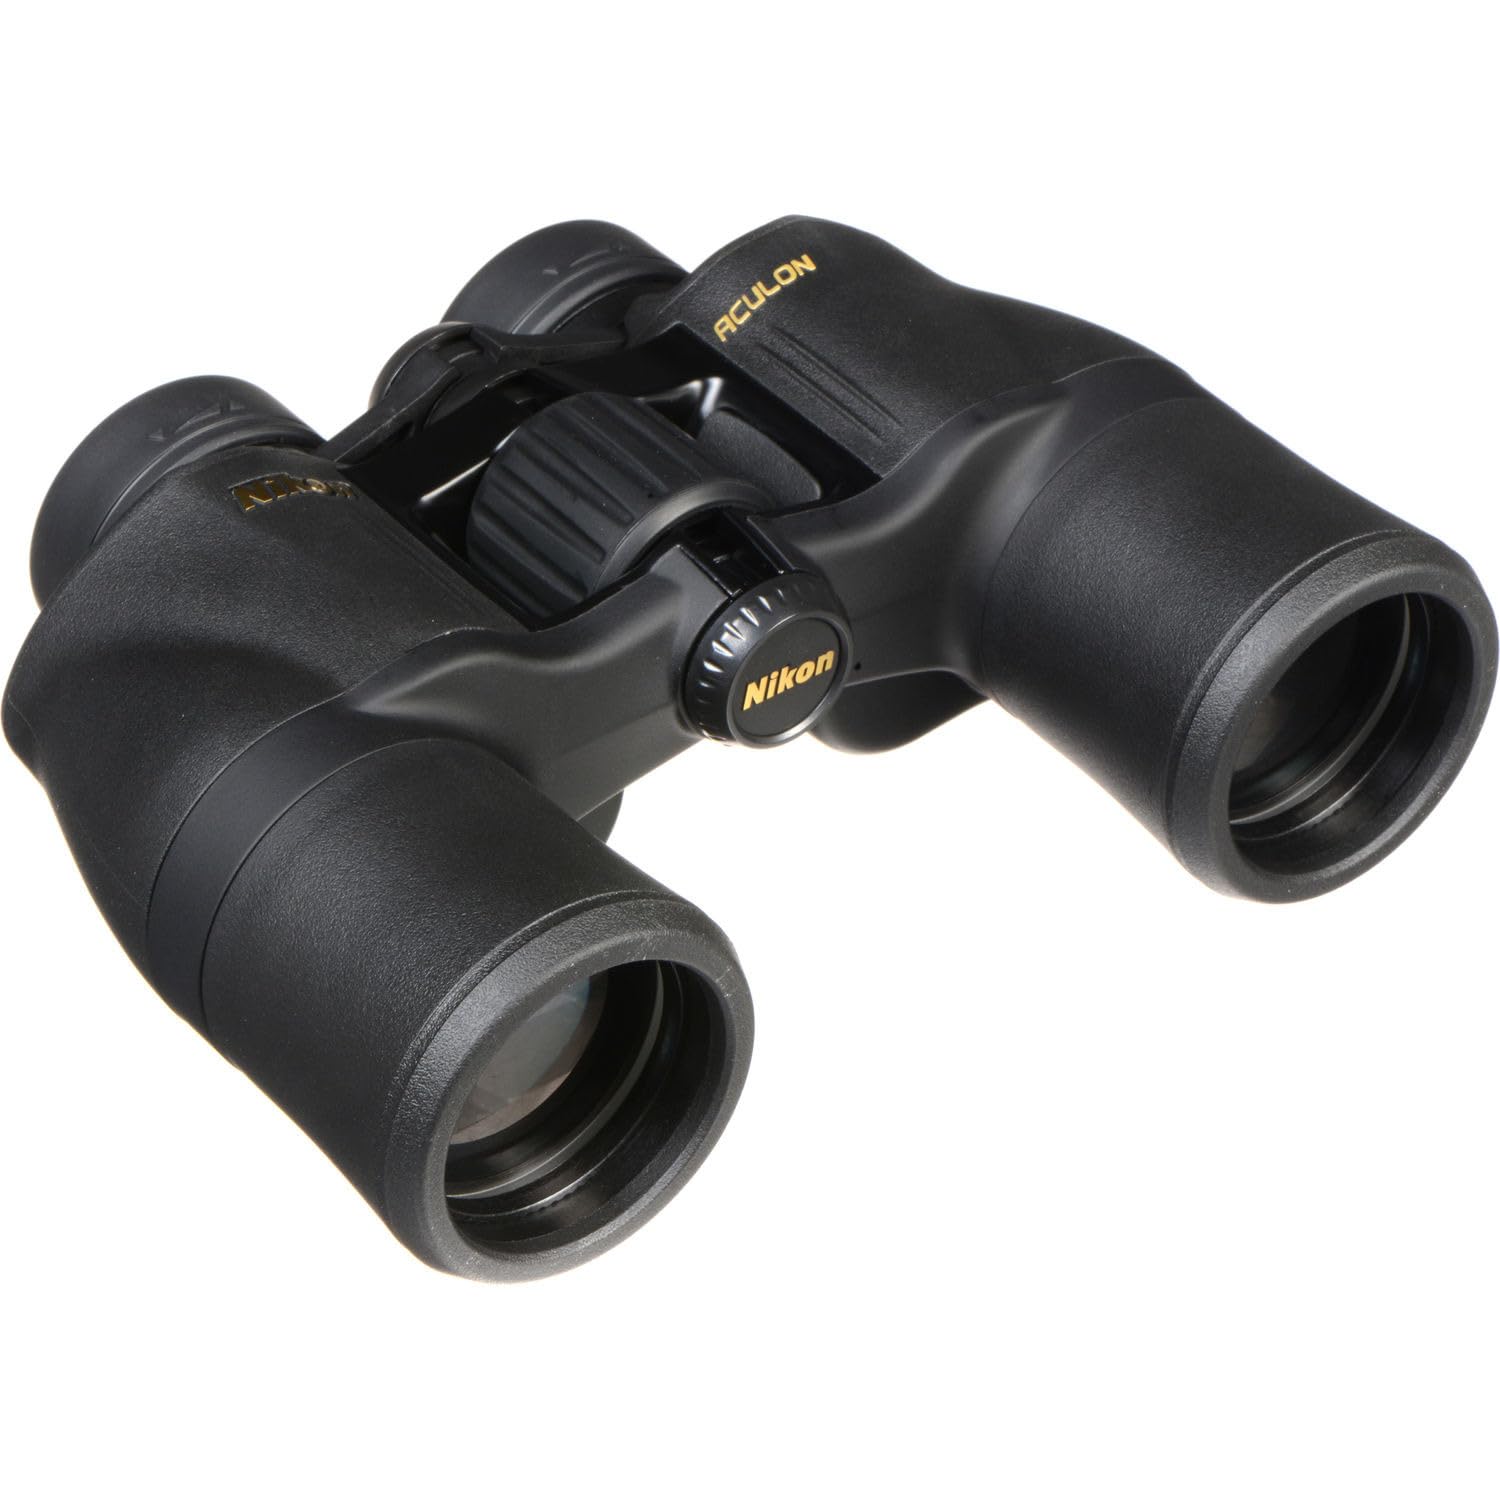
Nikon Aculon A211 8×42: Best Value for Serious Beginners
This under-$150 model punches above its weight with fully multi-coated optics and phase-corrected roof prisms—features typically found in more expensive binoculars. The 8.5° field of view provides excellent situational awareness for birding, while the 17.3mm eye relief accommodates most eyeglass wearers. The real value lies in its durability—O-ring sealed and nitrogen-purged construction withstands rain and humidity better than many competitors in this price range.
Why Fully Multi-Coated Optics Matter More Than Brand Name
Don’t get distracted by fancy marketing terms—look for “fully multi-coated” in the specifications. This means multiple anti-reflective coatings on all air-to-glass surfaces, boosting light transmission to 85-90% compared to basic coated optics at 70-80%. Higher light transmission delivers brighter images with better contrast, especially in low-light conditions. For under $200, prioritize this feature over brand recognition—it makes a far more noticeable difference in real-world performance.
The 5-Minute In-Store Test That Reveals True Binocular Quality
Before handing over your credit card, perform these critical checks that most shoppers skip. These simple tests expose optical flaws that specifications alone can’t reveal.
Step 1: The Edge-to-Edge Sharpness Check
Find a detailed scene with fine lines (newspaper text works well) at 50-100 feet:
1. Focus on the center of the image
2. Slowly scan to the edges without refocusing
3. Note where sharpness degrades
4. Premium binoculars maintain 80%+ sharpness to 80% of the field edge
5. Budget models often show significant softening in the outer 20%
If the corners look noticeably blurry while the center remains sharp, you’re looking at field curvature—a common flaw in lower-quality optics.
Step 2: The High-Contrast Edge Test for Chromatic Aberration
Look at a dark object against a bright background (like a telephone wire against the sky):
1. Focus carefully on the edge
2. Watch for purple or green fringes along the boundary
3. Premium ED (extra-low dispersion) glass virtually eliminates this
4. Budget models often show noticeable color fringing
Chromatic aberration becomes particularly problematic in high-contrast situations like dawn or dusk viewing—exactly when you need optimal performance.
When to Spend More: Premium Features Worth the Investment

Certain activities justify stepping up to mid-range or premium models. Know which features deliver real-world benefits versus marketing hype.
Why ED Glass Eliminates Color Fringing in High-Contrast Situations
Extra-low dispersion (ED) glass reduces chromatic aberration—the colored fringes that appear around high-contrast edges. This matters most when viewing birds against bright skies or animals at sunrise/sunset. While you’ll pay 30-50% more for ED glass, the improvement in image clarity during critical low-light periods makes it worthwhile for serious birders and hunters. Look for this feature if you regularly observe in challenging lighting conditions.
Phase-Corrected Roof Prisms vs. Porro: The Real Performance Difference
Roof prism binoculars (straight-barrel design) require phase-correction coatings to match Porro prism optical performance. Without this coating, roof prism models lose resolution and contrast. All quality roof prism binoculars now include phase correction, but it’s worth verifying in specifications. Porro prism models (offset barrels) often provide better depth perception and slightly wider fields at lower prices but are bulkier and less durable.
Final Checklist: Your Binocular Purchase Decision Framework
Before finalizing your purchase, run through this quick checklist:
– Primary use case matches magnification/lens size (8×42 for general use)
– Exit pupil between 4-5mm for versatile light performance
– Eye relief ≥15mm if you wear glasses
– Field of view ≥8° for birding/moving subjects
– Fully multi-coated optics as minimum standard
– O-ring sealed and nitrogen purged for weather resistance
– Weight comfortable for all-day carrying
By following this binocular purchase guide, you’ll avoid common pitfalls that lead to disappointing purchases. Remember, the best binoculars are the ones you’ll actually use consistently—prioritize comfort and suitability for your specific needs over maximum specifications. Whether you’re starting with an entry-level Nikon Aculon or investing in premium Swarovski optics, understanding these fundamentals ensures you get exactly what you need for clear, bright views on your next adventure.


