
You’re scanning a distant ridge for elk at dawn, but the image looks like a watercolor painting left in the rain. Or maybe you’re straining to read a ship’s nameplate across the harbor, your eyes burning after minutes of futile adjustment. This frustrating blur isn’t your binoculars’ fault—it’s almost always improper focusing. How to focus a binocular correctly transforms mediocre optics into crystal-clear vision, whether you’re tracking a hummingbird’s wings or stargazing. The secret lies in mastering two simple adjustments most users ignore. In just 90 seconds, you’ll learn the exact calibration process that eliminates eye strain and unlocks true optical performance. Forget guessing—this guide delivers the precise steps to achieve razor-sharp focus every time you lift your binoculars.
Blurry views waste precious moments during wildlife encounters and turn astronomy into an eyeache. Yet 90% of focus issues stem from skipping one critical setup step. Your eyes aren’t identical—one often needs slight correction, like wearing different prescription lenses. Binoculars account for this through a simple calibration you’ll do just once. Combined with proper eye alignment, this routine turns frustrating fumbling into instant clarity. By the end of this guide, you’ll diagnose focus problems in seconds and adapt your technique for fast-moving birds or distant stars. Let’s cut through the confusion and get you seeing the world in stunning detail.
Pre-Focus Setup: Adjust Your Binoculars for Your Eyes
Before touching any focus controls, configure your binoculars to match your physical traits. Skipping this creates immediate strain and prevents sharp focus.
Correct Your Interpupillary Distance in 10 Seconds
Hold your binoculars up to your eyes like you’re about to view scenery. Now pivot the barrels inward or outward until the two circles of light merge into one perfect circle. If you see a figure-eight shape, the barrels are too far apart. If the edges overlap excessively, they’re too close. Proper IPD alignment eliminates “kidney bean” shadows—those dark crescents that block your peripheral view. Test it: when correctly set, the full field of view should feel like looking through a single circular window with no dark edges.
Set Eyecups Based on Your Vision Needs
Twist down rubber eyecups completely if you wear glasses—this positions your eyes at the optimal “eye relief” distance (typically 14-18mm). If you don’t wear glasses, twist eyecups fully up so your eyelashes rest against the rubber. Wrong eyecup height causes vignetting (dark corners) or blurry edges. Pro tip: Close one eye while adjusting the other side—this isolates which eyecup needs tweaking. You’ll know it’s perfect when both eyes see the full circular field without moving your head.
How to Focus Binoculars: The Critical Diopter Calibration Step
This one-time calibration compensates for vision differences between your eyes. Skipping it causes chronic blurriness in one eyepiece—the #1 complaint among frustrated users. Do this once, and you’ll rarely touch the diopter again.
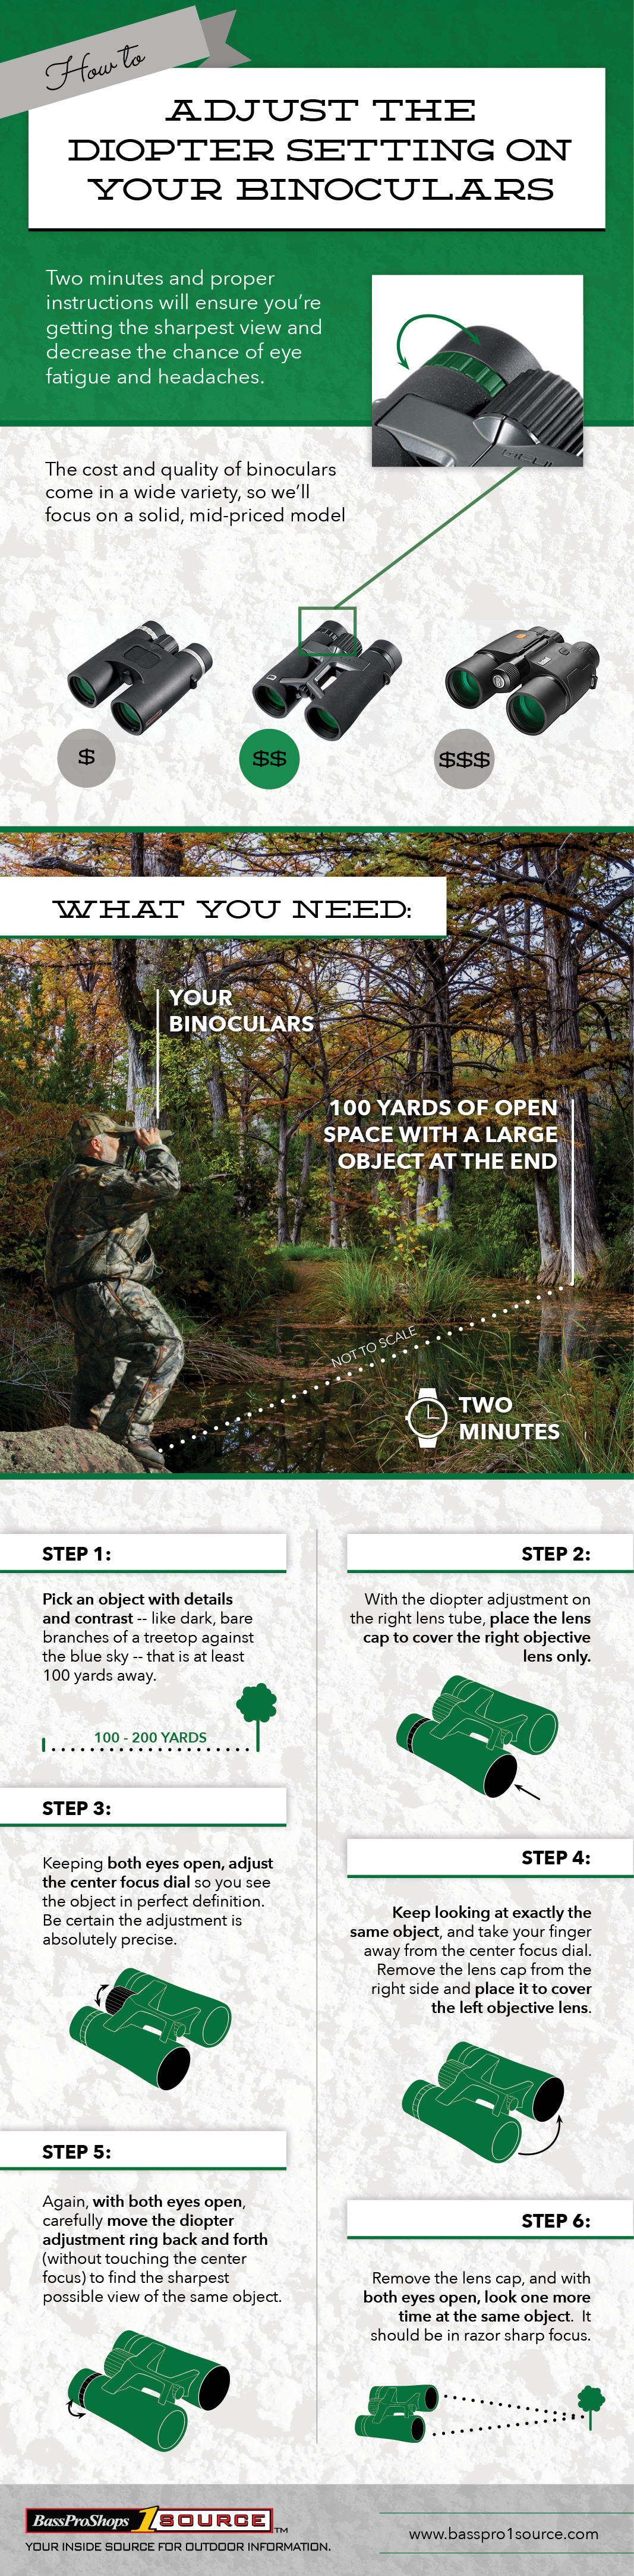
Cover and Focus Your Stronger Eye First
Locate the diopter ring (usually on the right eyepiece). Cover the objective lens on that side with your palm or a lens cap. Now, using only the center focus wheel, find a distant high-contrast target like a tree branch against sky. Focus with your uncovered eye until details snap into sharp relief. Crucially: lock the center focus if your model has a lock ring, or mentally note its position. This sets your baseline focus.
Calibrate the Diopter Without Moving the Center Wheel
Switch lens covers—now cover the left objective lens. Look through the right eyepiece at the same target. Do not touch the center wheel. Instead, rotate the diopter ring until the image sharpens. If your right eye is weaker, you’ll turn the ring toward “+” numbers; stronger eyes need “-” adjustments. Test by blinking between eyes—the image should now be equally sharp in both. Most diopters have a zero mark; align it with the indicator for future reference.
Two-Step Focus Method: Center Wheel and Rocking Technique
With diopter set, daily focusing becomes effortless. This two-phase approach works for everything from sprinting cheetahs to lunar craters.
Master the Center Focus Wheel for Instant Clarity
Forget the diopter during normal use—rely solely on the center wheel. For moving subjects like birds in flight, turn the wheel slowly while tracking the target. The “first sharp impression” is usually optimal; over-adjusting causes eye fatigue. Pro move: Pre-focus on a mid-range landmark (like a fence post) when scanning open terrain. When your subject appears, only minor tweaks are needed. This shaves critical seconds off reaction time for wildlife photography.
Achieve Perfect Sharpness with Focus Rocking
For stationary subjects like stars or architectural details, use the “rocking technique” to pinpoint maximum clarity. First, turn the center wheel until the image sharpens. Then, deliberately overshoot focus slightly in one direction. Rock back past the sharp point to the other side, narrowing the range each time. After 2-3 oscillations, the true focus point becomes unmistakable. This exploits how human eyes detect contrast edges, revealing details invisible with single-direction focusing.
Fix Blurry Binoculars: Troubleshooting Common Focus Problems
When focus fails, these targeted fixes solve 95% of issues without tools or expertise.
One Eyepiece Stays Blurry? Reset Your Diopter
If the right eyepiece remains fuzzy after center-wheel adjustments, your diopter calibration drifted. Re-do the one-time setup process—but this time, use a target at least 1,000 feet away. Close-range calibration causes distance errors. During step two, focus deliberately on fine details like leaf veins or brick textures. This precision ensures the diopter adjustment compensates accurately for your vision.
Seeing Kidney Bean Shadows? Check IPD and Eye Position
Those dark crescents mean your pupils aren’t centered in the eyepieces. First, readjust IPD while watching for the circles to merge perfectly. Still seeing shadows? Tilt your head slightly or reposition binoculars against your brow. Your eyes must be centered vertically too—press the eyecups firmly against your eye sockets without squinting. This eliminates “blackout” zones instantly.
Can’t Focus on Close Objects? Respect Minimum Distance
Trying to focus on a butterfly 2 feet away? Most binoculars have 6-15 foot minimum focus distances. Check your specs—if the subject is closer, back away slowly while turning the center wheel clockwise. For true close-focus binoculars (e.g., 5-foot models), focus on a textured surface like tree bark; smooth surfaces (like water) lack contrast for your eyes to lock onto.
Pro Focus Techniques for Birding, Sports, and Stargazing

Adapt your focus strategy to the activity for faster, sharper results.
Freeze Fast Action with Pre-Focus Zones
For birding or sports, mentally divide your viewing area into zones. Pre-focus the center wheel on a mid-distance zone (e.g., 50 yards out). When action enters that zone, your focus is already 80% there—just tiny nudges needed. During baseball games, pre-focus on the pitcher’s mound; for birding, set focus on a branch where birds typically land. This technique shaves 2-3 seconds off focus time—critical for fleeting moments.
Night Sky Focus: Daylight Calibration Wins
Never calibrate diopters in darkness. Do it at noon on a telephone wire or distant rooftop. At night, focus on Venus or Jupiter first—they’re bright enough to reveal perfect focus. Turn the center wheel until the planet’s disk snaps from a fuzzy blob to a crisp circle. If stars remain spiky, your focus is slightly off; use the rocking technique with Sirius (the brightest star) for final precision.
Close-Up Detail Hunting for Macro Viewing
For insects or flowers within minimum focus range, brace your elbows on a stable surface. Focus slowly while scanning the subject—details like insect wing veins appear at slightly different focus points than the body. Use the rocking technique to “stack” focus layers. Pro tip: View against a bright sky background; it increases contrast for tiny details.
Maintain Smooth Focus: Binocular Storage and Care Tips
Preserve focusing precision with these field-tested habits.
Always store binoculars with the center wheel turned fully counter-clockwise to the infinity setting (∞ symbol). This relaxes internal springs and prevents “focus creep” where settings drift over time. Wipe focus rings monthly with a microfiber cloth dampened with 70% isopropyl alcohol to remove grit—sand in the mechanism causes grinding resistance. Never force a stiff wheel; that often means internal grease hardened into varnish. Instead, take it to a specialty optics shop for ultrasonic cleaning. Crucially: after beach trips, rinse focus wheels with fresh water to dissolve salt crystals before they corrode moving parts.
Mastering how to focus a binocular properly is the single highest-impact skill for optical clarity. By dedicating 90 seconds to initial diopter calibration and IPD setup, you eliminate chronic blurriness and eye fatigue. Remember the golden rule: center wheel for daily adjustments, diopter only for initial setup. When troubleshooting, always verify IPD and eyecup height first—they cause 70% of “broken binocular” complaints. Store with focus at infinity, and your optics will deliver decades of crisp views. Now go lift those binoculars—the world awaits in breathtaking detail.


