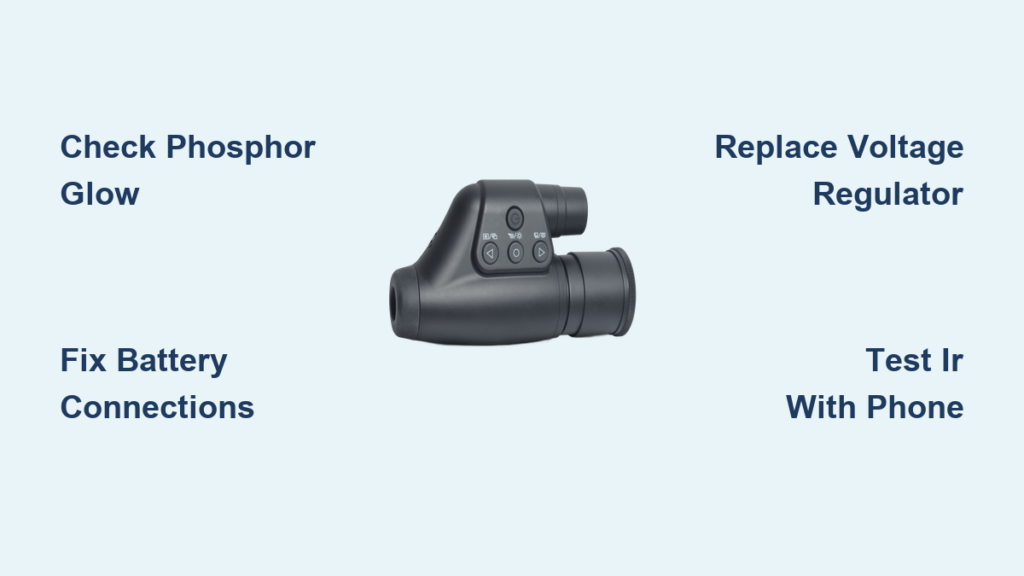
You power up your Night Owl Optics night vision monocular, the red LED glows, the infrared (IR) illuminator flickers—but the eyepiece stays pitch black. No green glow. No image. Just darkness. You’re not imagining it: your night vision device has failed, and you’re not alone. This issue is especially common in older Gen 1 models like the T3, NOCC3, and similar units often found on eBay, inherited, or dug out of storage after years of dormancy.
The good news? Most “dead” Night Owl monoculars aren’t truly dead. In fact, the problem is rarely the expensive image intensifier tube. Instead, it’s usually something simple—like a loose battery wire, a fried voltage regulator, or even a misunderstood focus setting. With a few basic tools and some patience, you can diagnose and fix most issues yourself—even if you’ve never opened an electronic device before.
This guide gives you a complete, step-by-step approach to troubleshooting and repairing your Night Owl Optics night vision monocular not working. From confirming whether the tube is alive to replacing critical components like the LP2985 regulator, we’ll walk you through every common failure point, how to test it, and how to fix it—without spending hundreds on a replacement.
Power On But No Image? Check the Phosphor Glow First
Before you unscrew a single screw, rule out the most common mistake: assuming the tube is dead when it’s not.
How to Test:
- Turn off all lights and let your eyes adjust for 5–10 minutes.
- Power on the monocular in complete darkness.
- Look directly into the eyepiece—do you see any faint green glow?
✅ If yes – the image intensifier tube is functional. The issue lies elsewhere: focus, IR, or power delivery.
❌ If no – the tube may be dead, or the circuit isn’t powering it.
Pro Tip: A working Gen 1 tube emits a soft green phosphor glow even in pitch blackness due to internal electron amplification. No glow usually means no power or a dead tube.
No Power at All? Start With Battery Connections
One of the most frequent causes of total failure is loose or corroded battery wiring—especially in units that have been dropped, stored, or poorly repaired.
What to Look For:
- Wires detached from battery terminals
- Cracked or missing solder joints
- Negative terminal barely touching the PCB
- Previous repairs using electrical tape instead of solder
How to Fix:
- Open the battery compartment carefully.
- Remove the AA batteries.
- Use a multimeter to test continuity between the terminals and the main PCB.
- Re-solder any loose connections using rosin-core solder.
- Add a bridging wire from the negative terminal to the ground tab for stability.
- Insulate with heat shrink tubing—never rely on tape.
✅ Real-World Fix: One user restored full function by re-soldering a single loose wire. The tube had been fine all along.
Is the Image Tube Really Dead?
The image intensifier tube is the heart of your monocular. If it’s shattered or degraded, no circuit repair will bring it back.
Signs of Tube Failure:
- No green glow in total darkness
- Device powers on but eyepiece stays black
- History of being exposed to bright light while powered (e.g., daylight, flashlights)
⚠️ Warning: Never point a powered night vision device at bright light sources. It can permanently burn the tube.
Can You Replace It?
Yes—but it’s not easy.
- Cannibalize from donor units: Working Gen 1 tubes can be pulled from Tasco Night Watch, old Night Owl models, or broken monoculars.
- Requires micro-soldering due to ultra-thin internal wires.
- Risk of misalignment or short circuits during installation.
Smart Strategy: Buy a non-working unit on eBay for $20–$50 as a parts donor. Test its tube before extracting.
Voltage Regulator Failure (Common in Digital Models)
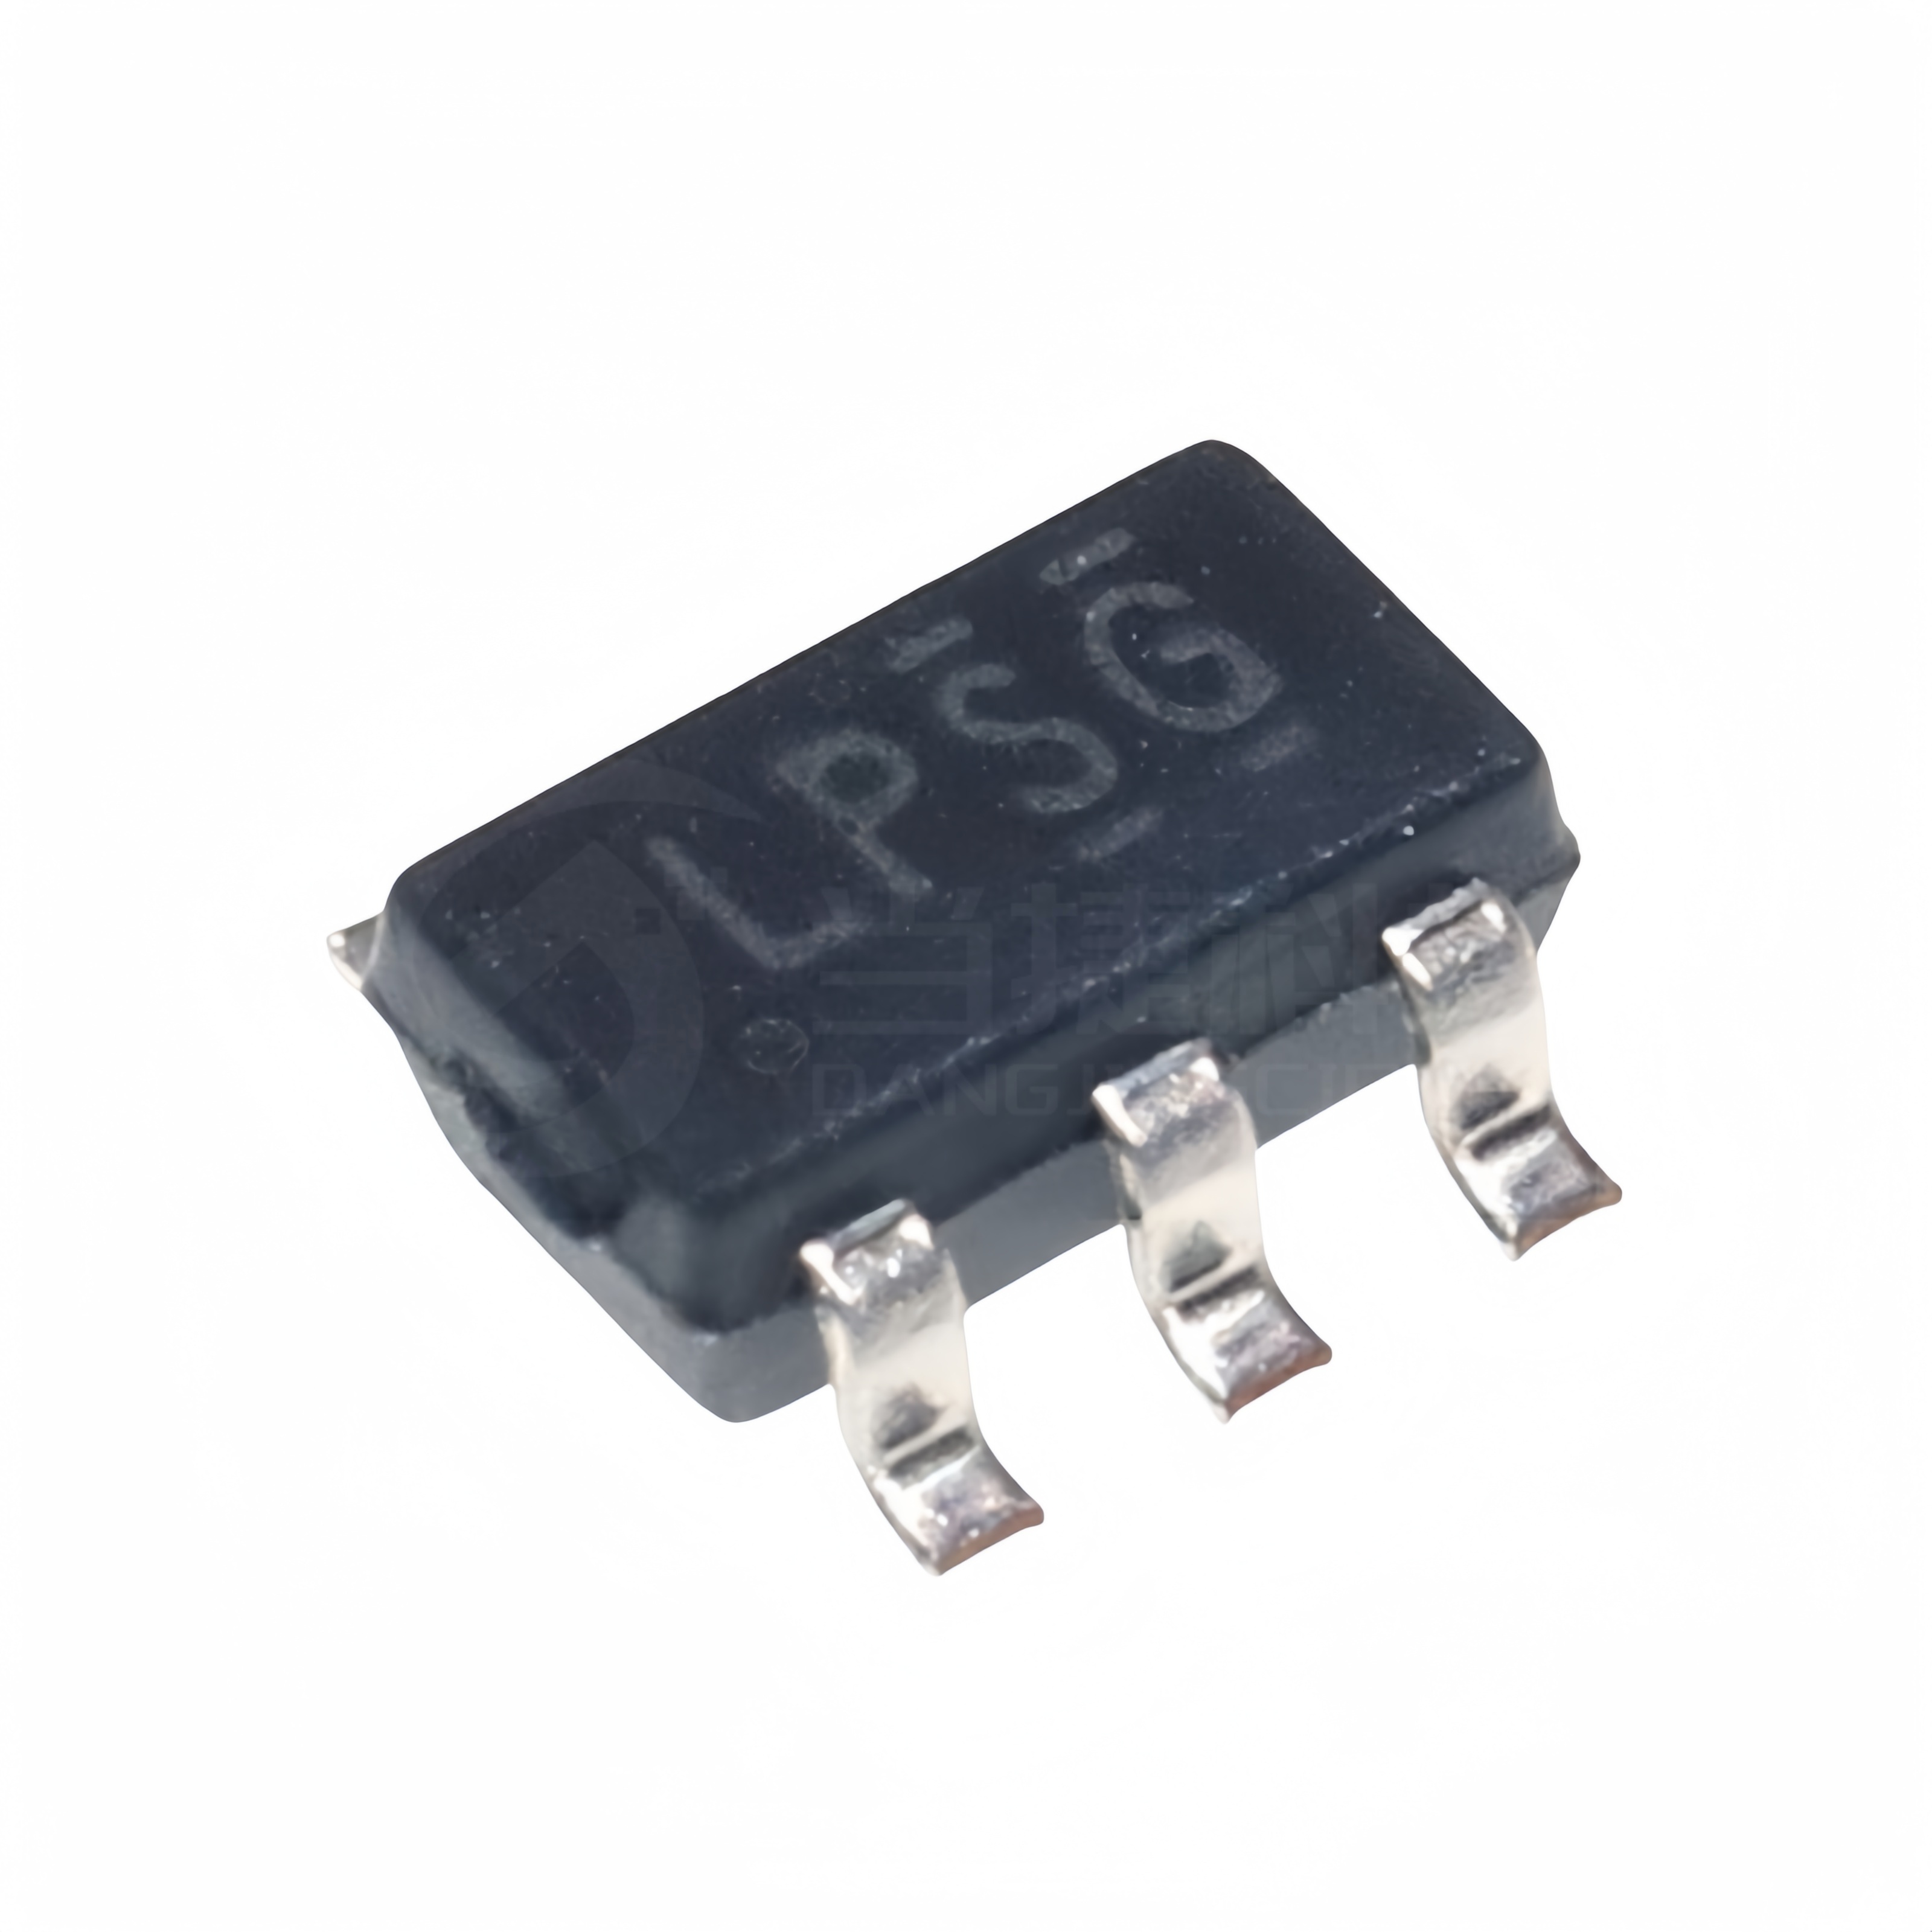
If your monocular has SD card recording, LCD menus, or USB ports, it likely uses a digital PCB that depends on a stable 3V supply. The LP2985 (or similar) 3V LDO regulator manages this.
Over time, voltage spikes or poor manufacturing can burn it out. Worse, previous owners may have replaced it with an incorrect chip, causing pinout mismatches.
How to Diagnose:
- No power at all, even with fresh batteries
- Visible rework on PCB (hot glue, discolored areas)
- Microscopic inspection shows feedback loop error (output wired to control pin)
Repair Steps:
- Locate the regulator: Usually a tiny SOT-23-5 chip near the battery input.
- Identify the correct model: Look for markings like “2985” or “LPSG.”
- Desolder the faulty chip: Use a precision iron and desoldering braid.
- Install a replacement: Use genuine LP2985IM5-3.0 or compatible 3V LDO.
- Secure it: Add a small heatsink and hot glue to prevent vibration damage.
✅ Success Sign: The LCD menu appears on startup—confirms the digital board is alive.
Tools You’ll Need:
– Microscope or magnifying glass
– Fine-tip soldering iron
– Desoldering pump
– Kapton tape (for insulation)
IR Illuminator Not Working? Test It With Your Phone

Your smartphone camera can detect infrared light as a purple or white glow—even if your eyes can’t.
Quick Test:
- Turn off the lights.
- Power on the monocular and activate IR (manual or auto mode).
- Point your phone’s camera at the IR LED.
- Look for a glowing spot on your phone screen.
❌ No glow? The IR circuit is faulty.
Common Causes:
- Burned-out surface-mount IR LED
- Failed driver chip (e.g., EX2002)
- Broken PCB trace
- Power sequencing issue (main board must be live first)
Fixes:
- Replace the LED: Use a hot air station or SMD rework tools.
- Bypass with external module: Wire a $2 5mm IR LED with a 330Ω resistor to the 3V line.
- Check the EX2002 chip: If present, test for output signal.
🛠️ DIY Hack: Attach a small IR flashlight to the housing with Velcro—simple and effective.
Focus Issues? Don’t Mistake It for a Dead Device
Many users think their monocular is broken when it’s just out of focus.
Correct Focus Procedure:
- Only adjust the ocular lens (the one closest to your eye).
- The objective lens (front) is fixed.
| Lighting Condition | Focus Method |
|---|---|
| Daylight | Use pinhole cover, adjust ocular lens |
| Low light | Remove cover, fine-tune for distance |
| Total darkness | Enable IR, focus on a nearby object first |
Tip: Start with a wall 10 feet away. Adjust until edges are sharp.
Momentary Power Systems (Binocular Models)
Some Night Owl binoculars use momentary switches—you press and hold to charge the high-voltage circuit.
How It Works:
- Press button for 2–5 seconds
- Image appears and lasts several minutes
- Longer press = higher gain (brighter image)
- High gain causes grain/noise—not a defect
❌ Misconception: “It turns off too fast.”
✅ Reality: It’s designed to pulse, not stay on continuously.
Physical Design Differences Matter
Not all T3 models are the same. Build quality varies—even within the same model.
Lightweight T3 (eBay Common)
- $40–$50 price range
- Basic finish, thinner housing
- Includes pinhole cover
- Fully functional when repaired
Heavy-Duty T3
- Sturdier shell, better sealing
- Same image quality—proves build ≠ performance
Dual-Tube Binocular Model
- Older Gen 1 design
- Two independent tubes
- Tripod mount included
- Stereo vision for depth perception
- Less eye strain during long use
Despite variations, Gen 1 resolution is ~640×480—grainy but usable for wildlife or security.
Real-World Performance When Fixed
Once repaired, these monoculars deliver real utility.
What You Can See:
- Animals under bushes (rabbits, cats, sheep)
- People at 50–75 feet with IR
- Kiwi birds on walls (yes, documented!)
- Shadows under vehicles
IR Drawback:
- Illuminator is visible to others with night vision
- Best for private, controlled environments
Stereo Advantage:
- Binocular models offer better depth perception
- Less eye fatigue during extended use
- Superior situational awareness
Repair Viability: Can You Fix It?
| Problem | Fixable? | Difficulty | Cost |
|---|---|---|---|
| Loose battery wire | ✅ | Low | <$5 |
| Failed voltage regulator | ✅ | Medium | <$10 |
| Dead IR LED | ✅ | Medium | <$5 |
| Shattered image tube | ✅ (with donor) | High | $50+ |
| Focus/user error | ✅ | None | $0 |
Bottom Line: Over 80% of failures are repairable without replacing the tube.
Step-by-Step Repair Checklist
1. Initial Diagnosis
- Confirm power light status
- Test IR with phone camera
- Look for phosphor glow in dark
- Rule out focus issues
2. Open the Unit
- Use a small Phillips screwdriver
- Document screw locations
- Gently pry open housing—don’t force
3. Inspect PCB
- Look for burnt components
- Check regulator (SOT-23-5 chip)
- Test battery input voltage
4. Test Connections
- Use multimeter to check continuity
- Verify ground path from battery to PCB
- Re-solder any loose joints
5. Replace Faulty Components
- Swap regulator if needed
- Repair or bypass IR LED
- Clean contacts with isopropyl alcohol
6. Reassemble Carefully
- Align battery compartment pin
- Press control panel evenly into housing
- Use same screws—most are identical
When to Walk Away
Not every unit is worth fixing.
❌ Don’t repair if:
– You lack basic soldering tools
– The tube is shattered and no donor available
– You need reliable performance for security or safety
– Modern digital night vision (e.g., ATN, Pulsar) fits your budget
✅ Do repair if:
– You enjoy DIY electronics
– Unit cost under $50
– You’re exploring night vision as a hobby
– You want a functional tool for camping or wildlife
Final Verdict: Worth Fixing?
Yes—for the right person.
The Night Owl Optics night vision monocular not working is often a fixable issue. These Gen 1 devices have known weaknesses—especially in power regulation and build quality—but that also makes them perfect for learning.
For under $50 and a few hours of work, you can:
– Revive a “dead” unit
– Learn PCB diagnostics
– Practice micro-soldering
– Gain hands-on experience with analog night vision
“Gen 1 night vision is fun, functional, and affordable. With basic troubleshooting and a little soldering, even a broken unit can be revived.”
If you’re curious about night vision tech, start with a $50 T3 from eBay. It’s a low-risk, high-reward project with real educational and practical value.
Night Owl Optics night vision monocular not working? Now you know how to fix it. From loose wires to fried regulators, the solution is likely within your reach. Roll up your sleeves, grab your soldering iron, and bring that green glow back to life.