
If your microscope image looks washed out, blurry, or lacking in detail—especially with transparent or unstained samples—chances are low contrast is the issue. Contrast refers to the visible difference in brightness between a specimen and its background. Without sufficient contrast, even the highest-magnification objective lens won’t reveal meaningful detail. This is particularly true when viewing live cells, bacteria, diatoms, or other phase objects that don’t absorb light but instead shift its phase—something the human eye simply can’t detect.
The good news? You don’t need to stain every sample or upgrade your equipment. There are simple, effective, and often free ways to dramatically improve contrast using proper optical techniques and adjustments. Whether you’re using a basic brightfield microscope or advanced instrumentation, this guide will walk you through practical methods—from adjusting the condenser aperture to using phase contrast, darkfield, and beyond—to achieve sharper, clearer images. By the end, you’ll know exactly how to increase contrast in a microscope based on your specimen, setup, and goals.
Adjust the Condenser Aperture Diaphragm
One of the most accessible ways to boost contrast is by fine-tuning the condenser aperture diaphragm (IAD). Closing it reduces the angle of the light cone reaching the specimen, which increases contrast by enhancing diffraction at edges.
How to Optimize the Aperture Setting
- Target range: Close the IAD until it fills 70–80% of the objective’s back focal plane.
- How to check: Remove an eyepiece and look into the body tube. Focus on the bright disc (image of the condenser aperture). Adjust the diaphragm so its edges appear just within the disc.
- Result: Improved edge definition and background darkening.
Warning: Over-closing sacrifices resolution and depth of field. Excessive closure causes diffraction artifacts, making fine details appear thicker or merge together.
When to Use This Method
- Ideal for amplitude objects like stained tissues under brightfield illumination.
- Avoid for high-resolution imaging—narrow apertures reduce resolving power.
- For darkfield microscopy, keep the aperture fully open and use a central stop instead.
Set Up Köhler Illumination Properly
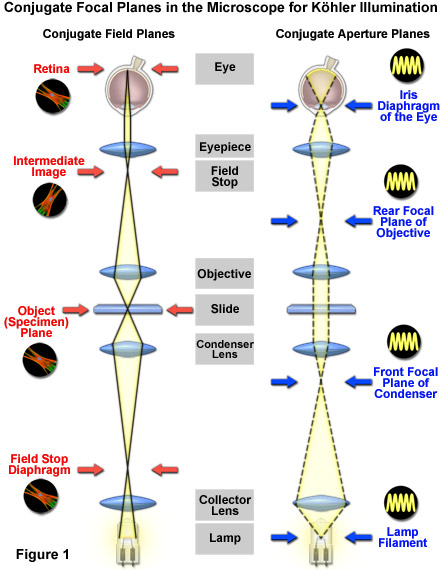
Before adjusting any contrast method, ensure your microscope is aligned using Köhler illumination—the gold standard for even lighting, reduced glare, and maximum contrast and resolution.
Step-by-Step Alignment
- Start with a 10× objective (offers best working distance).
- Open both diaphragms fully: field and aperture.
- Focus the specimen using coarse and fine focus.
- Close the field diaphragm to a small circle.
- Adjust condenser height until the diaphragm edges are sharp.
- Center the field diaphragm using condenser centering screws.
- Open the field diaphragm just beyond the field of view to eliminate stray light.
- Adjust the aperture diaphragm to 70–80% of the objective’s NA.
Important: Realign Köhler illumination every time you switch objectives, especially if their numerical aperture (NA) differs significantly.
Why It Matters
- Eliminates uneven lighting and internal reflections.
- Maximizes the effectiveness of all contrast-enhancing techniques.
- Required for phase contrast, DIC, and fluorescence microscopy.
Use Darkfield Microscopy for Scattering Specimens
Darkfield microscopy blocks direct light so only scattered light from the specimen enters the objective, creating a bright image on a dark background.
How to Set It Up
- Insert a central stop (darkfield stop) into the condenser filter tray.
- The stop diameter must exceed the objective’s NA acceptance angle.
- For objectives with NA > 0.6, use a dedicated darkfield condenser.
- In reflected light, use annular or unilateral epi-illuminators.
Best Specimens for Darkfield
- Bacteria, diatoms, radiolarians
- Surface contaminants
- Grain boundaries in polished metals
DIY Darkfield Stop
- Measure the open condenser iris diameter.
- Cut a black card or opaque disc 10–20% larger.
- Place it near the condenser’s front focal plane.
Note: On Zeiss microscopes with top-mounted apertures, homemade stops won’t work—use official darkfield condensers.
Apply Phase Contrast for Transparent Biological Samples
Phase contrast converts invisible phase shifts in transparent specimens into visible brightness differences—making live, unstained cells clearly visible.
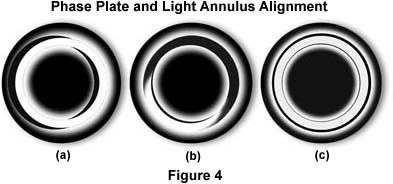
How It Works
- A phase ring in the objective and a matching annulus in the condenser manipulate light waves.
- Direct and diffracted light interfere, enhancing contrast.
Setup Steps
- Use phase-contrast objectives (marked Ph1, Ph2, etc.).
- Match the condenser annulus to the objective (e.g., Ph1 to Ph1).
- Insert a phase telescope or Bertrand lens to center the annulus over the phase ring.
- Use a green filter (550 nm) for optimal alignment and eye sensitivity.
Ideal Applications
- Live cells
- Unstained bacteria
- Spermatozoa
- Embryos
Limitations
- Halo artifacts around dense structures.
- Poor performance with thick specimens.
- Requires precise alignment.
Try Differential Interference Contrast (DIC)
DIC uses polarized light and Wollaston prisms to split light into two beams, generating a pseudo-3D, shadow-cast image with exceptional detail and no halos.
Key Features
- High contrast and resolution.
- Optical sectioning capability.
- No halo artifacts.
Equipment Needed
- Nomarski or Wollaston prisms in condenser and objective.
- Adjustable prism slider to control contrast intensity and direction.
Best For
- Thick tissue sections
- Surface topography
- Unstained biological samples
Note: DIC systems are expensive and alignment-sensitive but unmatched for detailed live imaging.
Use Hoffman Modulation Contrast (iHMC)
iHMC enhances contrast in thick, unstained specimens using oblique illumination and a modulator in the objective’s back focal plane.
Visual Outcome
- One side of the specimen appears bright, the other dark—giving a 3D effect.
- No halo artifacts.
Ideal For
- Live-cell imaging
- In vitro fertilization (IVF)
- Sperm and egg observation
Setup Requirements
- Specialized iHMC objectives and condensers with modulator strips.
- Alignment similar to phase contrast.
Enable Oblique Illumination for Edge Enhancement
Oblique illumination shines light from one side, creating shadows that enhance edge definition and surface texture.
How to Achieve It
- Insert a crescent-shaped stop below the condenser.
- Use an offset diaphragm or tilt the mirror (on older scopes).
- Try colored cellophane for Rheinberg effect.
Best For
- Diatoms
- Thick specimens
- Solid opaque samples (e.g., automotive parts)
DIY Tip
Cut a black card into a half-moon shape and place it under the condenser. Rotate it to change shadow direction.
Use Polarized Light Microscopy for Birefringent Materials
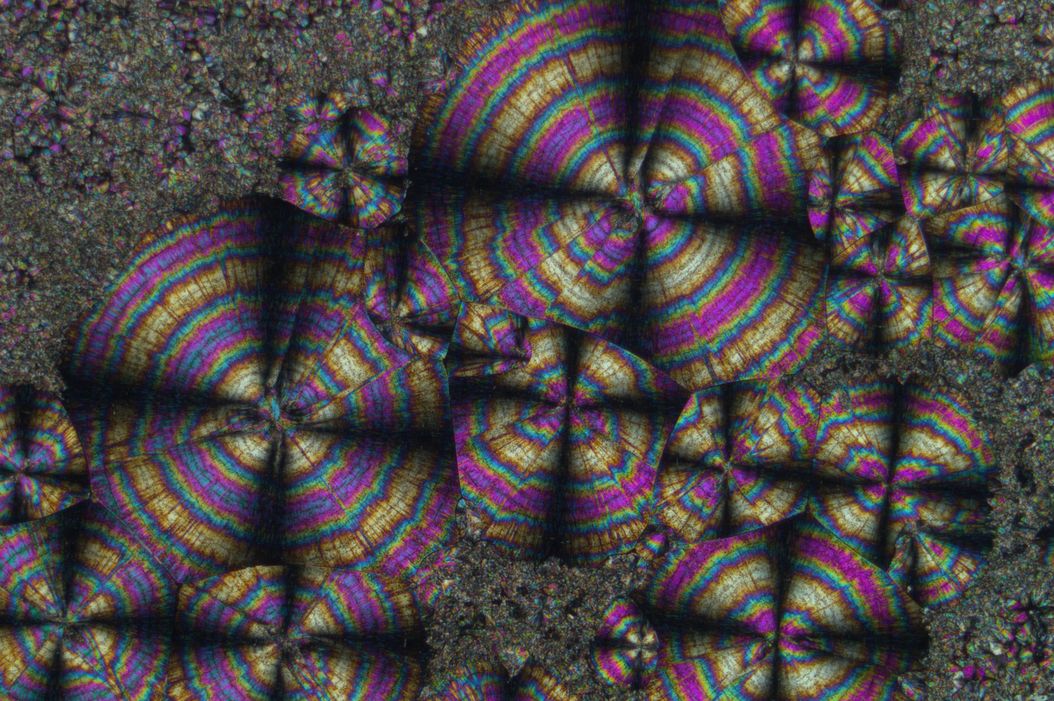
Polarized light reveals materials that rotate light polarization—such as crystals or fibers—making them glow against a dark background.
Setup
- Insert a polarizer below the condenser.
- Insert an analyzer above the objective (in tube or eyepiece).
- Cross them at 90° for maximum darkness (extinction).
- Rotate stage or polarizers to observe changes.
Applications
- Crystals (uric acid, cholesterol)
- Muscle fibers
- Textiles
- Minerals and polymers
DIY Analyzer
Cut a Polaroid filter and mount it in a 35 mm film canister cap. Slide into the eyepiece.
Leverage Fluorescence Microscopy for High-Specificity Imaging
Fluorescence provides extreme contrast by exciting fluorophores that emit light at longer wavelengths.
Key Advantages
- High specificity (label only what you want to see).
- Bright signal on dark background.
- Works with live and fixed samples.
Equipment
- HBO, XBO, or high-power LED light source.
- Excitation and emission filters.
- Dichroic mirror.
Note: Requires labeling with dyes or proteins (e.g., GFP)—not all specimens are naturally fluorescent.
Match Mounting Medium to Specimen Refractive Index
The refractive index (RI) difference between specimen and mounting medium directly affects contrast.
Visibility Index Formula
VI = |RI(specimen) – RI(mountant)|
Higher VI = higher contrast.
Example: Diatoms (RI ≈ 1.430)
| Mountant | RI | VI | Contrast Level |
|---|---|---|---|
| Air | 1.000 | 0.430 | High |
| Ethanol | 1.360 | 0.070 | Very Low |
| DPX | 1.330 | 0.100 | Low |
| Styrax | 1.050 | 0.380 | High |
Tip: Avoid ethanol for diatoms—it makes them nearly invisible.
Special Mountants
- Pleurax: Green-tinted mountant that acts as a built-in filter for diatom imaging.
Choose the Right Method by Specimen Type
Not all techniques work for all samples. Use this quick guide:
| Specimen Type | Best Contrast Method |
|---|---|
| Live cells, bacteria | Phase contrast, DIC, iHMC |
| Diatoms, fibers | Darkfield, oblique, Rheinberg |
| Crystals, minerals | Polarized light, dispersion staining |
| Stained tissues | Brightfield + aperture adjustment |
| Polished metals | Reflected darkfield, DIC, polarized |
| Fluorescent labels | Fluorescence microscopy |
| Thick opaque parts | Oblique, epi-illumination |
Avoid Common Mistakes
Even with the right technique, poor results often stem from simple errors.
- Over-closing the aperture: Sacrifices resolution. Stick to 70–80% rule.
- Poor Köhler setup: Causes glare and uneven lighting. Realign after changing objectives.
- Misaligned phase annulus: Causes low contrast. Use a phase telescope.
- Wrong mountant: Specimen disappears due to RI match. Choose mountant with different RI.
Try DIY Contrast Filters
You don’t need expensive parts to experiment.
Rheinberg Illumination
- How: Use colored filters—central stop in one color, outer ring in another.
- Effect: Specimen glows in outer color; background shows inner color.
- Materials: Colored cellophane or Lee Filters.
Spikeberg Illumination
- Hybrid of Rheinberg and polarized light.
- Use Polaroid-based central stop with colored rings.
- Rotate polarizers to switch between brightfield and darkfield.
Optimize Digital Image Processing
After capturing the image, enhance it—but only after optimizing optical contrast.
Safe Enhancements
- Histogram stretching: Expands intensity range.
- Gamma correction: Adjusts midtone brightness.
- Unsharp masking: Sharpens edges.
- Deconvolution: Removes blur from out-of-focus light.
Warning: Digital fixes can’t recover lost detail. Always maximize optical contrast first.
Final Checklist Before Imaging
| Task | Done? |
|---|---|
| Köhler illumination set | ☐ |
| Condenser aperture at 70–80% | ☐ |
| Field diaphragm just outside view | ☐ |
| Phase annulus centered (if used) | ☐ |
| DIC prisms aligned | ☐ |
| Darkfield stop inserted (if used) | ☐ |
| Polarizers crossed at 90° | ☐ |
| Green filter in place for phase | ☐ |
| Mountant RI mismatched for specimen | ☐ |
| Light source stable and flicker-free | ☐ |
By mastering these techniques, you’ll transform faint, invisible details into sharp, high-contrast images—without staining, killing cells, or upgrading equipment. Whether you’re a student, researcher, or hobbyist, knowing how to increase contrast in a microscope is one of the most powerful skills in microscopy.


