

Have you ever wanted to see your own human cells up close? With just a few simple tools, you can view cheek cells under a microscope and observe the nucleus, cytoplasm, and cell membrane in real time. This classic biology experiment is a hands-on way to explore eukaryotic animal cell structure without needing advanced equipment. By gently scraping the inside of your cheek, preparing a stained slide, and using a compound microscope, you can see living human cells in under 10 minutes. Whether you’re a student, teacher, or curious learner, this guide walks you through every step to ensure clear, successful results—while avoiding common mistakes like cell lysis or poor staining.
Gather Essential Materials for Cheek Cell Observation
Before collecting your sample, assemble all necessary supplies to prevent contamination and ensure smooth execution.
Required Lab Equipment
- Clean microscope slide – free of dust and fingerprints
- Coverslip (18×18 mm or 22×22 mm) – prevents drying and protects the lens
- Sterile toothpick or cotton swab – for safe, hygienic cell collection
- Dropper or transfer pipette – for precise liquid application
- Paper towel – to blot excess fluid from edges
- Fine forceps or mounted needle – helps lower the coverslip evenly
Solutions for Cell Preparation
- 0.9% saline solution – isotonic to human cells; prevents bursting
- Methylene blue stain (0.1%) – enhances nucleus visibility by binding to DNA
- Distilled water – only as a last resort; causes cells to swell and burst
Pro Tip: Methylene blue is far more effective than food coloring or iodine for animal cells because it binds specifically to nucleic acids, making the nucleus stand out clearly.
Safety Supplies
- Disposable gloves – prevent exposure to biological material
- Biohazard waste container – for safe disposal of used swabs and slides
- Eye protection (optional) – recommended in classroom environments
Warning: Methylene blue can permanently stain skin and clothing. Handle with care and avoid direct contact.
Follow Safety and Hygiene Protocols
Even simple biological experiments require proper safety practices to protect both the user and others.
Wear Protective Gear
Always wear gloves when handling cheek samples. While the risk is minimal, saliva can carry microbes. In shared labs, wearing safety goggles adds an extra layer of protection.
Prevent Cross-Contamination
- Use one toothpick per person; never reuse tools
- Label slides clearly if multiple people are involved
- Wash hands thoroughly before and after the procedure
Dispose of Biological Waste Properly
After observation:
– Place toothpicks, swabs, and paper towels in a biohazard bin
– Discard contaminated glassware in a sharps or biohazard container
– Never throw biological materials into regular trash
Note: Even small human samples are considered biohazardous due to their origin.
Collect Cheek Cells Safely and Effectively
The quality of your observation depends on how well you collect epithelial cells from the inner cheek.
Use Gentle Scraping Technique
- Take a sterile toothpick.
- Gently scrape the inner lining of your cheek with the flat end using light back-and-forth motions.
- Rotate the toothpick to gather loose cells—do not press hard enough to draw blood.
Visual cue: A faint white or translucent smear on the toothpick tip indicates a good cell sample.
Alternative Collection Methods
- Cotton swab: Swab the cheek and roll it directly onto the saline drop
- Fingertip method: Wash hands, rub inner cheek, then lightly touch the drop on the slide (less reliable but useful for home labs)
Avoid blood contamination—if the area feels sore or bleeds, stop and wait before retrying.
Prepare the Slide with Saline Solution

Proper slide preparation maintains cell integrity and prevents distortion.
Apply Isotonic Saline Drop
Place one small drop (1–2 mm diameter) of 0.9% sodium chloride (saline) in the center of the slide.
Why saline matters: Distilled water is hypotonic and causes cells to absorb water and burst (a process called lysis). Saline matches the body’s osmotic pressure, keeping cells intact and flat.
Transfer Cells to the Drop
Smear the toothpick tip across the saline drop to release the collected cells. Stir gently to disperse them evenly.
Common mistake: Using too many cells creates clumps that are hard to focus on. A light smear is ideal.
Stain Cells for Clear Nucleus Visibility
Staining increases contrast so cellular structures become visible under magnification.
Add Methylene Blue Correctly
- Add 1–2 drops of 0.1% methylene blue directly to the cell suspension.
- Wait 60–120 seconds for the stain to bind to DNA and RNA in the nucleus.
Science behind the stain: Methylene blue is a basic dye that attracts negatively charged molecules like nucleic acids. It turns the nucleus dark blue while leaving the cytoplasm lightly colored.
Avoid Over-Staining
- Use only 1–2 drops—excess stain creates a dark background that obscures cells
- If the field looks too dark, dilute with a drop of saline and blot excess
Stain alternatives:
– Crystal violet – stains nucleus purple; less specific than methylene blue
– Eosin – highlights cytoplasm in pink (often used in combination)
– Iodine or food coloring – ineffective for animal cells❌ Do not use blue food coloring—it doesn’t bind to DNA and won’t show the nucleus.
Mount the Coverslip Without Air Bubbles
A bubble-free mount ensures a flat, stable specimen for clear viewing.
Lower at 45-Degree Angle
- Hold the coverslip by the edges with forceps.
- Touch one edge to the liquid drop.
- Slowly lower the other end using capillary action to draw the solution underneath.
Pro Tip: Lowering the coverslip vertically traps air bubbles, which appear as black rings and block your view.
Remove Excess Fluid
Use a corner of a paper towel to wick away any fluid leaking from the edges. This prevents movement during scanning.
Warning: Never press down on the coverslip—this crushes delicate cells and distorts their shape.
Observe at Increasing Magnifications

Start low and gradually increase magnification to locate and examine cells clearly.
Begin with Low Power (40x–100x)
Set the microscope to the scanning objective (4x or 10x).
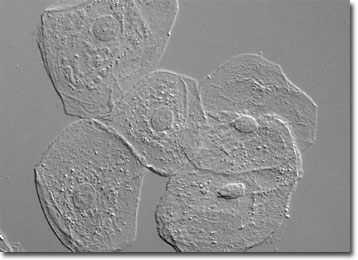
- Look for clusters of irregular, flat cells resembling “fried eggs”
- They often stick together due to surface proteins
- Adjust stage controls to center a dense area
Focus tip: Use the coarse adjustment knob first, then fine-tune with the fine knob.
Switch to Medium Power (100x–400x)
Move to the high-dry objective (40x lens = 400x total magnification).
- Individual cells become distinguishable
- The nucleus appears as a dark blue circle in the center
- The cytoplasm surrounds it in a lighter blue halo
- The cell membrane forms a faint outer boundary
Troubleshooting: If nothing is visible, return to low power and re-center the sample.
Use Oil Immersion for Detail (Optional, 1,000x)
If your microscope supports oil immersion:
- Place a drop of immersion oil on the coverslip
- Rotate the 100x oil objective into place
- Focus with the fine adjustment only
What you’ll see: Granular texture inside the nucleus and possibly tiny oral bacteria (small dark dots) attached to or near cells.
Identify Key Cellular Structures

At 400x magnification, several features of human epithelial cells should be clearly visible.
Locate the Nucleus
- Appearance: Dark blue, round or oval
- Size: ~5–10 micrometers in diameter
- Position: Central or slightly off-center
- Function: Houses DNA and controls cell activity
Why it stains dark: Methylene blue binds tightly to DNA, making the nucleus stand out.
Observe the Cytoplasm
- Color: Light blue or translucent
- Texture: Even but less dense than nucleus
- Contents: Contains organelles and cytoskeleton (not individually visible without special staining)
Note: Unlike plant cells, there’s no large central vacuole—only small ones, if any.
See the Cell Membrane
- Visibility: Thin, faint line around the cell edge
- Flexibility: No rigid wall, so edges may appear wavy or uneven
- Function: Regulates what enters and exits the cell
Clue: Look at where two cells touch—this junction often shows the membrane most clearly.
Spot Oral Bacteria (At High Power)
- Shape: Tiny rods (bacilli) or spheres (cocci)
- Color: Dark-staining due to methylene blue uptake
- Location: On or around cheek cells
Good news: These are part of your normal oral microbiome, not contamination!
Troubleshoot Common Problems
Even experienced users face issues. Here’s how to fix them fast.
No Cells Visible?
- Cause: Insufficient scraping or poor transfer
- Fix: Repeat collection with firmer (but still gentle) scraping; use methylene blue
Cells Burst or Look Blotchy?
- Cause: Used distilled water instead of saline
- Fix: Always use 0.9% NaCl to maintain osmotic balance
Too Many Air Bubbles?
- Cause: Coverslip placed too quickly
- Fix: Lower it slowly at a 45° angle using capillary action
Cells Clumped Together?
- Cause: Over-scraping or thick smear
- Fix: Dilute with another drop of saline and remount
Image Too Dark or Stained Black?
- Cause: Excessive methylene blue or long staining time
- Fix: Limit stain to 1–2 drops and wait only 1–2 minutes
Can’t Focus at High Power?
- Cause: Slide uneven, debris, or thick sample
- Fix: Prepare a new, thinner smear; clean slide; use fine focus knob only
User tip: If using a fingertip, wash hands first and touch the drop lightly to avoid oils and dirt.
Clean Up and Dispose Properly
Finish safely and responsibly.
Discard Biohazard Waste
- Place used toothpicks, swabs, and paper towels in a biohazard container
- Do not flush or throw in general trash
Handle Glassware Safely
- Disposable slides? Dispose in sharps or biohazard bin
- Reusable slides? Wash with soap, rinse, dry, and store
Final Hygiene Step
Wash hands thoroughly with soap and water after all cleanup.
Remember: Even simple biological samples require proper handling.
Final Note: Viewing cheek cells under a microscope is a powerful introduction to cell biology. With saline solution, methylene blue stain, and careful technique, you’ll see real human cells in minutes. Avoid distilled water and food coloring—they ruin results. Focus on gentle collection, proper staining, and slow coverslip placement for success. This low-cost, high-impact experiment opens the door to understanding life at the microscopic level.


