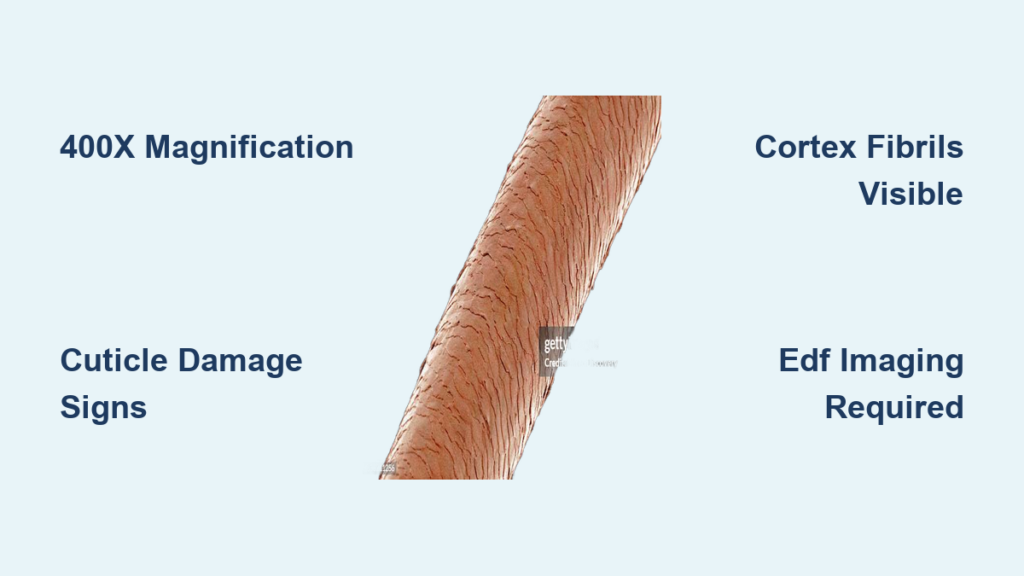
What does human hair look like under a microscope? To the naked eye, a single strand appears smooth and uniform, but under magnification—especially at 400x—it transforms into a complex biological marvel. The human hair under microscope unveils a layered, reinforced fiber with intricate cuticle patterns, internal keratin networks, and signs of health or damage invisible to casual observation.
This microscopic world isn’t just fascinating—it’s functional. Dermatologists, trichologists, forensic experts, and hair transplant surgeons rely on high-magnification imaging to diagnose conditions, evaluate treatments, and plan procedures. Whether you’re troubleshooting breakage, developing haircare products, or analyzing forensic evidence, seeing human hair under microscope changes everything.
In this guide, you’ll discover exactly what you see at 400x magnification, from cuticle scale alignment to cortical fibrils and ethnic variations in structure. You’ll learn the best tools and techniques for capturing diagnostic-quality images, how to interpret signs of damage, and why microscopic analysis is essential for science, medicine, and beauty.
Why Use a Compound Microscope for Hair Analysis?
Compound Beats Stereo for Structural Detail
To truly analyze human hair under microscope, you need more than surface-level views. While stereo microscopes offer 3D imaging and are useful for gross inspection, their maximum magnification—around 90x—is insufficient for resolving fine details like cuticle overlap or internal protein clusters.
Only a compound microscope delivers the resolution needed for professional analysis. With magnifications up to 1000x, it reveals subcellular structures within the hair shaft, including keratin fibrils, melanin granules, and early-stage damage.
Stereo systems may be more expensive, but they lack the resolving power required for clinical or diagnostic use. For accurate assessment of hair health, compound microscopy is non-negotiable.
The Gold Standard: Richter Optica UX1 Setup

Recommended Configuration for Diagnostic Imaging
The Richter Optica UX1 compound microscope has emerged as the preferred system for hair analysis due to its precision, durability, and imaging capabilities. When equipped with the right components, it meets professional standards.
Optimal Setup Includes:
– 40x Achromat objective lens (400x total magnification with 10x eyepiece)
– 3.2 megapixel digital camera for high-resolution image capture
– Strong LED illumination for consistent brightness and clarity
– Extended Depth of Focus (EDF) software to combine multiple focal planes
– Stage micrometer for accurate measurement of cuticle scales and shaft diameter
This configuration allows clinicians and researchers to:
– Assess cuticle integrity
– Measure protein cluster spacing
– Track damage progression
– Compare pre- and post-treatment results
Without this level of detail, observations remain subjective rather than scientific.
Capture Clear Images at 400x Magnification
Why 400x Is the Diagnostic Minimum
At 400x magnification, the human hair shaft reveals features completely invisible at lower powers:
- Individual cuticle scales with precise edge definition
- Keratin fibril bundles running longitudinally through the cortex
- Protein clusters acting as structural anchors
- Micro-cracks, erosion zones, and early signs of breakage
At 100x, only general scale direction is visible—enough for basic screening, but not for diagnosis. Below 200x, you miss critical indicators like scale lifting or cortical exposure.
For reliable analysis, 400x is the minimum standard.
Use Extended Depth of Focus (EDF) Imaging
Overcome the Limits of 2D Focusing
Hair is a three-dimensional structure, but standard microscopy captures only a thin slice in focus at any one time. To see the full thickness and length clearly, Extended Depth of Focus (EDF) software is essential.
EDF works by stacking multiple images taken at different focal planes into a single, fully sharp composite. This technique:
– Reveals cuticle lift across all layers
– Exposes subsurface cracks hidden in single-plane views
– Enables quantitative measurement of damage zones
– Shows the entire shaft in crisp detail
Without EDF, key structural flaws may go undetected, leading to incomplete assessments.
Calibrate with a Stage Micrometer for Accuracy
Turn Images Into Measurable Data
To make your microscopic observations truly diagnostic, calibration is mandatory. A stage micrometer—a precision slide with known scale divisions—allows you to set accurate measurements in imaging software.
With calibration, you can:
– Measure cuticle scale length (typically 6–8 µm)
– Track shaft diameter changes along the length
– Quantify split depth or erosion area
– Monitor longitudinal thinning over time
This capability is vital for:
– Product efficacy testing
– Clinical progress tracking
– Forensic comparisons
Uncalibrated images may look impressive, but they lack scientific value.
Anatomy of the Hair Shaft Under Magnification

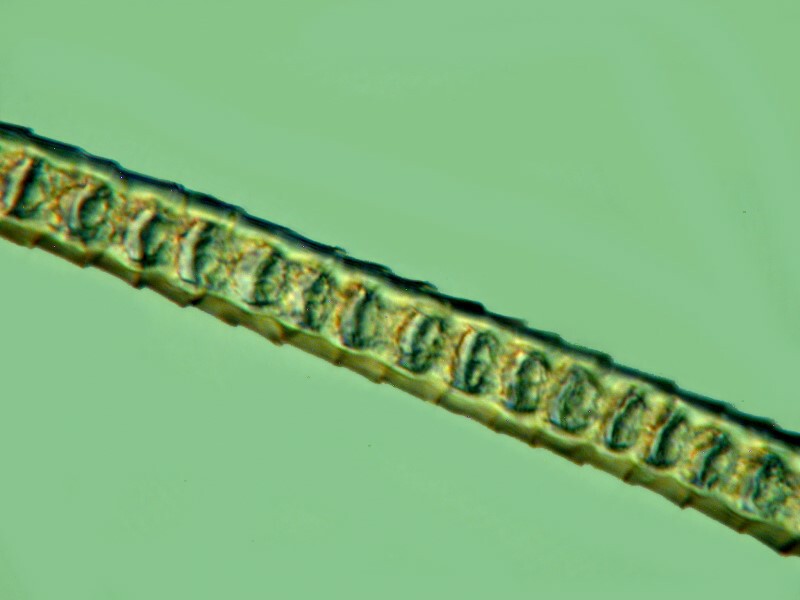
Cuticle: The Shingle-Like Protective Layer
Under the microscope, the cuticle appears as overlapping scales oriented uniformly from root to tip, resembling roof shingles or tree bark. Made of hard keratin, this outer layer shields the cortex from mechanical, thermal, and chemical stress.
Signs of Cuticle Damage:
– Scale lifting: Early sign of heat or chemical exposure
– Erosion: Loss of outer layers, exposing the cortex
– Cracks: Linear fissures from brushing or UV damage
– Frayed tips: Bushy, unraveled ends from cumulative wear
Once the cuticle is compromised, hair becomes porous, weak, and prone to breakage.
Cortex: The Strength and Color Core
Beneath the cuticle lies the cortex, the thickest layer responsible for:
– Tensile strength and elasticity
– Hair color (via melanin granules)
– Wave and curl pattern
At 400x, the cortex shows:
– Longitudinal fibrils packed like wires in a cable
– Macrofibrils and microfibrils organized in parallel
– Protein clusters spaced regularly along the shaft—biological reinforcements that prevent breakage
Ethnic Differences in Fibril Alignment:
– African hair: Asymmetrical arrangement → tight curls
– Asian hair: Uniform alignment → straight growth
– Caucasian hair: Intermediate pattern → wavy to straight
These internal differences directly determine hair shape and behavior.
Medulla: The Central Channel
The medulla is a central core that may be:
– Continuous
– Fragmented
– Absent (especially in fine or vellus hairs)
It’s more visible in thick or coarse hairs and may contribute to:
– Light reflection
– Thermal insulation
Not all hairs show a medulla at 400x—its presence varies by individual and hair type.
Keratin: The Protein That Builds Hair
90% of Hair Is Keratin
Human hair is ~90% keratin, a fibrous protein rich in cysteine amino acids that form strong disulfide bonds. Under the microscope, keratin appears as:
– A brick-wall pattern of layered cells
– Densely packed fibrils running lengthwise
– Regular protein clusters spaced along the shaft
These clusters are biologically programmed to reinforce weak points and enhance resilience.
How Damage Disrupts Keratin:
– Chemical treatments break disulfide bonds
– Heat styling denatures protein structure
– UV exposure oxidizes keratin, weakening fibers
Once disrupted, hair loses strength, shine, and elasticity.
Cross-Sectional Shapes by Ethnicity
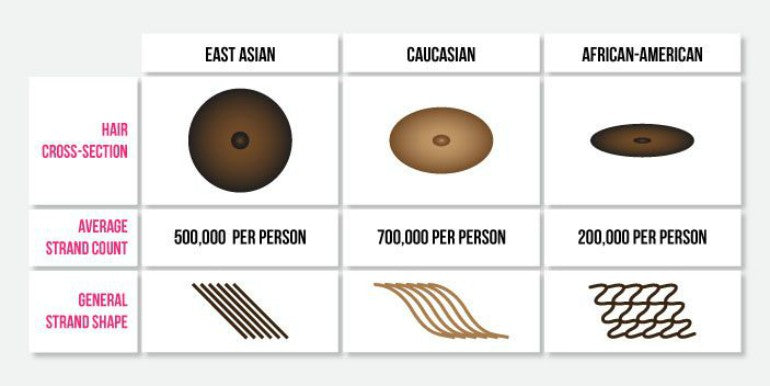
Shape Determines Shine and Strength
Cross-sectional analysis at low magnification reveals distinct ethnic patterns:
| Ethnicity | Shape | Diameter | Implications |
|---|---|---|---|
| Asian | Circular | 80–100 µm | Strong, straight, high shine |
| Caucasian | Oval/intermediate | 60–80 µm | Wavy, moderate strength |
| African | Highly elliptical | 50–70 µm | Fragile, curly, low shine |
Why It Matters:
– Circular hair reflects light evenly → shiny appearance
– Elliptical hair scatters light → duller look
– Irregular shapes create stress points → higher breakage risk
These differences guide product development and surgical planning.
Longitudinal Patterns and Curl Formation
Shape Is Genetically Programmed in the Follicle
Hair morphology is determined in the lower half of the follicle during the anagen phase. Once formed, the shape is permanent—even after transplantation.
Ethnic Longitudinal Traits:
– Asian: Straight, uniform shaft
– Caucasian: Mostly straight, occasional waves
– African: Twisted, zig-zag pattern with irregular diameter
Why African Hair Is More Fragile:
– Twist points concentrate mechanical stress
– Flatter cross-section increases vulnerability
– Thinner cuticle offers less protection
Yet, curly hair provides better scalp coverage—a major advantage in hair restoration.
Signs of Damage Visible at 400x
The Tip Tells the Whole Story
The terminal end (tip) shows the most damage because it’s the oldest part, exposed longest to environmental stressors.
Common Damage Signs:
– Split ends (trichoptilosis): Multiple splits at the tip
– Frayed edges: Bushy, unraveled ends
– Surface cracks: Longitudinal or transverse fissures
– Cuticle erosion: Scales lifted or missing
– Cortical exposure: Inner layer visible due to severe wear
Damage progresses from tip to root, so early detection is key.
Causes of Microscopic Damage:
– Mechanical: Brushing, tight hairstyles
– Chemical: Bleaching, perming
– Thermal: Flat irons (>150°C)
– Environmental: UV, pollution, chlorine
Prevention starts with reducing exposure and using protective products.
100x vs. 400x: What You Can Actually See
| Feature | 100x | 400x |
|---|---|---|
| Cuticle scales | General direction | Individual edges, overlap, lift |
| Protein clusters | Not visible | Clearly seen |
| Internal fibrils | Invisible | Visible as parallel strands |
| Damage assessment | Only major splits | Micro-cracks, early erosion |
| Diagnostic value | Screening only | Full structural analysis |
Bottom line: 100x is insufficient. 400x is the minimum for professional analysis.
Applications of Hair Microscopy
1. Trichological Diagnosis
- Identify causes of hair loss
- Distinguish breakage from shedding
- Monitor treatment progress
2. Cosmetic Product Testing
- Evaluate shampoos and conditioners
- Validate “repair” claims with imaging
- Measure reduction in split ends
3. Forensic Analysis
- Compare suspect and evidence samples
- Detect chemical treatments
- Determine species or racial origin
4. Hair Restoration Surgery
- Assess donor hair quality
- Plan graft angle based on curl
- Evaluate graft survival post-op
5. Client Education
- Show real-time images in clinics
- Demonstrate damage from heat or chemicals
- Support personalized care plans
Best Practices for Reliable Analysis
1. Use Proper Lighting
- LED illumination ensures consistent clarity
- Adjust intensity to avoid glare
2. Mount Hair Correctly
- Place strand flat on slide
- Use a coverslip to prevent movement
- Align longitudinally for full-length imaging
3. Focus Through Multiple Planes
- Capture images at root, mid-shaft, and tip
- Use EDF to create one fully focused image
4. Store and Compare Over Time
- Save images with timestamps
- Track changes in cuticle or diameter
5. Maintain Your Microscope
- Clean lenses with lens paper and solution
- Store in dust-free environment
- Recalibrate regularly with stage micrometer
Final Note
The human hair under microscope is a masterpiece of biological engineering. At 400x magnification, its complexity unfolds: a protective cuticle of overlapping scales, a cortex packed with keratin fibrils, and protein clusters strategically placed for strength.
Ethnic variations in shape and structure explain differences in shine, manageability, and fragility. Damage—whether from heat, chemicals, or brushing—leaves clear microscopic evidence, especially at the tip.
For professionals, the Richter Optica UX1 with 40x objective, 3.2MP camera, and EDF software sets the standard. Combined with calibration and proper technique, it turns observation into objective science.
Whether diagnosing hair loss, developing products, or educating clients, seeing human hair under microscope transforms guesswork into insight.