

Knowing how to use a microscope is essential for anyone exploring biology, medicine, or scientific research. Whether you’re a student preparing your first slide or a hobbyist examining pond water, mastering the microscope opens up an invisible world teeming with cells, bacteria, and intricate structures. This guide walks you through every critical step—from setup and focusing to cleaning and troubleshooting—using safe, reliable techniques. You’ll learn how to avoid damaging the instrument, achieve crisp images at high magnification, and maintain your microscope for long-term use.
Choose the Right Microscope for Your Needs
Light vs. Electron: Which One Do You Need?
Most users work with a compound light microscope, the standard in classrooms and labs. It uses visible light to illuminate thin specimens, offering magnification up to 1500x with a resolution of about 200 nanometers—enough to see individual cells, bacteria, and cell organelles. It’s ideal for live or stained samples mounted on glass slides.
In contrast, electron microscopes use electron beams instead of light, achieving resolutions below 1 nanometer. However, they require vacuum-sealed chambers, complex preparation, and cannot view living organisms. These are used in advanced research settings, not routine observation.
For nearly all educational and basic lab purposes, the light microscope is the correct choice. This guide focuses on its proper operation.
Understand Magnification and Image Clarity
Don’t Confuse Zoom with Detail
Total magnification is calculated by multiplying the eyepiece power (usually 10x) by the objective lens power:
10x eyepiece × 40x objective = 400x total magnification
But more zoom doesn’t always mean better viewing. Resolution—the ability to distinguish two close points—is what truly determines clarity. Beyond ~1500x, light microscopes suffer from empty magnification: the image grows larger but no new detail appears because of light’s physical limits.
To get the clearest view, balance magnification with proper lighting, focus, and specimen preparation.
Identify and Use All Key Microscope Parts
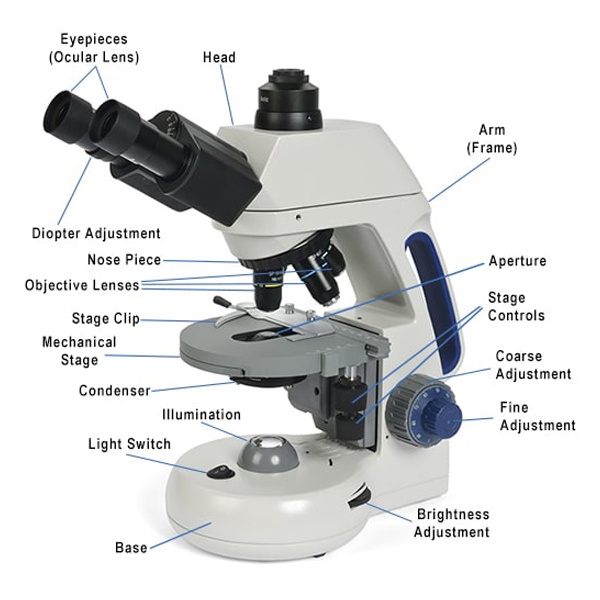
Know What Each Component Does
Understanding the parts ensures safe and effective use:
- Eyepiece (Ocular Lens): Where you look; typically 10x magnification.
- Objective Lenses: Primary magnifiers (4x, 10x, 40x, 100x); rotate via nosepiece.
- Nosepiece (Turret): Holds objectives and allows quick switching.
- Stage: Flat platform holding the slide; has clips or mechanical controls.
- Coarse Focus Knob: Large knob for initial focusing—use only at low power.
- Fine Focus Knob: Small knob for sharpening focus at high magnifications.
- Iris Diaphragm: Adjusts light amount to improve contrast.
- Condenser: Focuses light onto the specimen; can be raised or lowered.
- Illuminator: Built-in light source at the base.
- Arm and Base: Always use both hands when carrying.
On binocular models, adjust interpupillary distance and diopter rings for personalized, strain-free viewing.
Set Up Your Microscope Safely
Carry and Position with Care
Always carry the microscope with two hands—one on the arm, one under the base. Keep it close to your body and away from table edges. Place it on a level, stable surface with enough room for notes and slides.
Remove the dust cover, inspect the cord for damage, and plug it in only after setup. Never rush this step—microscopes are precision instruments that can be damaged by drops or jarring.
Prepare a Proper Microscope Slide
Create a Clean, Flat Wet Mount
Standard slides are 75 mm × 25 mm glass. The specimen must be thin and flat so the coverslip lies flush and the lens doesn’t crash.
A coverslip protects the objective, flattens liquid samples, and prevents drying. Always place it over the specimen.
To make a wet mount:
1. Place a thin sample (like onion skin) in the center of the slide.
2. Add one drop of water or saline—too much causes floating.
3. Hold the coverslip at a 45° angle, touch one edge to the liquid, and gently lower it.
– Capillary action pulls the fluid evenly, reducing air bubbles.
Never press down—this can crush delicate cells.
Stain for Better Contrast
Transparent specimens like cheek cells need staining to reveal structure. Common dyes:
– Iodine: Highlights starch in plant cells.
– Methylene blue: Stains nuclei and membranes in animal cells.
To stain after mounting:
1. Place a drop of dye on one edge of the coverslip.
2. Touch the opposite edge with paper towel to wick the stain under the slide.
3. Wipe excess to avoid contaminating lenses.
Clean and dry reusable slides after use.
Focus the Microscope in 5 Safe Steps
Always Start at Low Power
- Turn on the light and rotate to the lowest objective (4x or 10x).
– Listen for the click to confirm alignment. - Raise the stage using the coarse focus knob to make space.
- Open the iris diaphragm halfway—adjust later as needed.
Never start with high power—it increases the risk of lens crash.
Place and Secure the Slide Correctly
- Center the specimen over the light hole in the stage.
- Use stage clips or mechanical knobs to hold the slide firmly.
- Ensure the coverslip side faces up—toward the objective.
Write “up” on the slide to remember orientation.
Focus Using Side and Eye Views
- Look from the side, not through the eyepiece.
- Use the coarse focus knob to lower the objective until it’s 1–2 mm above the slide.
– Never let it touch. - Look through the eyepiece and slowly raise the stage with the coarse knob until the image appears.
- Use the fine focus knob to sharpen the details.
- Adjust the iris diaphragm for contrast:
– Reduce light for transparent samples.
– Increase for stained or dark specimens.
The image is inverted: move the slide up to see it go down; right moves left.
Increase Magnification Without Losing the Specimen
- Center the object in the field of view at low power.
– If off-center, it will vanish when you switch objectives. - Rotate the nosepiece to the next higher objective (e.g., 10x → 40x).
– Most scopes are parfocal, so the image stays roughly in focus. - Use only the fine focus knob at high power.
– The coarse knob moves too far and risks lens damage.
High-power objectives have very short working distances—sometimes less than 0.1 mm.
Use Oil Immersion for 100x Magnification
Why Oil Is Essential for Clarity
The 100x objective requires immersion oil because air scatters light between the slide and lens. Oil has the same refractive index as glass, preserving resolution and brightness.
Without oil, the 100x image will be dim and blurry.
Apply Oil Without Damaging the Lens
- Focus and center the specimen at 40x.
- Rotate the nosepiece to a blank position (no lens in line).
- Place one drop of immersion oil directly on the coverslip.
- Carefully swing the 100x objective into place—let it dip into the oil.
– Do not force it; oil should form a bridge. - Use only the fine focus knob to sharpen the image.
- Open the condenser and iris diaphragm fully for maximum clarity.
Never use the coarse focus knob at 100x—lens crash is likely.
Clean and Store Your Microscope Properly
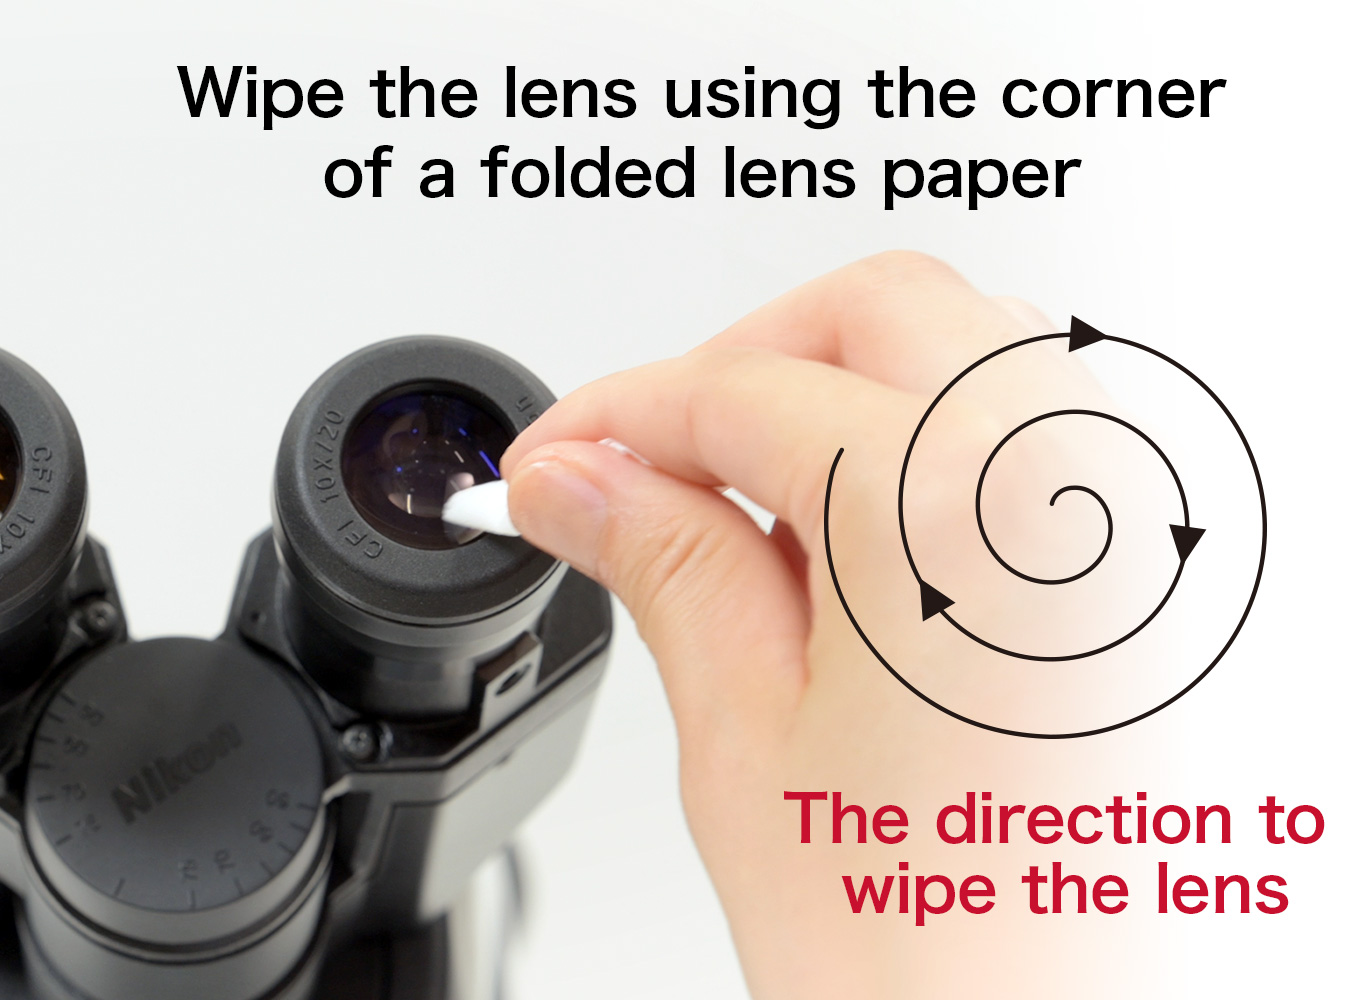
Wipe Lenses the Right Way
- Never touch lenses with fingers—oil and dirt degrade image quality.
- Use lens paper only:
- For dry lenses: wipe gently with dry paper.
- For oil lenses: moisten paper with lens cleaner or xylene, then wipe.
- Discard oil-contaminated paper immediately—never reuse it.
Clean the 100x lens right after use. Dried oil damages coatings.
Store to Prevent Damage and Dust
- Turn off and unplug the microscope.
- Rotate to the lowest power objective.
- Lower the stage completely.
- Remove the slide.
- Wipe the stage clean and dry.
- Cover with the dust cover.
- Store in a dry, dust-free area.
Never leave a slide on the stage—salt or stains can corrode the surface.
Optimize Viewing Comfort and Image Quality

Adjust for Binocular Models
- Interpupillary adjustment: Slide eyepieces until two circles merge into one.
- Diopter calibration:
1. Close left eye, focus with right eye using fine knob.
2. Close right eye, adjust left eyepiece ring until sharp.
3. Do not touch fine focus during left-eye adjustment.
This eliminates eye strain and improves clarity.
Set Condenser and Diaphragm Correctly
- Raise the condenser to about 0.1 mm below the slide (paper-thickness).
- Open the iris diaphragm as magnification increases:
- 4x–10x: 30–50% open
- 40x: 60–80% open
- 100x: fully open
Too much light causes glare; too little hides detail.
Troubleshoot Common Problems Fast
Fix These Issues Immediately
- Image won’t focus: Fine knob may be at limit. Turn it back ½ turn, reposition with coarse knob, then refocus.
- Blurry or hazy image: Likely dirty lenses. Clean with lens paper and proper solution.
- Only one eyepiece clear: Diopter is misaligned. Recalibrate.
- Objective hits slide: You’re focusing downward while looking through the eyepiece. Always focus upward after lowering from the side.
If knobs grind or the stage drifts, stop use and consult a technician—do not attempt repairs.
Follow Safety and Best Practices
Do’s and Don’ts for Every User
✅ DO:
– Start with the lowest power objective.
– Carry with two hands.
– Use coarse focus only at low power.
– Center specimen before increasing magnification.
– Clean lenses after oil use.
– Store with low objective in place and stage lowered.
❌ DO NOT:
– Touch lenses with fingers.
– Force focus knobs.
– Use coarse focus at high power.
– Let objectives touch slides.
– Leave slides on the microscope.
– Mix lens paper between oil and dry lenses.
Wear gloves when handling stains or biological samples.
Apply Settings to Real Observations
Recommended Setups for Common Tasks
| Task | Objective | Stain | Light Settings |
|---|---|---|---|
| Plant cells (onion) | 10x or 40x | Iodine | Diaphragm 50% open |
| Bacteria | 100x (oil) | None or methylene blue | Condenser high, diaphragm full |
| Blood smear | 40x or 100x | Wright’s stain | High light at 100x |
| Dissection (stereo) | Lowest zoom | N/A | Use eyeguard in bright rooms |
Final Tips for Mastery
Using a microscope effectively requires technique, patience, and care. Always start low and go slow: find your specimen at 4x, center it, then move up in magnification. Master the fine focus and diaphragm to reveal hidden details. Clean lenses after every use—especially after oil. Store properly to extend the microscope’s life.
With practice, you’ll move smoothly from 4x to 100x oil immersion, capturing sharp, detailed images every time. Whether in class, lab, or at home, these skills form the foundation of scientific discovery.
Now that you know how to use a microscope, explore the invisible world—one clear focus at a time.


