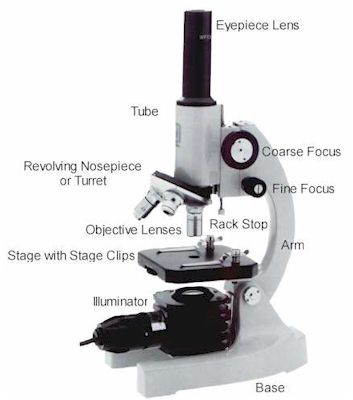
You power on your microscope, adjust the eyepieces, and peer into the lens—only to be met with complete darkness. The power light might be on, but the illumination is dead. If you’re troubleshooting a microscope light not working, you’re not alone. This is one of the most frequent issues in classrooms, labs, and home workshops. The good news? 80% of these problems are simple user errors—not hardware failures—and can be fixed in under five minutes with no tools.
Whether you’re using a student-grade model, a professional compound scope, or a digital USB microscope, this guide delivers step-by-step diagnostics based on real technician reports, circuit analysis, and model-specific repair data. You’ll learn how to quickly rule out common mistakes, identify hidden failures, and know when to claim a warranty instead of risking a DIY fix. From closed diaphragms and blown fuses to software blocks and failed transistors, we’ll cover every possible cause—so you can restore light fast and get back to work.
Open the Field Diaphragm Before Checking Anything Else
Why a Closed Iris Blocks All Light
One of the most common reasons for no illumination is a fully closed field diaphragm. This small lever, usually located on the condenser beneath the stage, controls the diameter of the light beam. When shut, it completely blocks the path—even if the bulb is on and the power is connected.
- Location: Side of the condenser assembly, just below the stage.
- Visual Clue: A small knob or lever that adjusts the size of the light circle.
- Fix: Rotate it counterclockwise to open fully.
- Pro Tip: Always open the diaphragm before turning on the microscope. Chad Potts of Munday Scientific confirms: “We’ve had service calls for ‘no light’—only to find the diaphragm was closed.”
✅ Action Step: Before touching cords or replacing bulbs, verify the field diaphragm is open. This single check resolves countless “dead light” complaints.
Confirm Power Is Actually Reaching the Microscope
Test the Outlet, Cord, and Internal Connections
A loose or damaged power connection is often the culprit—especially in high-traffic labs where cords get yanked or pinched.
Check the Wall Outlet and Power Cord
- Plug a lamp or phone charger into the same outlet to verify it’s live.
- Inspect the microscope’s power cord for frays, kinks, or bent connectors.
- Unplug and firmly reseat the cord at both ends.
Inspect Internal Wiring (Digital Models)
On digital scopes like the Andonstar AD266S, the base LED is connected via a small internal cable. Over time, vibration or rough handling can disconnect it.
– Safe Check: After unplugging, remove the bottom panel (if accessible) and ensure the LED ribbon or wire is seated.
– Warning: Never force open sealed units—especially if under warranty.
⚠️ Critical Advice: For new digital microscopes (under one year), warranty replacement is safer than DIY repair. Opening the unit may void coverage.
Turn Up the Brightness Knob – It Might Be Set to Zero
How a Rheostat Can Fool You Into Thinking the Light Is Dead
Many users overlook the light intensity control, also known as the rheostat or dimmer knob. If it was turned down during storage or cleaning, the bulb won’t illuminate—even if everything else is working.
- Symptoms: Power light is on, but no glow from the base.
- Fix: Rotate the knob fully clockwise to max brightness.
- Test: Power cycle the scope after adjustment.
Is the Rheostat Itself Faulty?
If turning the knob does nothing, the potentiometer may be dirty or failed—especially in older models.
✅ Quick Diagnostic: Use a multimeter to test resistance across the potentiometer. If resistance doesn’t change when turning the knob, it needs replacement.
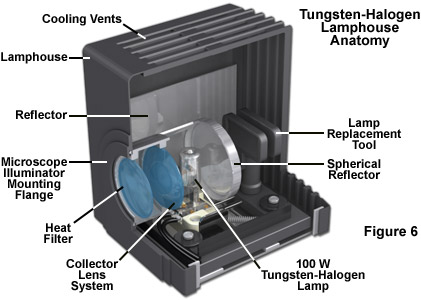
Replace the Bulb – The Most Common Hardware Failure
How to Safely Diagnose and Install a New Lamp
A burned-out bulb is the leading cause of total light loss, particularly in halogen microscopes used in schools and clinics.
Signs of Bulb Failure
- No visible glow from the lamp housing.
- Blackened glass or broken filament when inspected.
- Flickering or dimming before complete failure.
Bulb Types and Handling Tips
| Type | Lifespan | Critical Notes |
|---|---|---|
| Halogen | 1,000–2,000 hrs | Handle with gloves—skin oils create hot spots and shorten life |
| LED | 20,000+ hrs | Rarely fails, but driver circuit may |
Step-by-Step Bulb Replacement
1. Power Down and Cool
- Turn off and unplug the microscope.
- Wait 15+ minutes—halogen bulbs exceed 300°C during use.
2. Access the Lamp Housing
- Locate the panel (usually on the side or base).
- Use plastic tweezers or a bulb tool—never bare hands.
3. Remove and Inspect Old Bulb
- Check for darkening, broken filament, or loose base.
- Compare to replacement specs (e.g., 6V 20W).
4. Install New Bulb
- Insert carefully, ensuring proper alignment.
- Secure with clips or screws.
5. Test and Align
- Power on and verify brightness.
- Perform Köhler illumination alignment if required.
✅ Pro Tip: Keep a labeled spare bulb on hand. Write the model number and voltage on the packaging.
Examine the Lamp Socket for Corrosion or Damage
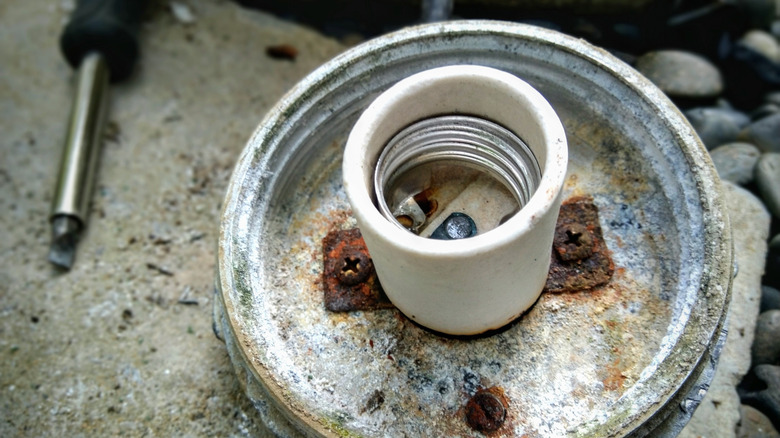
Why a Good Bulb Won’t Light in a Bad Socket
Even with a new bulb, poor contact in the socket can prevent power delivery.
What to Check
- Corrosion: Green or white buildup on metal contacts.
- Warping: Melted plastic from overheating.
- Loose Fit: Bulb wobbles or doesn’t seat.
Repair Options
- Clean contacts with isopropyl alcohol and a cotton swab.
- Replace the entire housing if cracked or damaged.
⚠️ Danger Signal: Sparks, smoke, or burning smell? Stop use immediately. Internal wiring or fuse may be compromised.
Disengage the Beam Splitter on Trinocular Models
Why Light Goes to the Camera, Not the Eyepieces
Trinocular microscopes have a beam splitter lever that redirects light to the camera port. If engaged, no light reaches the eyepieces.
- Location: Side or rear of the trinocular head.
- Fix: Push the lever in to disengage and send light to the oculars.
- Test: Look into the camera port—if you see light, the splitter is active.
✅ User Reminder: Always disengage the beam splitter before routine viewing.
Rotate the Disc Diaphragm on Student Microscopes
Solid Plate Blocking the Light Path?
Budget-friendly and kids’ microscopes use a rotating disc diaphragm—a wheel with holes of varying sizes.
- Issue: If the solid (non-aperture) section is aligned with the light path, no illumination passes through.
- Fix: Rotate the disc until a hole lines up.
- Visual Aid: Shine a flashlight from below to confirm alignment.
✅ Note: This is not the same as the field iris. It’s a fixed mechanical wheel, not an adjustable ring.
Replace a Blown Fuse in the Base or Power Module
Hidden Fuses Can Kill Power to the Lamp
Many microscopes include a small fuse near the power input or in the base.
How to Diagnose
- Power connected, outlet functional, but no response.
- Bulb and socket appear fine.
- No signs of external damage.
Replacement Steps
- Consult the manual for fuse location.
- Use a fuse puller or tweezers to remove it.
- Check for a broken filament inside the glass.
- Replace with exact same rating (e.g., 1A, 250V).
⚠️ Never Substitute: A higher-amp fuse can overheat and create a fire hazard.
Troubleshoot Battery and Charging Issues (Cordless Models)
Dimming or Dead LEDs? Check the Power Source
Portable scopes like the Andonstar AD266S run on 3x AA Ni-MH batteries or external 5V DC power.
Common Problems
- Gradual dimming: Low battery.
- Screen on, no light: LED circuit failure.
- Works on USB, not battery: Charging circuit defective.
Quick Fixes
- Charge fully using the original adapter.
- Try fresh batteries.
- Clean the USB port with compressed air.
✅ Test: Use a known-good power bank or wall adapter (5V DC) to confirm power delivery.
Fix Software Lighting Blocks on Digital Microscopes
Why the LED Works in One App But Not Another
Digital USB models like the Plugable Desktop Microscope can have software-controlled LEDs, which Windows privacy settings may block.
Case Example: Windows 10 Blocked Lighting
- Symptoms:
- No image in Digital Viewer.
- Works in third-party webcam apps.
- LED lights up when using other software.
Root Cause
- Privacy settings prevented the app from accessing the camera and lighting controls.
Fix
- Go to Settings > Privacy > Camera.
- Enable “Allow apps to access camera”.
- Grant access specifically to Digital Viewer.
✅ Pro Tip: Restart the app after changing permissions.
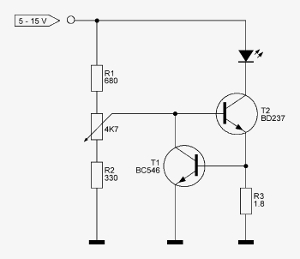
Diagnose Internal Circuit Failures (LED Models)
When the Bulb and Power Are Fine—but Dimming Doesn’t Work
Some LED microscopes have driver circuits that can fail independently of the bulb.
Case Study: Fixed by Replacing a Transistor
- Symptom: LED always on at low brightness, regardless of knob position.
- Voltage Readings:
- Across LED: 2.4V (constant).
- VCC: 4V.
- Components Involved:
- LM334 current regulator.
- 8550 PNP transistor.
Diagnosis
- Potentiometer tested good.
- Transistor failed—could not modulate current.
Solution
- Replaced the 8550 transistor.
- Full brightness control restored.
✅ Expert Insight: A single failed transistor can disable dimming—even if the knob and bulb appear functional.
Prevent Future Light Failures With These 6 Best Practices
Keep Your Microscope Running Smoothly
- Wear gloves with halogen bulbs – Skin oils cause early burnout.
- Avoid rapid on/off cycles – Thermal stress damages filaments.
- Clean the dust cover after use – Prevents internal buildup.
- Store covered – Protects from moisture and dust.
- Inspect cords monthly – Catch frays early.
- Use stable power sources – Surges damage LED drivers.
✅ Bonus Tip: For long sessions, leave the light on at low brightness—repeated cycling harms halogen bulbs more than continuous use.
When to Call a Pro or Claim Warranty
Know When to Stop Troubleshooting
| Condition | Recommended Action |
|---|---|
| Bulb replaced, still no light | Check socket, fuse, or wiring |
| Burning smell or melted parts | Stop use. Seek professional repair. |
| Digital scope works in one app only | Fix software permissions first |
| New device (<1 year) | Claim warranty—do not open |
| Internal screws sealed or tiny | Contact manufacturer |
| Suspected circuit failure | Repair only if electronics-skilled |
For Andonstar AD266S/AD269S Owners
- Unit is new (purchased July 2025).
- Base LED failed suddenly.
- Other functions work.
- ✅ Action: Use Amazon’s “Problem with order” → Request replacement or refund.
- Provide: Model, serial, purchase date.
⚠️ Never force screws—you may crack the housing or void warranty.
Final Summary: Fix Microscope Light Fast
When your microscope light is not working, follow this sequence:
- Open the field diaphragm.
- Check power cord and outlet.
- Turn up the brightness knob.
- Inspect or replace the bulb.
- Verify beam splitter or disc diaphragm position.
- Test fuse, battery, or software settings.
- Seek warranty or professional help if internal failure is suspected.
Most issues are simple oversights—not broken hardware. With these steps, you’ll fix the problem in minutes. And for modern digital models? Warranty service is faster and safer than DIY.
Keep this guide handy. Next time the light fails, you’ll be the one who fixes it—no service call needed.