If you’ve ever adjusted magnification on a compound microscope, you’ve used the microscope nosepiece—a small but essential component that makes seamless transitions between objective lenses possible. Officially known as the revolving nosepiece, objective turret, or revolving turret, this part holds multiple lenses and rotates them into position over the specimen. Understanding the microscope nosepiece definition, how it works, and how to use it properly is crucial for anyone using a microscope, from students to lab professionals.
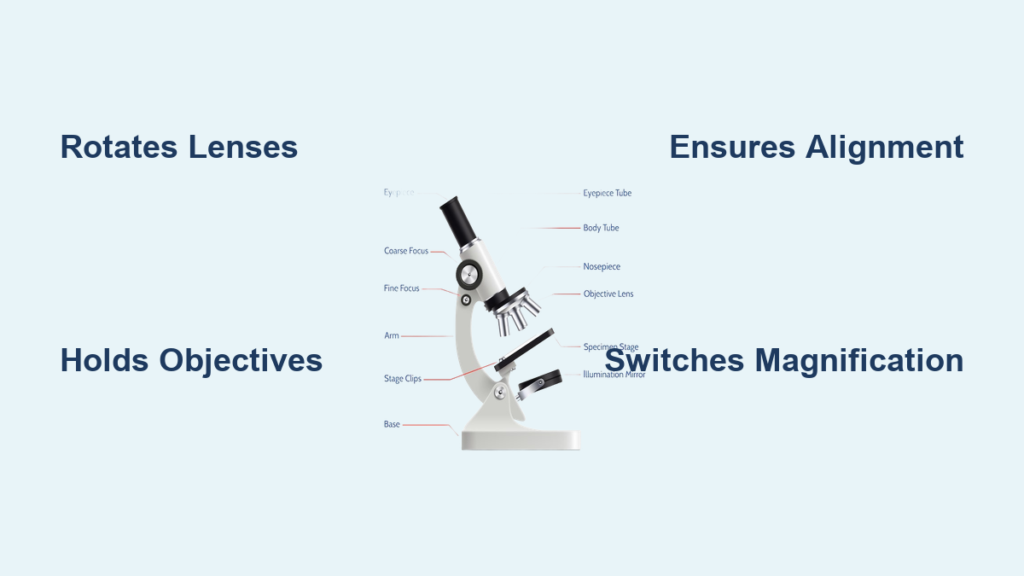
The nosepiece isn’t just a lens holder—it’s a precision interface that ensures each objective aligns perfectly with the optical path. Located just below the body tube and above the stage, it connects the lenses to the microscope’s head and allows quick switching between magnifications like 4×, 10×, 40×, and 100×. Without it, changing objectives would require unscrewing and reattaching each lens manually—an inefficient and risky process that could damage both lenses and slides.
In this guide, we’ll explore the microscope nosepiece in depth: its structure, function, variations, and role in effective microscopy. You’ll learn how it supports parfocality, maintains alignment, and enables advanced imaging workflows. Whether you’re troubleshooting focus issues, upgrading your setup, or teaching microscopy basics, this breakdown will help you get the most from your instrument.
What Is a Microscope Nosepiece?
Official Definition and Alternative Names
The microscope nosepiece is the rotating component attached to the lower end of the body tube that holds and positions multiple objective lenses. Also called the revolving turret or objective turret, it allows users to switch between different magnifications quickly and accurately.
In scientific terms, the nosepiece acts as the mechanical and optical interface between the objective lenses and the microscope’s optical axis. It ensures that each lens can be brought into precise alignment with the light path from the condenser, through the specimen, and up to the eyepieces.
While “nosepiece” can refer to parts in other fields—like the bridge of eyeglasses or a helmet’s protective plate—in microscopy, it refers exclusively to this lens-carrying turret. Its name likely comes from its protruding position beneath the microscope head, resembling a nose.
Where Is the Nosepiece Located?
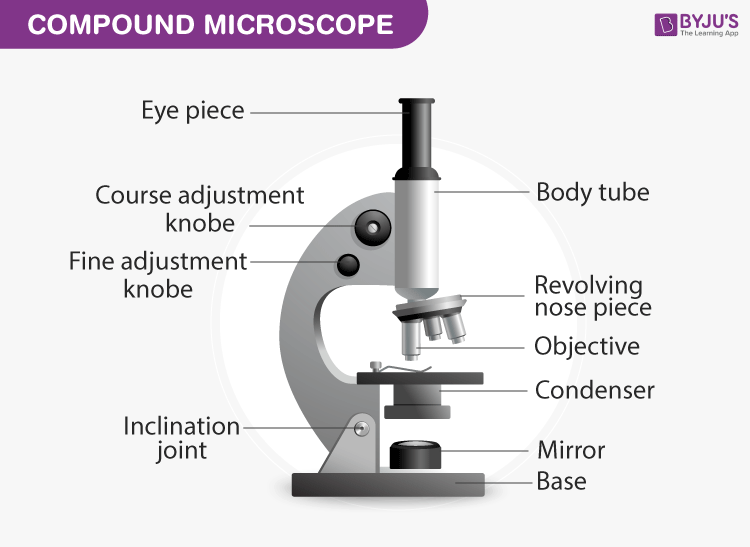
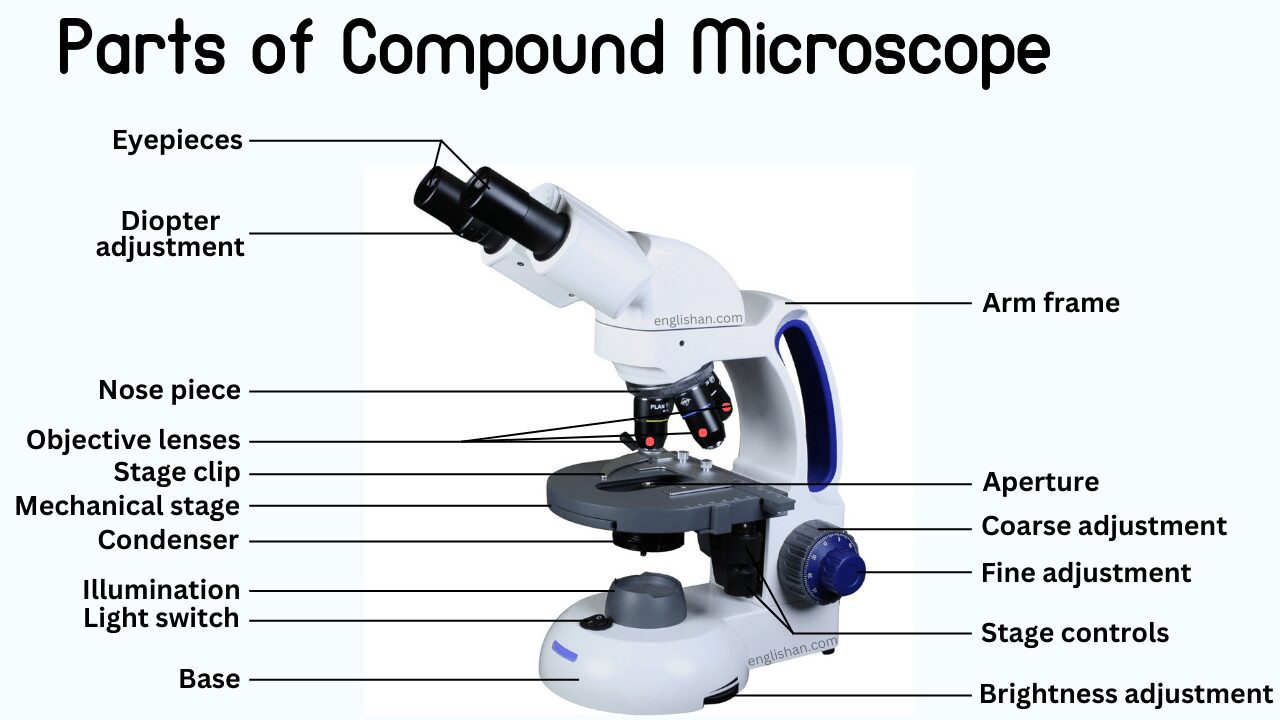
The nosepiece sits between the body tube and the stage, directly above the specimen. It attaches to the microscope head via a threaded or bayonet mount and rotates freely to bring each objective lens into use.
This central location makes the nosepiece a critical link in the imaging chain. When you rotate it, you’re aligning a new objective with the condenser and eyepiece optics. If the nosepiece is misaligned, damaged, or improperly used, it can cause blurry images, off-center fields of view, or even lens crashes into slides.
Physical Structure and Key Features
Shape, Material, and Build Quality
Most nosepieces are cylindrical or polygonal discs made from durable metal alloys such as aluminum or steel. These materials provide strength, resist wear, and maintain precise alignment over time. Plastic nosepieces exist but are typically found only in low-cost or student-grade microscopes and are more prone to stripping or warping.
The design includes 3 to 6 threaded holes arranged radially to hold objective lenses. High-end models may feature centering screws that allow fine-tuning of each lens position, ensuring perfect coaxial alignment across all magnifications.
Serrated Edge for Easy Rotation
A knurled or serrated outer rim is a standard feature on most nosepieces. This textured edge improves grip, allowing users to rotate the turret easily—even when wearing gloves. It also prevents accidental contact with the lenses, which can lead to contamination, scratches, or misalignment.
Always rotate the nosepiece by gripping this edge, never the lenses themselves.
RMS Thread Standard for Universal Compatibility
Each lens slot uses the RMS (Royal Microscopical Society) thread standard: 0.7965”-36 UNH. This universal threading ensures that objective lenses from different manufacturers can be used interchangeably on compatible microscopes.
Thanks to RMS standardization, you can replace a 100× oil immersion lens with a 60× dry objective or add a phase contrast lens without changing the entire nosepiece. This flexibility allows users to customize their microscope for specific applications.
Core Functions of the Nosepiece
Holds Multiple Objective Lenses Securely
The primary role of the nosepiece is to securely hold 3 to 6 objective lenses. These typically include:
– 4× (scanning) – for locating the specimen
– 10× (low power) – for general observation
– 40× (high power) – for detailed structure
– 100× (oil immersion) – for maximum resolution
By mounting these lenses on a single rotating turret, the nosepiece eliminates the need to manually unscrew and replace objectives, saving time and reducing contamination risk.
Enables Fast, Smooth Magnification Changes
Rotating the nosepiece allows instant switching between magnifications. This supports a standard microscopy workflow:
1. Start with the 4× objective to find the area of interest.
2. Rotate to 10× for broader detail.
3. Move to 40× or 100× for high-resolution analysis.
This stepwise approach prevents high-power lenses from crashing into slides and ensures efficient navigation of the specimen.
Maintains Optical Alignment Across Lenses
Each time you switch objectives, the new lens must align perfectly with the optical axis—the straight path from the eyepiece through the specimen to the light source. A well-made nosepiece ensures coaxial alignment, meaning the center of the field of view remains consistent across all magnifications.
Poor alignment causes image shift, forcing you to re-center the specimen after every magnification change—an inefficient and frustrating experience.
Common Nosepiece Configurations
3-Position Nosepieces: Basic Educational Use
Found in entry-level microscopes, 3-position nosepieces typically hold:
– 4×
– 10×
– 40×
Ideal for middle school or high school biology labs, these turrets are simple, durable, and sufficient for basic observations where oil immersion isn’t required.
4-Position Nosepieces: The Standard for Most Labs
The most common configuration, 4-position nosepieces accommodate:
– 4×
– 10×
– 40×
– 100× (oil immersion)
This setup supports full magnification range and is standard in college labs, medical testing, and general research environments.
5–6 Position Nosepieces: For Advanced Research
Used in high-end research microscopes like the Olympus BX or Nikon Eclipse series, these turrets allow for specialized combinations, such as:
– Brightfield objectives
– Phase contrast lenses
– Fluorescence objectives
– DIC (Differential Interference Contrast)
With more positions, users can switch between imaging techniques instantly—critical for live-cell imaging or pathology work.
Forward vs Rear-Facing Objective Designs
Forward-Facing Objectives (Toward the User)
In some microscopes, the objective lenses point toward the operator. This design can make it easier to apply immersion oil but may interfere with slide handling, especially with large or awkward samples.
Common in older or budget models, forward-facing turrets can limit workspace on the stage.
Rear-Facing Objectives (Away from the User)
Most modern microscopes use rear-facing objectives, where lenses point away from the user. This design provides:
– More open stage space
– Easier slide manipulation
– Better ergonomics for frequent sample changes
Preferred in clinical and teaching labs, rear-facing nosepieces improve workflow efficiency and reduce hand fatigue.
Role in the Microscopy Workflow
Start Low, Focus, Then Increase Magnification
The nosepiece enables the standard microscopy procedure:
1. Begin with the 4× objective to locate the specimen.
2. Focus using coarse and fine focus knobs.
3. Rotate the nosepiece to 10×, then 40×, refining focus at each step.
4. Use 100× oil immersion for finest detail (if applicable).
This method prevents lens damage and ensures smooth navigation.
Why You Should Never Start at High Power
Starting with the 40× or 100× lens risks:
– Scratching or cracking the slide
– Damaging the objective lens
– Losing the specimen in the narrow field of view
The nosepiece makes it easy to follow best practices by keeping the low-power lens within quick reach.
Parfocality: Stay in Focus When Switching Objectives
What Is Parfocality?
Parfocality means that when you rotate the nosepiece to switch lenses, the specimen remains approximately in focus. Only minor adjustments with the fine focus knob should be needed.
This feature saves time and protects lenses by minimizing large focus movements.
How the Nosepiece Supports Parfocality
High-quality nosepieces are precisely machined so that all lenses sit at the same focal plane. When combined with parfocal objectives, the system minimizes refocusing.
If your microscope requires major refocusing after rotation, check for:
– Loose or improperly tightened lenses
– Damaged threads on the nosepiece or objective
– Non-parfocal lenses
– Misaligned or worn nosepiece turret
Compatibility and Standardization
RMS Thread: Universal Lens Fit
The RMS thread (0.7965”-36 UNH) ensures that most light microscope objectives fit securely into the nosepiece—regardless of brand. This allows cost-effective upgrades, such as adding a high-performance 60× dry lens from a third-party supplier.
Infinity vs Finite Tube Systems
While the nosepiece handles mechanical mounting, ensure your objectives match your microscope’s optical system:
– Finite (160 mm tube length): Older microscopes
– Infinity-corrected: Modern research instruments
Using incompatible objectives—even if they screw in—can result in blurry or unfocused images.
Maintenance and Care Tips
Clean After Using Oil Immersion
After using the 100× oil lens, wipe the nosepiece and threads with lens paper. Leftover oil can:
– Attract dust
– Corrode metal over time
– Contaminate other lenses
Use only lens paper and mild lens cleaner—never alcohol or abrasive cleaners.
Prevent Dust and Debris Buildup
Always cover your microscope when not in use. If dust accumulates:
– Use compressed air or a soft brush
– Avoid blowing with your mouth (moisture promotes fungal growth)
Dust on the nosepiece can scratch lenses or interfere with smooth rotation.
Rotate Properly to Avoid Damage
Always:
– Grip the serrated edge, not the lenses
– Rotate until the objective clicks or locks into place
– Avoid forcing the turret if it sticks
Forcing rotation can strip threads or decenter lenses, leading to permanent misalignment.
Upgrading and Customizing Your Setup
Replace 100× Oil with 60× Dry Objective
Many users find the 100× oil lens impractical. A 60× dry objective offers:
– High magnification without oil
– Easier cleanup
– Excellent resolution for pond water, histology, or routine inspections
Simply unscrew the 100× lens and install the 60× in its place.
Test for Parfocality After Changes
When adding new lenses:
1. Tighten securely
2. Rotate through all positions
3. Check if focus remains stable
4. Adjust centering screws if available
Misaligned or non-parfocal lenses defeat the purpose of a revolving nosepiece.
Best Practices for Users
Rotate Clockwise for Higher Magnification
A common convention is to arrange objectives so that clockwise rotation increases magnification (4× → 10× → 40× → 100×). This builds muscle memory and improves efficiency.
If your setup rotates the opposite way, consider reordering the lenses.
Ensure Full Seating Before Focusing
Always rotate the nosepiece until you hear or feel a click or lock. A partially seated lens won’t be aligned, risking blurry images or collisions.
Never focus while rotating—stop, lock, then adjust focus.
Importance in Education and Testing
Students are often tested on:
– The name and function of the nosepiece
– Its role in magnification changes
– Proper rotation technique
– The concept of parfocality
Educators emphasize nosepiece use to teach workflow discipline, equipment care, and precision handling—foundational skills in microscopy.
Final Note: The microscope nosepiece is a precision component that enables efficient, accurate, and safe observation. By understanding its definition, function, and proper use, you can maximize your microscope’s performance and longevity. Whether you’re a student, teacher, or researcher, treating the nosepiece with care ensures reliable magnification changes and consistent, high-quality imaging across all applications.