
Knowing how to change magnification on a microscope is essential for anyone working in biology, education, engineering, or industrial inspection. Whether you’re viewing a single cell or inspecting a circuit board, adjusting magnification properly allows you to see fine details clearly while protecting your equipment. Most microscopes offer multiple ways to control magnification—through objective lenses, eyepieces, zoom controls, or auxiliary lenses. The key is not just increasing the size of the image, but doing so without sacrificing clarity or damaging the specimen. In this guide, you’ll learn the exact steps to adjust magnification safely and effectively on both compound and stereo microscopes, how to calculate total magnification, avoid common mistakes like empty magnification, and match settings to your specific task.
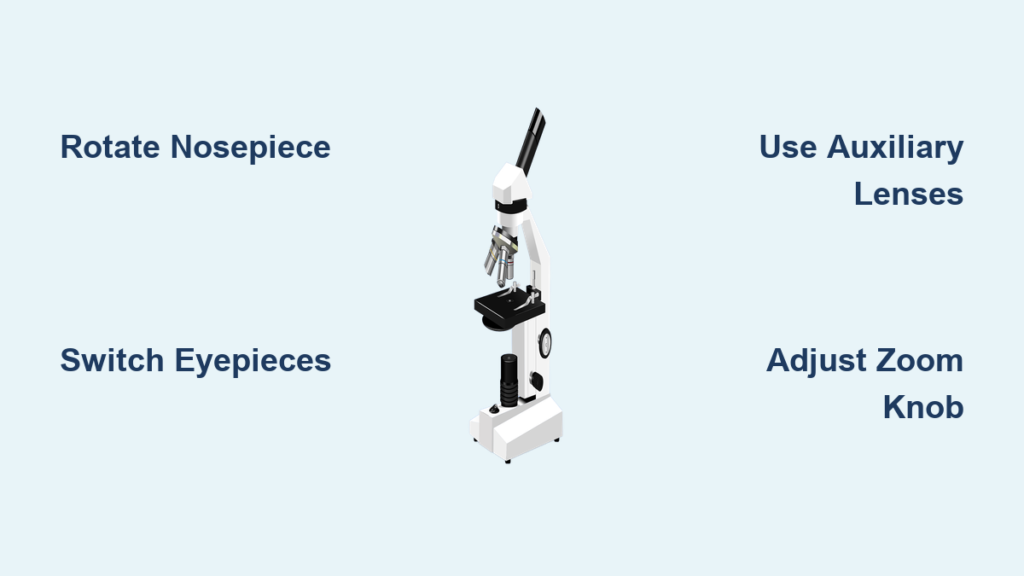
Rotate the Nosepiece to Switch Objectives
The most common way to change magnification on a compound microscope is by rotating the nosepiece to select a different objective lens.
Match Lens Length to Magnification Level
Objective lenses are color-coded and vary in length: shorter lenses provide lower magnification, while longer lenses offer higher power. Standard configurations include:
– 4x (red) – scanning view
– 10x (yellow) – low power
– 40x (blue) – high power
– 100x (white) – oil immersion
Always begin with the 4x objective. It gives the widest field of view, making it easier to locate your specimen and reducing the risk of crashing the lens into the slide.
Listen for the Click
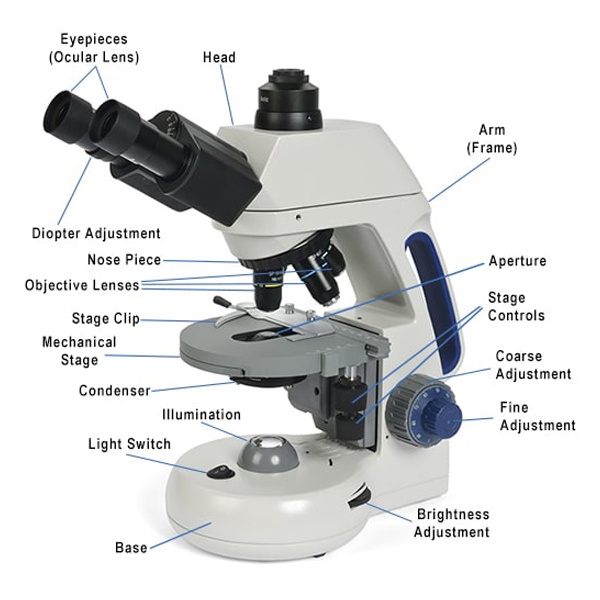
When switching objectives, rotate the nosepiece slowly until you hear a distinct click. This confirms the lens is securely aligned with the optical path. Never force the turret—if it resists, realign the lenses before continuing. Forcing it can misalign optics or damage internal gears.
Avoid Slide Damage at High Power
High-magnification objectives extend much closer to the slide. After switching to 40x or 100x, use only the fine focus knob. The coarse knob moves the stage too quickly and can push the lens into the slide, causing scratches or breakage. Always focus upward (away from the slide) when using high power.
Upgrade Eyepieces for Permanent Magnification Change
Replacing the ocular lens (eyepiece) is a simple way to increase total magnification across all objectives.
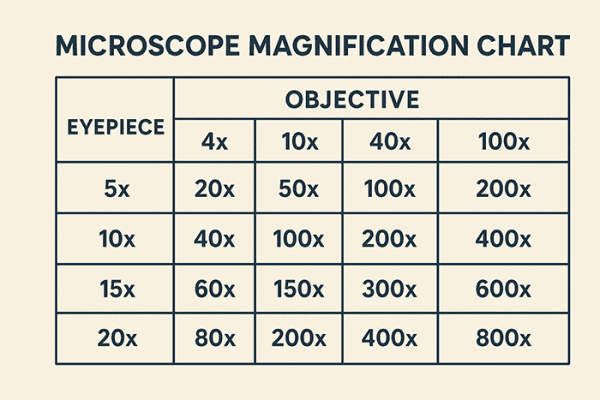
Calculate New Total Magnification
Use this formula:
Total Magnification = Objective × Eyepiece
For example:
– 40x objective × 10x eyepiece = 400x
– 40x objective × 16x eyepiece = 640x
Standard eyepieces are usually 10x, but 12.5x, 15x, 20x, and even 30x options are available. Swapping eyepieces increases magnification uniformly across all objectives.
Watch for Empty Magnification
Higher-power eyepieces enlarge the image but don’t improve resolution. If the objective lens can’t resolve finer details, you’ll see a larger, blurrier image—this is empty magnification. It’s common when using 30x eyepieces with low-NA objectives. Stick to eyepieces that match your objective’s resolving power for clear, useful images.
No Impact on Working Distance
Unlike auxiliary lenses, changing eyepieces doesn’t affect working distance—the space between the lens and specimen. This makes eyepiece upgrades ideal when you need more detail without sacrificing room for tools or manipulation.
Attach Auxiliary Lenses on Stereo Microscopes
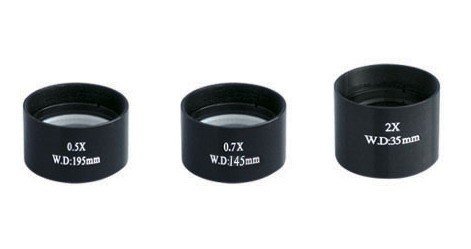
Auxiliary lenses screw onto the bottom of stereo microscopes and change the base magnification.
Choose Between Magnifying and Reducing Lenses
| Lens Type | Effect | Best For |
|---|---|---|
| 0.3x–0.75x | Reduces magnification, increases working distance | Industrial repair, surgery |
| 1.0x | Neutral—no change | Standard viewing |
| 1.5x–2.0x | Increases magnification, reduces working distance | Fine-detail inspection |
Use reduction lenses (e.g., 0.5x) when you need space for tools. Use magnifying lenses (e.g., 2.0x) for inspecting tiny solder joints or surface defects.
Adjust for Working Distance Needs
High-magnification auxiliary lenses drastically reduce working distance. A 2.0x lens can cut clearance by up to 75%. Always check space before attaching—especially in electronics or medical applications where tools must fit under the lens.
Recalculate Total Magnification
With auxiliary lenses, the formula becomes:
Zoom Setting × Eyepiece × Auxiliary Lens
Example:
0.7x zoom × 10x eyepiece × 1.5x auxiliary = 10.5x total magnification
Use the Zoom Knob on Stereo Microscopes
Many stereo microscopes feature a continuous zoom mechanism instead of fixed objectives.
Smooth Adjustment Without Switching
Turn the zoom knob or lever to increase or decrease magnification seamlessly. Common ranges include 0.62x–4.2x or 1x–7x. This eliminates vibration from turret rotation and allows real-time scaling during inspection.
Maintain Focus Across Zoom Levels
Quality zoom systems are parfocal, meaning the image stays in focus as you zoom. Lower-cost models may require minor refocusing. Always fine-tune with the focus knob after adjusting zoom to ensure clarity.
Optimize Lighting at Higher Zoom
As magnification increases, the field darkens due to reduced light transmission. Increase illumination or open the diaphragm to maintain visibility. Ring lights or coaxial illuminators help preserve even brightness and reduce shadows.
Follow the Correct Step-by-Step Workflow
A structured approach prevents damage and ensures optimal viewing.
Start at the Lowest Magnification
Begin with the 4x objective or minimum zoom setting. This gives the widest field of view, making it easier to find and center your specimen. Secure the slide with stage clips and adjust brightness.
Center and Focus Before Zooming
Use the coarse focus knob to bring the sample into rough focus. Once visible, center the area of interest. Only then should you increase magnification.
Progressively Increase Magnification
Switch objectives one step at a time—4x → 10x → 40x—or turn the zoom knob gradually. After each change, use fine focus only to sharpen the image.
Refocus and Re-Light as Needed
Higher magnifications reduce depth of field and light intake. Re-adjust condenser height, diaphragm aperture, or light intensity for sharper contrast. Avoid over-illumination, which can wash out details.
Apply Oil for 100x Objectives Correctly
The 100x oil immersion objective requires special handling for maximum resolution.
Apply a Drop of Immersion Oil
Place a small drop of immersion oil directly on the cover slip over the specimen. Then rotate the 100x objective into place. The oil eliminates air gaps, reducing light scattering and improving clarity.
Focus Only with Fine Adjustment
Never use the coarse knob with the 100x lens. Even slight movement can drive the oil-covered lens into the slide. Use fine focus exclusively and turn slowly.
Clean After Use
Wipe oil from the lens and slide using lens paper and a recommended cleaner (e.g., xylene or commercial lens solution). Leaving oil on degrades lens coatings and attracts dust.
Understand Magnification Limits and Trade-Offs
Increasing magnification comes with trade-offs that impact image quality.
Field of View Shrinks with Higher Power
As magnification increases, you see less of the specimen. At 40x, you might view an entire cell; at 400x, only its nucleus. This narrowing makes navigation harder—always re-center before switching up.
Depth of Focus Decreases
High magnification reduces the thickness of the plane in focus. At 1000x, only a thin slice of a cell may be sharp. Use fine focus to “optically section” through layers.
Resolution, Not Just Magnification, Matters
Resolution—the ability to distinguish two close points—is limited by the objective’s numerical aperture (NA). Beyond a certain point, increasing magnification adds no useful detail. That’s empty magnification: big, blurry, and unhelpful.
Use Meiji EM Series Magnification Tables
For Meiji EM series microscopes, refer to magnification tables to plan your setup.
Zoom Models: EMZ-1, EMZ-6, EMZ-10, EMZ-13
Example:
EMZ-13 with 2.0x auxiliary lens and 30x eyepieces
– Zoom range: 1–7x
– Total magnification: 60–420x
– Working distance: drops to 32mm at highest power
This combination is ideal for ultra-fine inspection but requires precise handling due to minimal clearance.
Fixed/Turret Models: EMF-1, EMT-2, EMX-1
Example:
EMT-2 with 2.0x auxiliary lens
– Objectives: 1x, 3x
– With 10x eyepiece: 20x, 60x
– With 30x eyepiece: 60x, 180x
These models offer discrete steps rather than continuous zoom, suited for applications requiring consistent, repeatable settings.
Follow Best Practices for Safe, Effective Use
Adopting proven techniques improves results and extends microscope life.
Always Begin with Low Power
Starting at low magnification prevents collisions and simplifies specimen location. It’s the safest and most efficient method—used in classrooms and labs worldwide.
Refine Focus Gradually
After switching objectives or zoom levels, make small adjustments with the fine focus knob. Rapid turns can overshoot focus or damage slides.
Adjust Illumination Strategically
Higher magnifications need more light. Use the condenser and iris diaphragm to balance brightness and contrast. Too much light washes out detail; too little obscures structure.
Document Observations at Each Level
Record or photograph your specimen at different magnifications. Label each with:
– Objective power
– Eyepiece magnification
– Auxiliary lens (if used)
– Total magnification
– Notes on detail, clarity, and field size
This builds analytical skills and supports accurate reporting.
Match Magnification to Your Application
Different tasks require different setups.
Biological Research: Use Compound Microscopes
- Typical range: 40x to 1000x
- Objectives: 4x, 10x, 40x, 100x (oil)
- Eyepieces: 10x standard, up to 16x
- Best for: Viewing cells, bacteria, tissues
Start with 4x to locate, then move to 10x and 40x. Use oil immersion at 100x for maximum resolution.
Industrial Inspection: Use Stereo Microscopes
- Typical range: 5x to 200x (up to 420x with accessories)
- Zoom or fixed objectives with auxiliary lenses
- Emphasis on 3D view, depth of field, working space
- Best for: Circuit boards, watch repair, dissection, quality control
Use 0.5x auxiliary lens for tool access; switch to 2.0x for solder joint inspection.
Summary of Key Takeaways
- Total magnification = Objective × Eyepiece × (Auxiliary Lens)
- Always start at the lowest power to locate and center your specimen
- Rotate the nosepiece until it clicks—never force it
- Longer objective = higher magnification = greater crash risk
- Use fine focus only at medium and high magnifications
- Immersion oil is mandatory for 100x objectives—clean after use
- Eyepiece changes boost magnification without altering working distance
- Auxiliary lenses change both magnification and working space—choose wisely
- Zoom microscopes allow smooth, continuous adjustment via a knob
- Field of view and depth of focus decrease as magnification increases
- Document every observation with full magnification details
Mastering how to change magnification on a microscope isn’t just about turning knobs—it’s about understanding optics, safety, and application needs. Whether you’re a student, researcher, or technician, using the right combination of lenses and techniques ensures clear, meaningful images every time. Remember: higher magnification isn’t always better. Prioritize resolution, clarity, and proper handling over sheer zoom power. With practice, you’ll quickly learn to balance these factors for precise, reliable microscopic analysis.


