

A smudge on the lens might seem minor, but in microscopy, it can mean the difference between a groundbreaking discovery and a blurry misinterpretation. Dust, fingerprints, dried immersion oil, and other contaminants scatter light, reduce contrast, and obscure fine details—jeopardizing research accuracy, diagnostic precision, and educational clarity. Knowing how to clean microscope lens properly isn’t just good lab practice; it’s essential for preserving image quality and protecting expensive optical components. This guide provides a step-by-step, expert-backed method using only safe tools and techniques. You’ll learn exactly when to clean, what supplies to use, how to avoid damaging delicate coatings, and how to keep your microscope performing like new for years.
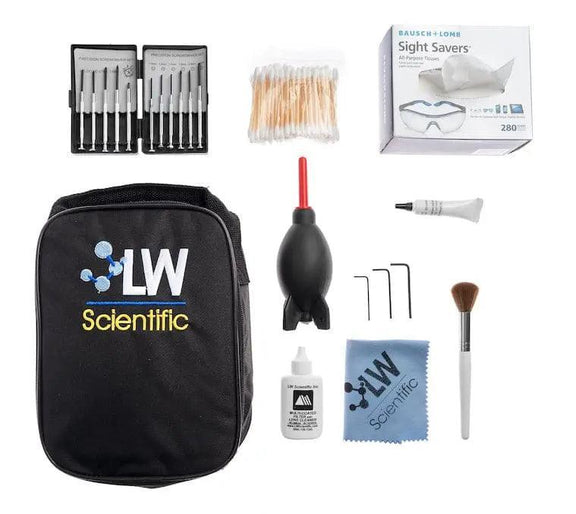
Essential Cleaning Tools and Materials
Using the wrong cloth or cleaner is one of the fastest ways to ruin a high-quality lens. Always use tools specifically designed for optical surfaces.
Use These Approved Cleaning Supplies
- Air blower (squeeze bulb): Removes loose dust without touching the lens. Recommended: Giottos AA1910 Medium Rocket Air Blaster.
- Soft-bristle brush: For particles that won’t blow away. A clean makeup brush (e.g., Elf Brand) works well and is lint-free.
- Lint-free wipes:
- KimTech Science Delicate Task Wipes – anti-static, single-ply, safe on mirrors, prisms, and coated lenses.
- Fine-grade lens paper – ideal for high-magnification objectives; avoid coarse varieties.
- Microfiber cloths: Must be optics-rated, not generic. Wash with scent-free, softener-free detergent to prevent residue buildup.
- Cleaning solvents:
- Isopropyl alcohol (IPA), 90%+ purity – most effective for removing oils and organic residues.
- Ethanol, 95–98% – a safer alternative for some vintage optics.
- Commercial lens cleaners – ZEISS Cleaning Mixture L or photography-grade fluids are reliable.
- Avoid: Household glass cleaners, ammonia-based sprays, or “rubbing alcohol” with additives—they dissolve lens cement and attract dust.
- Cotton swabs: Use high-quality 100% cotton or foam-tipped swabs. Never reuse.
- Forceps: Handle lens paper with tweezers to avoid transferring skin oils.
Pro Tip: Always apply solvent to the wipe—not the lens. This prevents liquid from seeping into internal lens elements, which can cause fogging or permanent damage.
When to Clean Your Microscope Lens
Never clean on a fixed schedule. Over-cleaning wears down anti-reflective coatings. Only clean when contamination is confirmed.
Signs Your Lens Needs Cleaning
- Fixed spots or smudges that don’t move with the specimen
- Ghosting, halos, or reduced contrast around bright objects
- Blurry zones that persist across focus adjustments
- Hazy or oily film visible under oblique lighting
How to Confirm Contamination
- Rotate the eyepiece: If the defect moves, it’s on the eyepiece.
- Switch objectives: If the issue disappears, the previous objective was dirty.
- Use a clean test slide: Persistent artifacts indicate lens contamination.
- Inspect with side lighting: Shine a flashlight at an angle to reveal invisible fingerprints or oil films.
Expert Advice: “Never clean optics based on guesswork. Confirm the source first—then clean only what’s necessary.”
Daily and Weekly Maintenance Routine
Prevent buildup with consistent, minimal cleaning.
Daily Steps (After Each Use)
- Use an air blower to remove dust from lenses, stage, and condenser.
- Wipe eyepieces and objectives with dry lens paper.
- Turn off illumination and cover the microscope with a dust cover.
Weekly Cleaning Checklist
- Clean all exposed lens surfaces: eyepieces, objectives, condenser.
- Use a slightly damp Kimwipe with 90% IPA if residue is present.
- Inspect immersion objectives for oil residue.
- Check stage and slide holder for debris.
Critical Rule: Always remove immersion oil immediately after use—never let it dry.
Step-by-Step Cleaning Procedure
Follow this sequence to clean lenses safely and effectively.
1. Prepare the Microscope
- Power off and unplug the instrument.
- Work in a clean, low-dust area.
- Allow the microscope to cool if recently used.
- Remove objectives or eyepieces only for deep cleaning.
2. Remove Loose Dust
- Hold the microscope vertically to prevent particles from falling into internal parts.
- Use an air blower with short, directed bursts.
- For stubborn particles, use a soft brush with gentle outward strokes.
- Never touch the lens surface at this stage.
Warning: Do not use canned air unless absolutely necessary—and never tilt the can. Propellant discharge can damage coatings.
3. Apply Cleaning Solution Correctly
- Place 1–2 drops of 90% IPA or ethanol on a fresh lens paper or Kimwipe.
- The wipe should be damp, not wet.
- Never spray or drip solvent directly onto the lens.
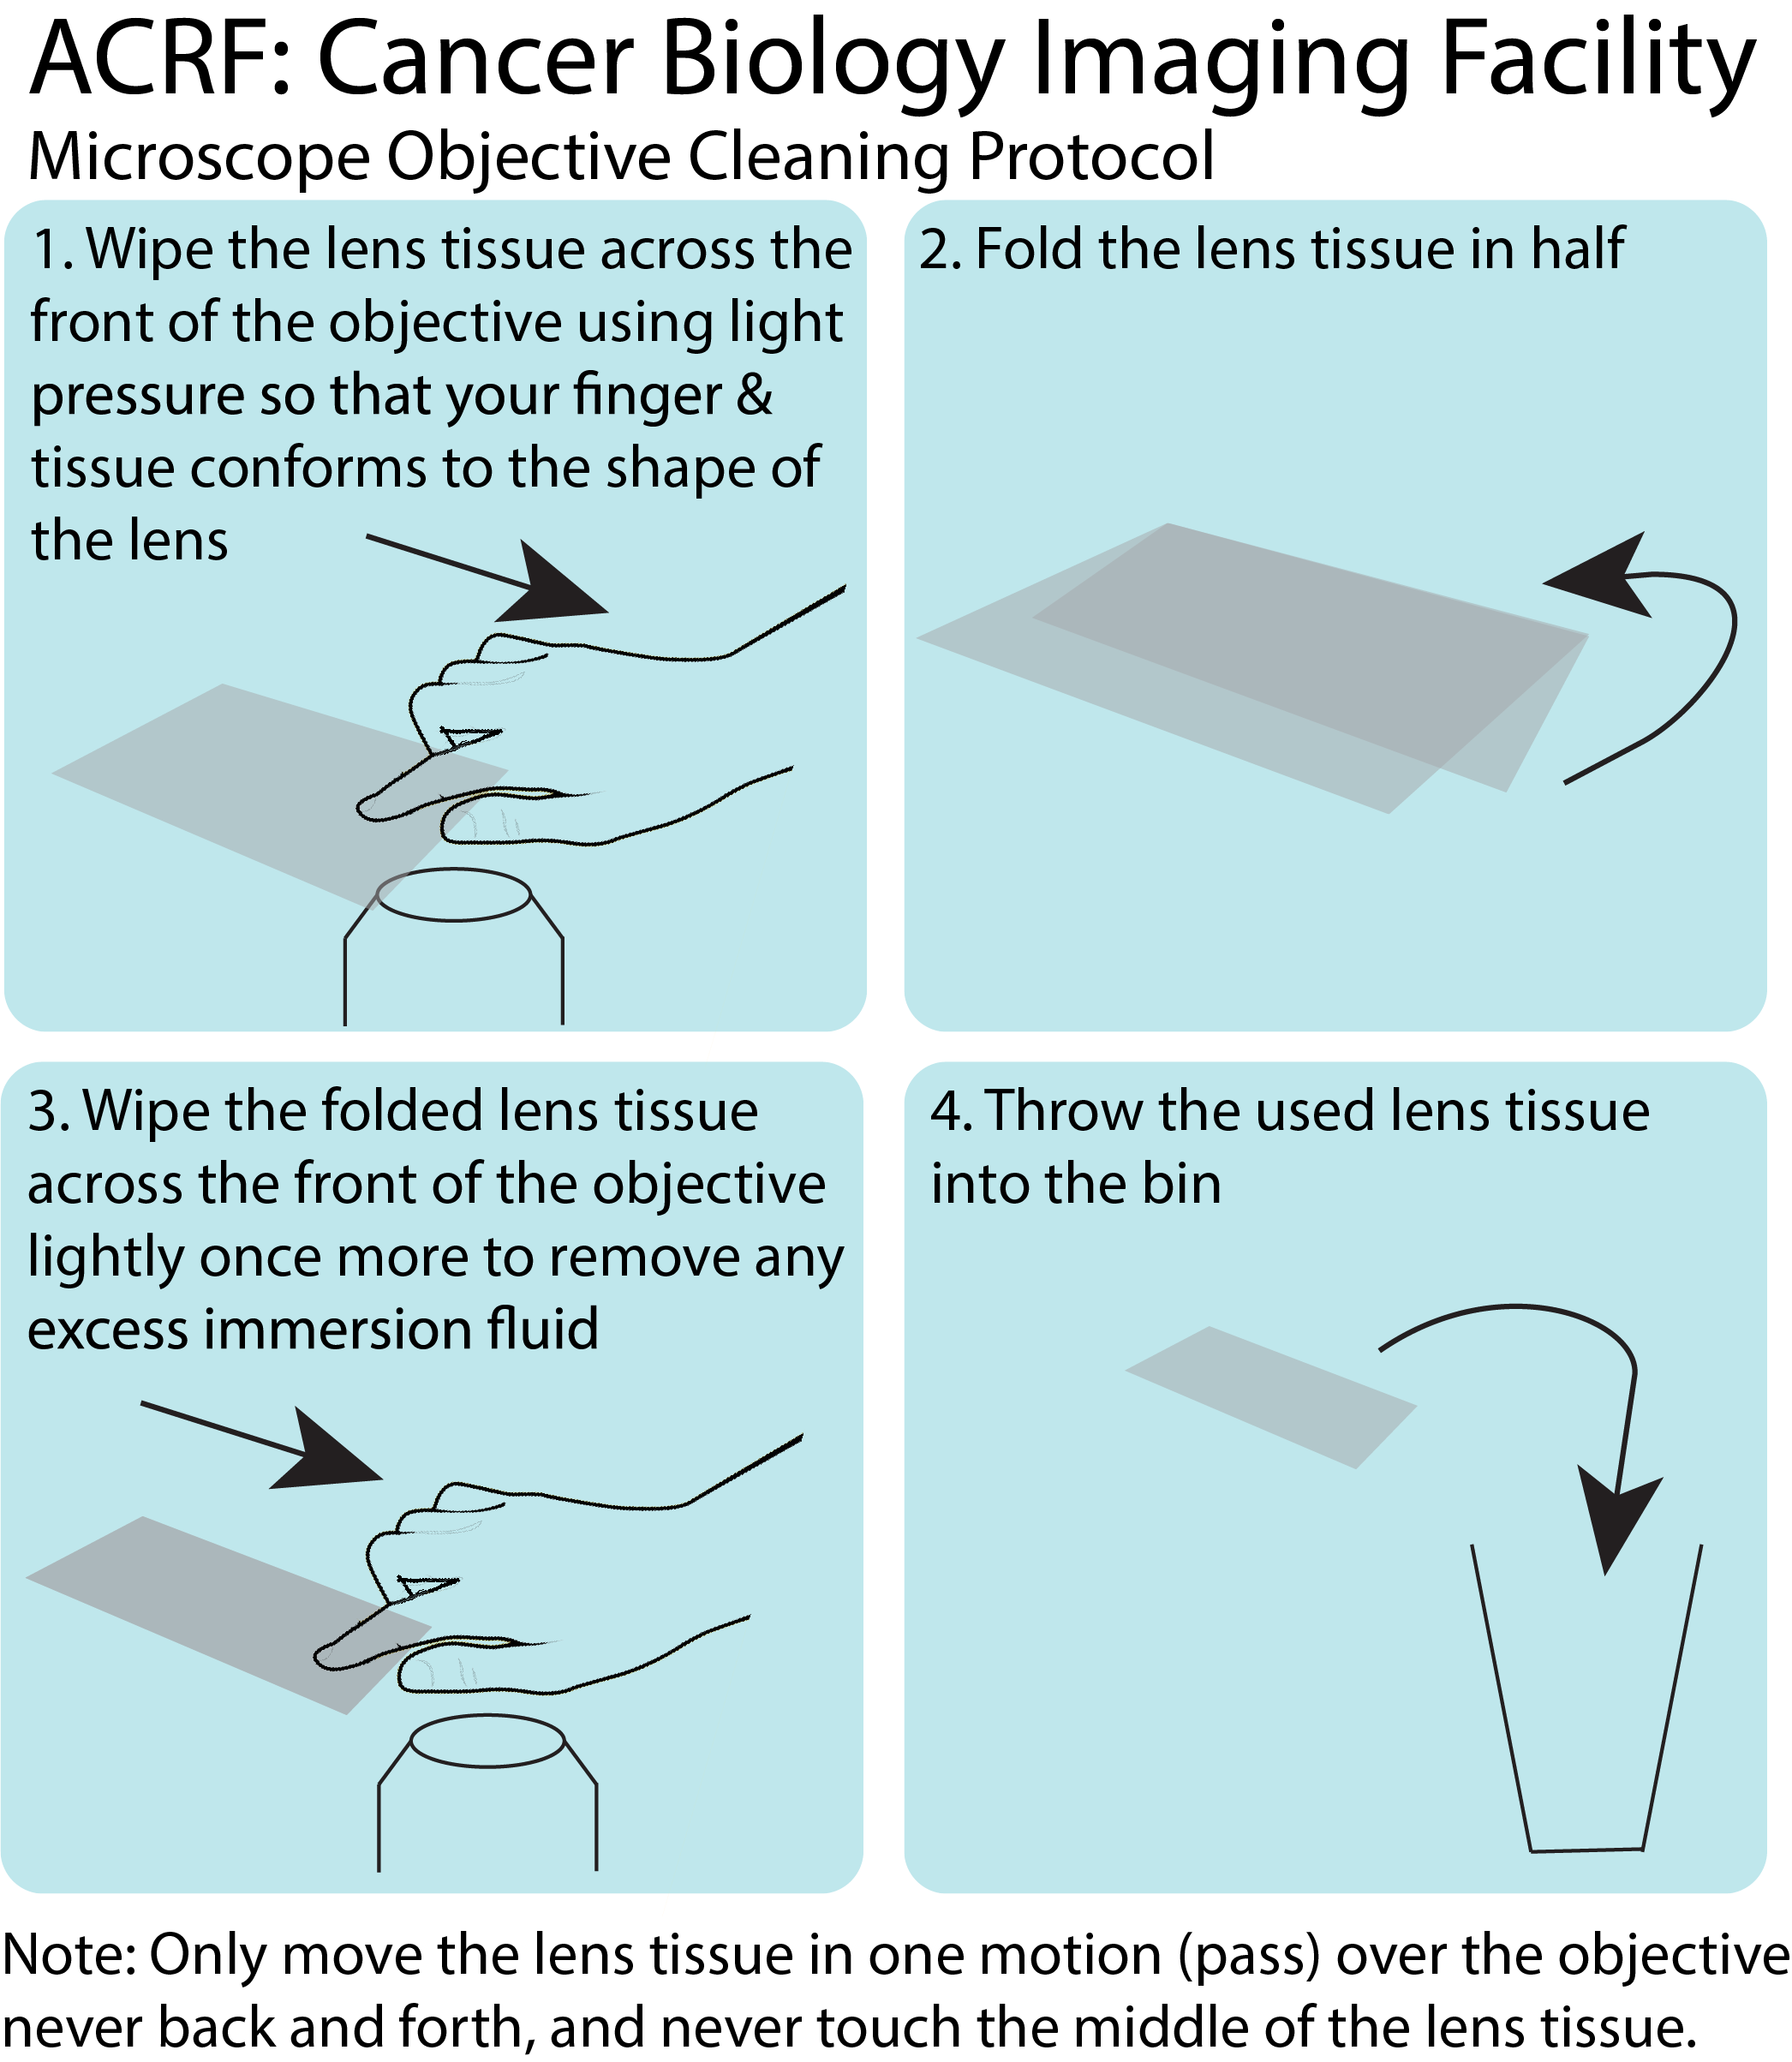
4. Wipe the Lens Surface
Choose one method and stick to it:
- Circular motion: Start at the center and spiral outward gently (common in labs).
- One-directional wipe: Minimizes swirl marks on coated lenses (preferred by some experts).
Use minimal pressure—let the solvent dissolve the grime. Roll a cotton swab slowly as you wipe to lift debris.
Pro Tip: Replace wipes or swabs frequently. A dirty swab scratches more than it cleans.
5. Dry and Inspect
- Use a dry section of lens paper or microfiber cloth for a final pass.
- Check under bright light for streaks or residue.
- Repeat if needed with fresh materials.
6. Reassemble and Test
- Reinstall components carefully.
- Use a clean slide to verify image quality.
- Confirm all artifacts are gone before resuming work.
Note: Both wiping methods are acceptable. Choose based on your equipment and results.
Cleaning Oil Immersion Objectives

Oil immersion lenses require immediate attention after use.
Immediate Post-Use Steps
- Wipe the front lens with dry lens paper right after removing the slide.
- If residue remains, moisten paper with 90%+ IPA or 95% ethanol.
- Wipe gently in a circular or linear motion.
- Finish with a dry pass.
Critical Warning: Dried immersion oil hardens and can permanently damage lens coatings or cement. Never delay cleaning.
What NOT to Do When Cleaning
Avoid these damaging practices at all costs.
Common Mistakes to Avoid
- ❌ Using paper towels or tissues – They contain wood fibers that scratch lenses.
- ❌ Applying household cleaners – Ammonia or Windex dissolves lens cement.
- ❌ Spraying solvent directly on the lens – Risk of internal seepage and fogging.
- ❌ Pressing hard while wiping – Even soft cloths abrade coatings under pressure.
- ❌ Using unapproved microfiber cloths – Some trap dirt or leave residues.
- ❌ Using xylene or acetone routinely – Toxic and harmful to lens materials.
- ❌ Cleaning vintage scopes with water – Corrodes old metals and cements.
Expert Caution: “Never use eyeglass cleaner on microscope lenses—additives attract dust and strip anti-reflective coatings.”
Internal and Vintage Microscope Cleaning
Only experienced users should attempt internal cleaning.
Risks of Internal Cleaning
- Disassembling objectives or eyepieces can misalign optics.
- Matte black paint inside vintage scopes may flake, causing internal specks.
- Bakelite parts (common in pre-1970s scopes) are brittle and prone to cracking.
Safe Practices for Vintage Optics
- Use 90% IPA or 95% ethanol only—never distilled water.
- Clean prisms and mirrors with extreme care and minimal solvent.
- Repair flaking baffle paint with matte black nail polish or spray paint.
- Research brand-specific materials before cleaning.
Pro Insight: “With vintage scopes, I avoid water entirely. Older metals and lens cements are vulnerable to corrosion.”
When to Call a Professional
Some issues require expert service.
Indicators for Professional Help
- Image quality declines despite proper cleaning
- Focus drift or mechanical instability
- Suspected internal contamination
- Damaged lens coatings or cement separation
- Microscope under warranty or service contract
Expert Recommendation: ZEISS-certified technicians use diagnostic tools and OEM parts to restore full performance—especially for high-end or research-grade instruments.
Proper Storage and Transport
Prevent contamination and physical damage with correct handling.
Transport Best Practices
- Remove objectives, eyepieces, and condenser.
- Store in foam-lined cases or original packaging.
- Keep objectives vertical to avoid thread stress.
- Label as “Fragile Optical Instrument”.
- Include silica gel packets to control moisture.
Long-Term Storage Tips
- Store in a dry, dust-free environment.
- Avoid direct sunlight and temperature swings.
- Use a manufacturer-approved dust cover.
- Never store with oil residue—it hardens and damages objectives.
Pro Tip: “Never store a microscope with oil on the lens—it can ruin the objective.”
Recommended Products and Brands
Use only high-quality, optics-safe materials.
Top-Rated Supplies
| Category | Recommended Products |
|---|---|
| Solvents | 90%+ IPA (reagent grade), 95–98% ethanol, ZEISS Cleaning Mixture L |
| Wipes | KimTech Science Delicate Task Wipes (8.4″ x 4.4″), Edmund Optics #52-105 lens paper |
| Tools | Giottos AA1910 air blaster, soft makeup brush, fine-tip forceps |
| Swabs | Foam-tipped or 100% cotton, single-use only |
User Tip: “Use forceps to fold lens paper. Apply 92%+ IPA—this method gives streak-free results on any reflective surface.”
Final Tips for Long-Term Lens Care
Protect your investment with smart habits.
Key Maintenance Rules
- ✅ Clean only when necessary—over-cleaning wears down anti-reflective coatings.
- ✅ Confirm contamination location before cleaning any component.
- ✅ Always use fresh wipes and swabs—never reuse.
- ✅ For electronics or soldering residue, use reagent-grade IPA.
- ✅ Wash microfiber cloths regularly with safe detergent.
- ✅ Store slides in 70% ethanol; cover glasses last indefinitely.
Expert Summary: “A clean microscope lens is crucial for accurate, high-resolution imaging. Professionals use specialized tools and methods to maintain optics at peak performance—follow their lead to protect your equipment.”
Final Note: Cleaning microscope lenses properly isn’t about frequency—it’s about precision, the right tools, and avoiding preventable damage. By following this guide, you ensure clear imaging, extend the life of your optics, and maintain the integrity of your observations. Keep your kit ready, clean only when needed, and always prioritize safety over speed.


