

A microscope is only as accurate as the care it receives. Whether you’re a student, educator, or researcher, knowing how to store and carry a microscope properly is essential for preserving its precision, performance, and lifespan. These sophisticated instruments contain delicate lenses, sensitive focus mechanisms, and often advanced electronic components—all vulnerable to damage from drops, dust, moisture, or improper handling. Even a minor misstep during transport or storage can lead to misaligned optics, scratched lenses, or mechanical failure, compromising image quality and requiring costly repairs. This guide provides a clear, step-by-step approach to safely moving and storing any microscope, from classroom models to high-end research systems. You’ll learn exactly how to prepare your scope for transport, carry it securely, choose the right storage environment, and maintain it over time—ensuring it remains a reliable tool for discovery and analysis.
Power Down and Prepare Before Moving
Before lifting a microscope, always take time to power it down and prepare it for transport. Skipping this step increases the risk of electrical damage, lens contamination, or mechanical stress.
Remove and Clean the Slide
Begin by removing any specimen slide from the stage. Leftover liquids or biological material can dry and corrode metal surfaces or interfere with future observations. Wipe the stage with a slightly damp lint-free cloth if residue is present, then dry it thoroughly. Never use harsh chemicals or abrasive materials, as they can scratch the stage surface.
Turn Off and Unplug All Components
Switch off the illumination system—whether LED, halogen, or fluorescent—and unplug the power cord from both the microscope and the wall outlet. For digital models equipped with cameras, monitors, or computer interfaces, power down all connected devices and disconnect USB, HDMI, or Ethernet cables. This prevents accidental activation during movement and protects sensitive electronics from power surges or short circuits.
Clean Lenses and Exterior Surfaces
Use compressed air or a soft brush to remove loose dust from the microscope’s exterior. For lenses—both eyepieces and objectives—use only lens paper to avoid scratches. Apply a small amount of ethanol-based lens cleaning solution to the paper (never directly onto the lens) and wipe gently in a spiral motion from center to edge. Avoid using alcohol on coated optics unless approved by the manufacturer, as repeated exposure can degrade anti-reflective layers over time.
Set the Microscope to a Safe Transport Position
Positioning the microscope correctly before movement minimizes stress on internal components and prevents accidental collisions between lenses and the stage.
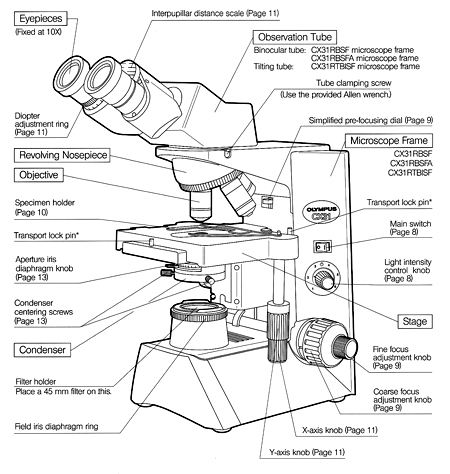
Rotate to the Lowest Objective
Turn the nosepiece so that the 4x or 10x objective is aligned over the stage. High-power objectives (like 40x or 100x oil immersion) extend farther and are more prone to striking the stage if the microscope is bumped. Placing the shortest lens in position creates maximum clearance and reduces the risk of damage.
Lower the Stage or Raise the Body
On upright microscopes, use the coarse focus knob to lower the stage fully. On inverted models, raise the body to create space between the objectives and the stage. This prevents contact during transport, protecting both the lenses and the focus mechanism gears from unnecessary strain.
Secure Eyepieces and Detachable Components
Reinsert eyepieces firmly into the binocular tube. Remove digital cameras, filters, or auxiliary lenses and store them in protective cases. If your model allows, reverse the binocular head 180° by loosening the fixing screw, rotating it, then retightening. This reduces the overall height and prevents protrusion damage during storage or transport.
Organize and Store Cables Properly
Wind the power cord neatly around built-in cable hooks or clips. Store the AC adapter in a designated compartment on the base or in an accessory box. Never wrap cords tightly around sharp edges—they can fray or break. Keep connectors covered to prevent dust buildup in ports.
Cover the Microscope to Prevent Contamination
After use, always cover the microscope. A proper cover shields against dust, moisture, and accidental bumps.
Use a Breathable Dust Cover
Choose a fabric dust cover or manufacturer-provided vinyl cover designed for your specific model. These allow airflow while blocking particulates. Avoid sealing the microscope in plastic bags—trapped moisture promotes mold growth and corrosion, especially in humid environments.
Ensure a Snug, Non-Pressing Fit
The cover should fit securely without pressing on knobs, levers, or protruding parts. Misaligned covers can deform over time or apply pressure that misaligns focus mechanisms. Replace torn or ill-fitting covers immediately to maintain protection.
Carry the Microscope with Two Hands for Stability
How you carry a microscope determines whether it survives daily use. Never treat it like ordinary equipment.
Use the Arm and Base Grip
Always carry the microscope with two hands: one gripping the arm, the other supporting the base. This distributes weight evenly and keeps the unit stable. Your arms should cradle the microscope close to your body to minimize swinging or imbalance.
Follow Model-Specific Carrying Techniques
Different microscopes require slight variations in handling:
CKX™ Inverted Microscopes
Hold the lower binocular section with one hand and the hand grip at the base of the column with the other. Keep the unit vertical—never tilt.
CX™ Upright Microscopes
Grip both sides of the arm firmly and support the base with your forearm. Walk slowly with clear vision ahead.
SZ51/61 Stereo Microscopes
Place one hand under the stand base, the other on the column. Lift straight up and move steadily to prevent wobbling.
Warning: Complex systems like BX™, IX™, or SZX™ models should only be moved by trained technicians. Their weight, modular design, and optical sensitivity make improper transport a serious risk.
Move Slowly and Keep the Microscope Upright
Speed increases the risk of accidents. Always move deliberately and keep the microscope upright at all times.
Keep It Vertical at All Times
Never lay a microscope on its side or tilt it excessively. Doing so can dislodge internal prisms, misalign light paths, or cause oil from immersion objectives to leak into mechanical parts. Always maintain an upright orientation during transport.
Clear the Path and Move Carefully
Check doorways, cords, and floor obstacles before moving. Sudden stops or turns can shift your balance and lead to drops. In labs with heavy foot traffic, schedule transport during low-activity periods.
Use a Padded Cart for Long Distances
If moving the microscope across rooms or floors, place it on a padded lab cart with raised edges. Secure it with straps if available. Never stack items on top. For fieldwork or off-site use, invest in a custom foam-lined case that holds the scope and accessories securely.
Store in a Clean, Dry, and Stable Environment

Where you store a microscope affects its condition more than most users realize.
Choose the Right Storage Location
Store the microscope in a clean, dry, temperature-stable room. Avoid:
– Direct sunlight (causes heat buildup and fading)
– High humidity (leads to mold and rust)
– Dusty areas (clogs gears and coats lenses)
– Vibration sources (e.g., centrifuges, foot traffic)
Place it on a level bench, cabinet, or shelf—never on the floor. Keep away from windows, heaters, or air conditioning vents that cause thermal fluctuations.
Maintain Ideal Temperature and Humidity
Keep the storage area between 10°C and 30°C (50°F–86°F). Sudden temperature changes cause condensation, which damages electronics and fosters fungal growth on lenses. In facilities without climate control, use a sealed cabinet with silica gel desiccants to absorb moisture.
Use Proper Storage Solutions
- Dedicated cabinets with soft lining and locks prevent unauthorized access and physical damage.
- Ventilated enclosures allow airflow without exposing the scope to airborne contaminants.
- Original packaging (if available) offers the best protection for long-term storage or shipping.
Prevent Contamination and Environmental Damage
Even when not in use, microscopes face threats from moisture, chemicals, and physical hazards.
Avoid Moisture Traps
Do not place rubber mats, paper towels, or absorbent pads under the microscope. These trap humidity against the base and encourage corrosion. Instead, ensure the surface is clean and non-porous.
Keep Chemicals and Biological Agents Away
Store the microscope away from acids, solvents, or biological cultures. Fumes can damage plastic components, corrode metal, or fog lenses. In shared labs, assign a designated “clean zone” for optical instruments.
Never Stack Items on or Near the Microscope
Avoid placing books, boxes, or other equipment on or near the stored microscope. A falling object can crack lenses, bend the arm, or knock the unit off the shelf.
Perform Regular Maintenance During Storage
A stored microscope isn’t maintenance-free. Regular checks prevent small issues from becoming major failures.
Inspect Every 2–3 Months
Even if unused, examine the microscope every few months:
– Check for dust accumulation and clean lenses if needed.
– Test all knobs and focus controls for smooth operation.
– Look for signs of mold, corrosion, or insect intrusion.
– Confirm the dust cover is intact and correctly positioned.
– Briefly power on the system (if safe) to verify illumination and electronics.
Long-Term Storage Tips
For storage exceeding six months:
– Insert fresh silica gel packs inside the cabinet or cover.
– Store detachable eyepieces and objectives in sealed containers with desiccant.
– Consider removing batteries from cordless models to prevent leakage.
Adapt Handling to Microscope Type
Storage and transport needs vary by model. Apply these type-specific guidelines.
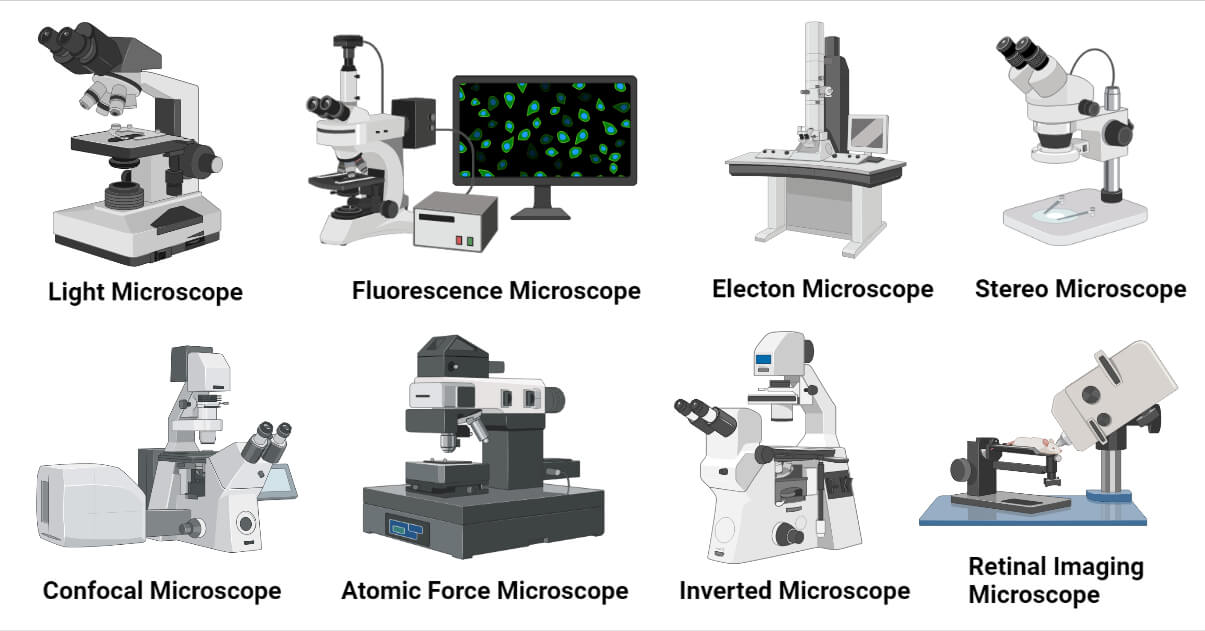
Student/Upright Microscopes (e.g., CX23)
Lightweight and durable, these are safe for student handling under supervision. Always enforce the two-hand carry rule. Store in classroom cabinets with individual slots. Cover after every use to prevent chalk dust or debris buildup.
Inverted Microscopes (e.g., CKX Series)
Carry using the binocular section and base grip. Never tilt. Store upright with the stage clear and objectives in low-power position. Ideal for cell culture labs—keep away from CO₂ incubators that emit moisture.
Stereo Microscopes (e.g., SZ51/61, SZX Series)
Simple models can be carried manually; complex versions with boom stands or digital attachments require technician assistance. Store with zoom controls protected from dust. Lock the boom arm if applicable to prevent accidental movement.
Digital/Imaging Microscopes
Handle camera modules and touchscreens with extra care. Store USB drives, calibration tools, and software licenses together in a labeled case. Protect sensors from static discharge by avoiding synthetic clothing during handling.
Fluorescence or Confocal Systems
These high-sensitivity instruments should never be moved by untrained personnel. Relocation often requires partial disassembly and professional recalibration. Store in climate-controlled rooms. Lamp housings and filters may need separate, light-proof storage to preserve performance.
Why Proper Handling Matters
Proper storage and transport protect delicate components, preserve image quality, prevent mechanical wear, and extend the microscope’s lifespan. A well-maintained instrument delivers consistent, reliable results—saving time, money, and ensuring scientific integrity.
Final Checklist: Store and Carry a Microscope Safely
✅ Turn off and unplug all power sources
✅ Remove and clean the slide from the stage
✅ Clean lenses with lens paper and approved solution
✅ Rotate nosepiece to lowest objective (4x or 10x)
✅ Lower the stage completely using coarse focus
✅ Secure eyepieces and detachable components
✅ Reverse binocular tube if recommended
✅ Wind and store cables properly
✅ Cover with breathable dust cover
✅ Carry with two hands: one on arm, one under base
✅ Move slowly and keep upright
✅ Store in dry, stable, dust-free environment
✅ Perform periodic inspections every 2–3 months
By following these steps consistently, you protect one of science’s most essential tools. Whether in a school lab or a research facility, disciplined handling ensures your microscope remains accurate, reliable, and ready for discovery.


