
Your shower drain gurgles ominously after every rinse, and no amount of plunging or chemical cleaners fixes that persistent slow drain. You’ve probably wrestled with a manual drain snake before—wrist aching, cable twisting, and clogs laughing at your efforts. But what if you could clear that hair-and-gunk blockage in under five minutes using the cordless drill already in your garage? How to use a drain snake with drill transforms drain clearing from a messy chore into surgical precision, leveraging your drill’s torque to shred through roots, hair, and soap scum that hand-cranked snakes can’t touch. This isn’t just about convenience; it’s about avoiding $200 plumber calls for clogs you can fix yourself—if you avoid the critical mistakes that damage pipes or leave you stranded with a stuck cable.
The magic happens when your drill’s rotation transfers to the snake cable, creating a corkscrew force that grabs hair like a drill bit bites wood. But skip safety prep or misjudge drill settings, and you’ll rip PVC joints or send metal shrapnel flying. I’ve seen DIYers melt drill chucks by forcing kinked cables through P-traps or accidentally drill holes in cast-iron pipes. This guide cuts through the guesswork with field-tested steps from professional drain cleaners, including the #1 mistake that ruins 80% of DIY attempts (hint: it’s not what you think). You’ll learn exactly how to feed cables without kinking, choose drill speeds that slice clogs instead of jamming cables, and retrieve hair wads without redepositing gunk downstream.
Critical Safety Gear You Can’t Skip for Drill-Powered Snaking
Skipping safety gear turns your drill-powered snake into a pipe-damaging hazard. That spinning cable moves at 300+ RPMs—fast enough to slice skin or shatter PVC if it whips loose. Most DIY injuries happen when users underestimate how violently the cable can recoil when hitting a joint.
Non-Negotiable Protective Equipment
- Impact-Resistant Gloves: Wear mechanics gloves with reinforced palms (like Ironclad Apex). They prevent cable burrs from slicing your skin during retrieval and give grip when pulling slimy gunk. Never use cloth gloves—they’ll snag and tear.
- Polycarbonate Safety Goggles: Debris flies sideways when the auger tip hits a clog. Standard glasses won’t stop high-velocity hair or soap chunks. OSHA-approved goggles with side shields are essential.
- Rubber-Soled Work Boots: Prevent slips on wet floors if water backs up. Avoid sandals—metal fragments from damaged cables can cause serious foot injuries.
Workspace Setup That Prevents Disaster
Clear the area of rugs and toiletries first—this isn’t optional when the cable could whip out of the drain. Place a 5-gallon bucket lined with a trash bag directly under the drain, then lay absorbent mats (like Shop-Vac spill pads) around it. For tubs, remove the overflow plate but never feed the snake through the overflow opening—the pipe angles sharply downward and traps cables. Always access via the main drain. If working on a sink, unplug the garbage disposal and flip its circuit breaker—even residual magnetism can spin blades when the snake passes through.
Choosing the Right Drill Snake Combo for Your Pipes

Using the wrong cable diameter or drill setting cracks pipes or melts tools. Most home clogs need a 1/4-inch cable, but oversized tools cause catastrophic damage.
Snake Cable Selection Guide
- For Sinks/Tubs: Use a 25-foot, 1/4-inch steel cable with a smooth-spiral guard. Avoid “cutting blade” tips—they snag on PVC joints. Instead, choose a corkscrew auger tip (like the Instant Power Drain Snake) that grabs hair without scratching pipes.
- For Main Lines: Step up to a 3/8-inch cable only if you have cast-iron pipes. Residential PVC cracks under larger diameters.
- Critical Check: Inspect the cable before every use. If you see a kink—even a slight bend—do not use it. As one user learned the hard way: “A 90-degree kink makes the cable jump violently inside pipes, preventing it from reaching the clog.” Straighten minor kinks with locking pliers, or clip off damaged sections and attach a new tip (replacement tips cost $5 at Home Depot).
Drill Setup That Prevents Cable Jams
- Drill Settings: Set to forward rotation only—never hammer or impact mode. Start at the lowest speed (under 300 RPM). Higher speeds cause cables to “helix” and knot inside pipes.
- Chuck Security: Insert the cable hex shank 1.5 inches into the chuck, then tighten with a screwdriver—not just the key. Any wobble creates dangerous vibration.
- Control Handle: Attach the drill’s side handle. Your off-hand must brace against pipe resistance; freehand drilling risks losing control when the cable hits a clog.
Step-by-Step: Snaking a Drain with a Drill Without Damaging Pipes
Manual Feed Through the P-Trap (The Make-or-Break Step)
Start by hand-feeding the cable 12-18 inches into the drain until you feel the U-bend of the P-trap. Do not use the drill yet. Twist the cable clockwise as you push—this navigates the curve without kinking. If you force it, the cable will jam against the trap’s inner wall. Once past the trap, you’ll feel sudden slack. Stop here; the main line begins.
Power-Feeding the Cable to the Clog
With your gloved hand guiding the cable entry point:
1. Set drill to lowest speed and squeeze the trigger for 2-second bursts.
2. Push gently as the cable rotates—never force it. If resistance increases, stop and pull back 6 inches before retrying.
3. Listen for changes: A smooth whirring means clear passage. A “grinding” sound means you’re hitting the clog. A “banging” noise means the cable is kinked or bent—stop immediately.
Breaking Up the Clog Like a Pro
When you feel the clog (usually 2-4 feet in for tubs), switch to a “pecking” motion:
– Engage drill for 3 seconds while applying light forward pressure
– Release trigger and pull back 2 inches
– Repeat until resistance vanishes
This prevents cables from wrapping around roots or hair masses. Once clear, run water from the faucet while slowly retracting the cable—this flushes debris downstream and prevents re-clogging.
Troubleshooting Drill Snake Failures in Under 60 Seconds

“The Cable Won’t Advance Past the P-Trap” Fix
This almost always means you’re feeding too fast or using the drill prematurely. Solution: Pull the cable out completely. Reinsert by hand while twisting clockwise with steady pressure. If it still jams, run hot water from the faucet during feeding—this lubricates the pipe and reduces friction. Never force it; persistent resistance means you’re hitting a joint, not a clog.
“The Drill Sounds Like It’s Jumping Inside the Pipe”
This is the kink problem described in the knowledge base: “Whenever I try to feed it… it sounds like it’s jumping around.” Immediate action: Stop drilling. Pull the cable out and inspect for bends. Straighten with pliers or clip the damaged section. Using a kinked cable risks cracking pipe joints—replace it before continuing.
“The Snake Got Stuck and Won’t Pull Out”
Reverse the drill to low-speed counter-clockwise rotation while applying gentle backward tension. If it doesn’t budge after 10 seconds, try a side-to-side rocking motion while pulling. Never yank hard—this can snap the cable. If still stuck, disassemble the P-trap to access the cable from below. Leaving it embedded invites pipe corrosion.
When to Call a Pro: Drill Snakes Have Limits
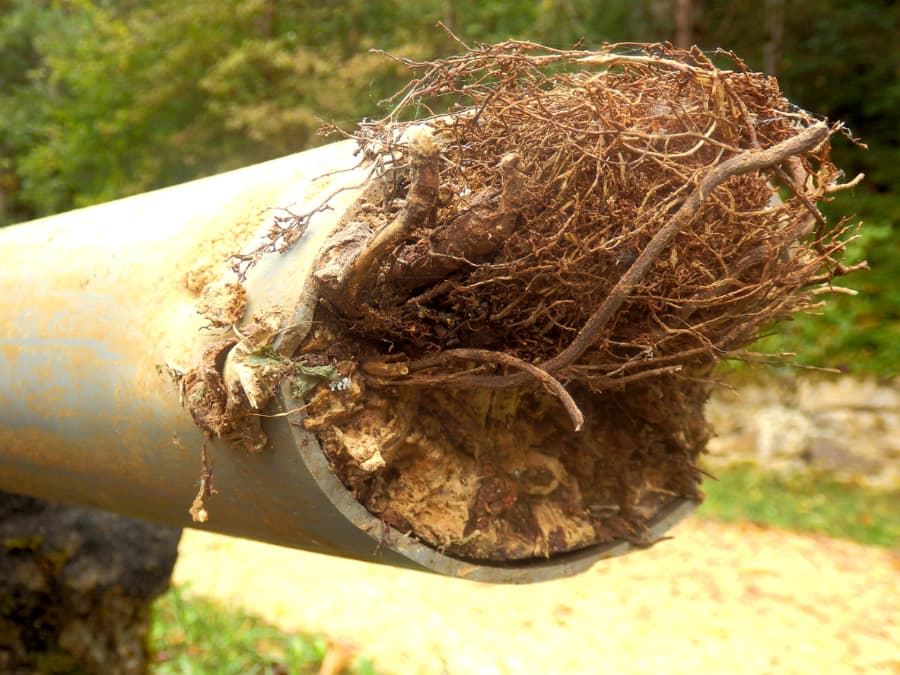
If your drain still backs up after three attempts with a straightened cable and proper technique, the clog is likely beyond DIY reach. Drill-powered snakes max out at clearing 25-50 feet of line—deeper main sewer blockages or concrete-hardened grease require industrial augers or hydro-jetting. Stop immediately if you smell sewage (indicating a broken pipe) or see water pooling under sinks (sign of a leak from overdrilling). One user’s monthly Drano habit after failed snake attempts proved the clog was actually tree roots—requiring a $150 professional rooter service they could’ve avoided with early intervention.
Final Note: A properly executed how to use a drain snake with drill session takes 5 minutes and costs $0 in chemicals. After clearing, pour enzyme cleaners (like Green Gobbler) monthly to prevent regrowth—never chemical drain openers, which corrode pipes. Store your snake fully uncoiled in a dry place; kinks form when cables sit bent. With these steps, you’ll clear 95% of household clogs safely. If the snake still won’t advance after checking for kinks and using slow pecking motions, your pipes likely need professional assessment before a minor clog becomes a flood.


