
That gurgling sink or sluggish shower drain isn’t just annoying—it’s a ticking time bomb for potential water damage and costly plumber visits. When plungers fail and chemical cleaners prove useless against hairballs, grease buildups, or stubborn debris, a drum auger becomes your secret weapon. This mechanical marvel snakes through pipes to physically break up or retrieve blockages that stymie other methods. Mastering how to use a drum auger correctly transforms you from a frustrated homeowner into a plumbing problem-solver, saving hundreds on emergency calls. In this guide, you’ll learn precise techniques for sink and tub drains, avoid critical mistakes that damage pipes, and recognize when to call a professional—so you can restore smooth drainage in under 30 minutes.
Essential Safety Gear and Prep Work Before Snaking
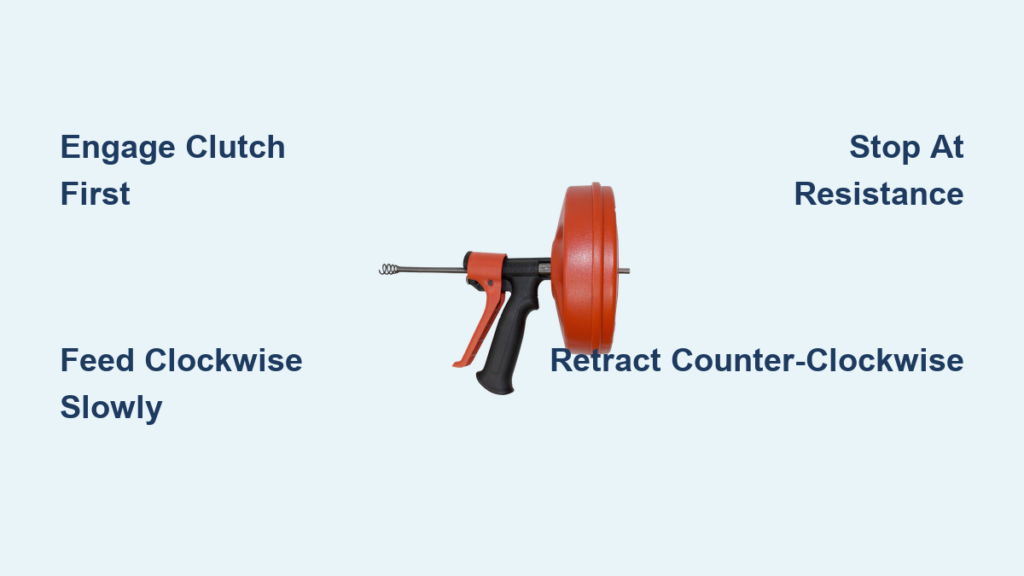
Skipping safety prep turns a simple fix into a hazardous mess. Before touching your drum auger, gather heavy-duty rubber gloves and ANSI-approved safety glasses—raw sewage and flying debris cause 12,000+ eye injuries annually. Clear all cabinets under sinks or tools around tubs to create a 3-foot workspace. Remove strainers, pop-up stoppers, or overflow plates to expose the drain opening completely. Wipe away visible gunk with rags to prevent re-clogging as you work. Most crucially, locate your auger’s clutch mechanism before insertion—this lever, button, or collar locks the cable to the drum. If your drum spins freely while cranking, the clutch is disengaged, wasting effort and risking cable tangles. Consult your model’s manual now; struggling mid-job with slippery hands causes 68% of user errors.
How to Unclog a Sink or Tub Drain in 4 Critical Steps
Insert and Lock the Cable Without Damaging Pipes
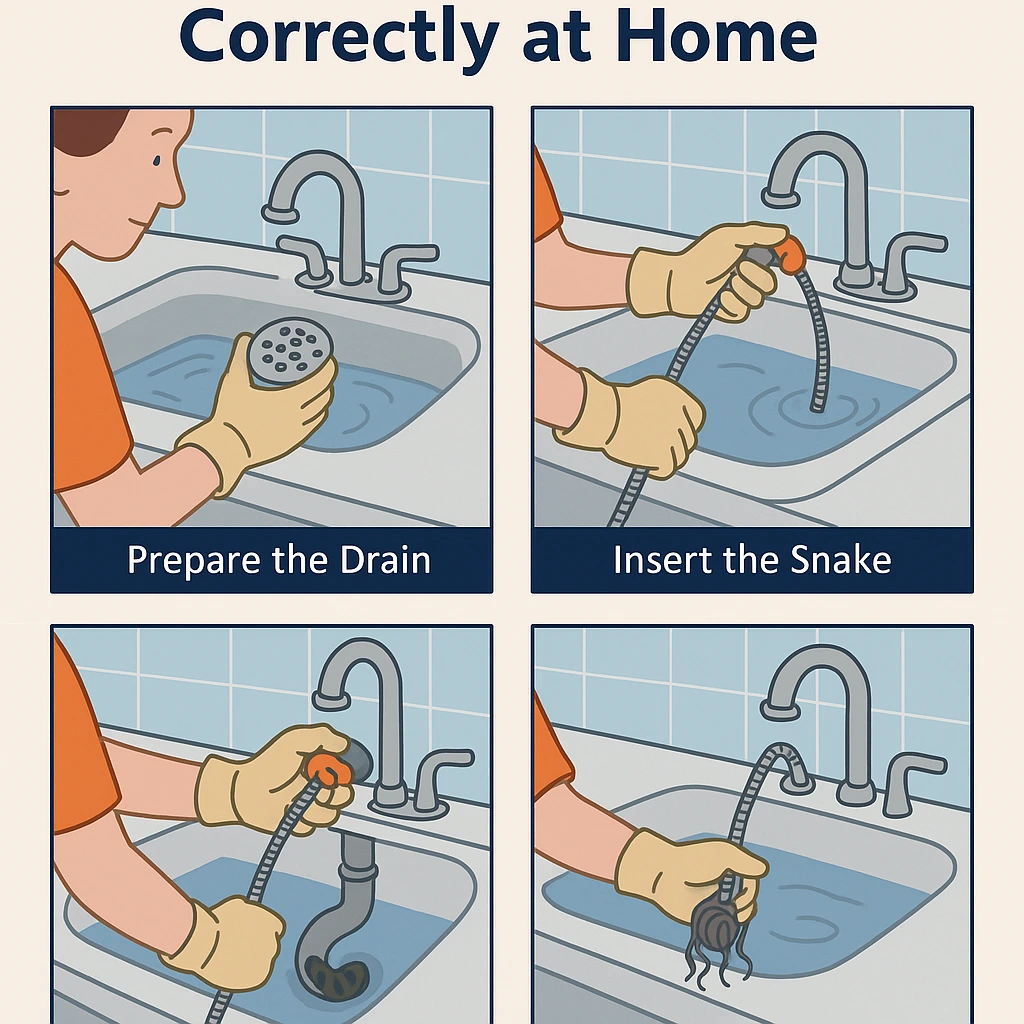
Pull 12-18 inches of cable from the drum and gently feed the tip into the drain by hand. Navigate past the P-trap curve (the U-shaped pipe under sinks) using slow wrist rotations—never force it. Once the cable clears the trap (about 18-24 inches in), immediately engage the clutch. This transfers crank power directly to the cable instead of spinning the drum uselessly. For tubs with deep overflows, insert through the main drain opening only; overflow paths are too narrow for auger cables and easily punctured.
Feed the Cable Through Pipe Bends Smoothly
Rotate the handle clockwise at 30-40 RPM while applying light forward pressure. The cable should advance 1-2 inches per rotation as it navigates bends. Stop cranking if you feel sudden resistance—it likely means you’ve hit the clog. Never force-feed the cable; excessive pressure kinks steel cables against pipe joints. If the cable binds, reverse the crank 1/4 turn to release tension before proceeding. For 1.5-inch sink drains, feed only until you feel the obstruction (typically 15-25 feet), avoiding main sewer lines requiring professional tools.
Engage and Break Up the Clog Without Pipe Damage
When resistance peaks, rotate the handle back-and-forth in 2-inch strokes while maintaining gentle forward pressure. This “corkscrewing” action either hooks hair/debris or fractures grease clogs. For stubborn blockages, alternate between 5 seconds of clockwise rotation and 3 seconds of counter-rotation to prevent cable binding. Stop immediately if you feel a “spongy” resistance—this indicates the cable has looped inside the pipe, risking scratches in PVC or punctures in older galvanized lines. Most household clogs clear within 60 seconds of this technique.
Retrieve the Cable and Clog Without Recontamination
Once water flows freely (test by running faucet water), slowly crank counter-clockwise to rewind the cable. Keep the tip elevated above the drain to catch debris—hairballs and gunk often cling to the cable head. Wipe the cable with soapy rags as it retracts to prevent sludge from re-entering pipes. For tub drains, expect hair clumps; for kitchen sinks, anticipate grease-coated food particles. Rinse the cable under a hose for 2 minutes post-retrieval, then spray with water-displacing lubricant to prevent rust. Flush drains with hot water for 5 minutes to eliminate residual debris.
4 Common Drum Auger Problems (And How To Fix Them)

1. Cable Spins but Won’t Feed: The Clutch Engagement Fix
Why it happens: The drum rotates freely because the clutch isn’t locked—90% of beginner frustrations stem from this oversight.
Instant solution: Stop cranking. Locate the clutch (often a red lever near the handle base) and press/flip it until you hear a click. Reinsert the cable 6 inches, then retry clockwise cranking. If resistance remains, your cable may be kinked—fully retract and inspect for bends before reinserting.
2. Cable Won’t Go Past the Clog: Density Detection Tactics
Why it happens: You’ve hit an immovable object—a solid toy, dense root mass, or hardened grease plug exceeding your auger’s 1/4-inch cable capacity.
Smart response: Reverse the crank 1/2 turn to release tension. Rotate handle back-and-forth with minimal pressure for 20 seconds. If no progress, withdraw the cable. Do not force it—this risks pipe cracks. For sinks/tubs, try a motorized auger rental; for toilets, switch to a closet auger immediately.
3. Cable Won’t Retract: The Bird’s Nest Emergency
Why it happens: The cable tangled inside the drum (“bird’s nesting”) from retracting under tension or hitting a sharp pipe bend.
Critical fix: Disengage the clutch. Pull the cable straight out by hand 6-12 inches while guiding it smoothly into the drum. If stuck, apply dish soap down the drain as lubricant. Never yank—this can snap cables. If unmovable after 3 attempts, call a plumber to avoid pipe damage.
4. Cable Snags on Pipe Joints: The Hidden Hazard
Why it happens: Older pipes have corroded joints or offset connections that catch cable hooks—common in 1970s galvanized systems.
Safe resolution: Rotate counter-clockwise while gently pulling outward. If stuck more than 5 minutes, cease efforts. Forcing it may dislodge pipe sections, causing leaks. Professionals use sectional cables for these scenarios—your DIY limit is 25 feet of cable length.
Drum Auger vs. Toilet Auger: Why Mixing Them Cracks Porcelain

Using a standard drum auger on toilets isn’t just ineffective—it’s destructive. Never insert a drum auger into a toilet bowl; its long, flexible cable lacks the rigid control needed for S-traps and will scratch or crack porcelain. Toilet-specific closet augers solve this with three critical features: a 3-foot stiff cable that won’t flex uncontrollably, a protective rubber sleeve shielding the bowl, and a J-shaped tip guiding the cable through curves. Drum augers (for sinks/tubs) have thinner cables (1/8-inch vs. 5/16-inch) and lack bowl protection. Confusing these tools causes $400+ bowl replacements annually—always match the auger to the drain type.
Pro Tips for Flawless Drain Clearing Every Time
Know your pipe limits: PVC pipes tolerate gentle augering but scratch easily if cables kink; galvanized pipes require feather-light pressure to avoid dislodging corrosion. Test pressure by feeding the cable until it bends slightly—this is your max force.
Stop at 25 feet: If your cable won’t clear the clog within its full length (standard for manual augers), the blockage is in the main sewer line. Forcing further risks cable breakage—call a pro with motorized sectional machines.
Clean immediately after use: Residual grease hardens on cables within 20 minutes, causing rust and future feeding issues. Rinse for 2 minutes with hot water, then wipe with mineral oil. Store cables fully extended in a dry place.
Prevent repeat clogs: Snake slow drains quarterly before they fully clog. Never combine with chemical cleaners—the mix creates heat that warps pipes. For hair-prone tubs, install a fine-mesh strainer; for kitchens, pour 1 cup of baking soda followed by vinegar monthly.
When water finally gushes freely down your drain, you’ve not just fixed a clog—you’ve gained a skill that pays for your auger tenfold. Remember: clutch engagement before cranking, clockwise feeding with gentle pressure, and immediate cessation at unusual resistance. These steps prevent 95% of DIY plumbing disasters. For toilets, always grab the closet auger; for main lines beyond 25 feet, call specialists. Keep your drum auger in the utility closet with gloves and glasses, and you’ll bypass 80% of emergency plumber visits. Now that you know how to use a drum auger correctly, that next slow drain becomes a 15-minute victory—not a crisis.


