Peering into a plant cell under microscope reveals a hidden world of geometric precision and biological function. Unlike animal cells, plant cells are encased in rigid boundaries and packed with specialized organelles that support growth, energy conversion, and structural integrity. Whether you’re a student examining an onion skin slide or a researcher using advanced imaging, the view is both informative and revealing. With a standard light microscope (40x–400x magnification), you can identify key features like cell walls, chloroplasts, nuclei, vacuoles, and starch grains—but only with proper sample preparation and technique.
Without staining or precise focusing, many structures remain invisible due to transparency or overlap. Yet, when done correctly, the experience transforms abstract textbook diagrams into real, observable biology. This guide walks you through exactly what to expect when viewing different plant tissues, how to prepare your samples for clarity, and why some components appear while others don’t. From classroom staples like Elodea leaves to research-grade discoveries in alpine plants, understanding what you see—and what you can’t—is essential for accurate observation and scientific thinking.
Prepare the Right Sample for Clear Results
Choose Thin, Transparent Plant Tissues
To get a clear view of plant cells, select specimens that are thin, single-layered, and translucent. Ideal candidates include:
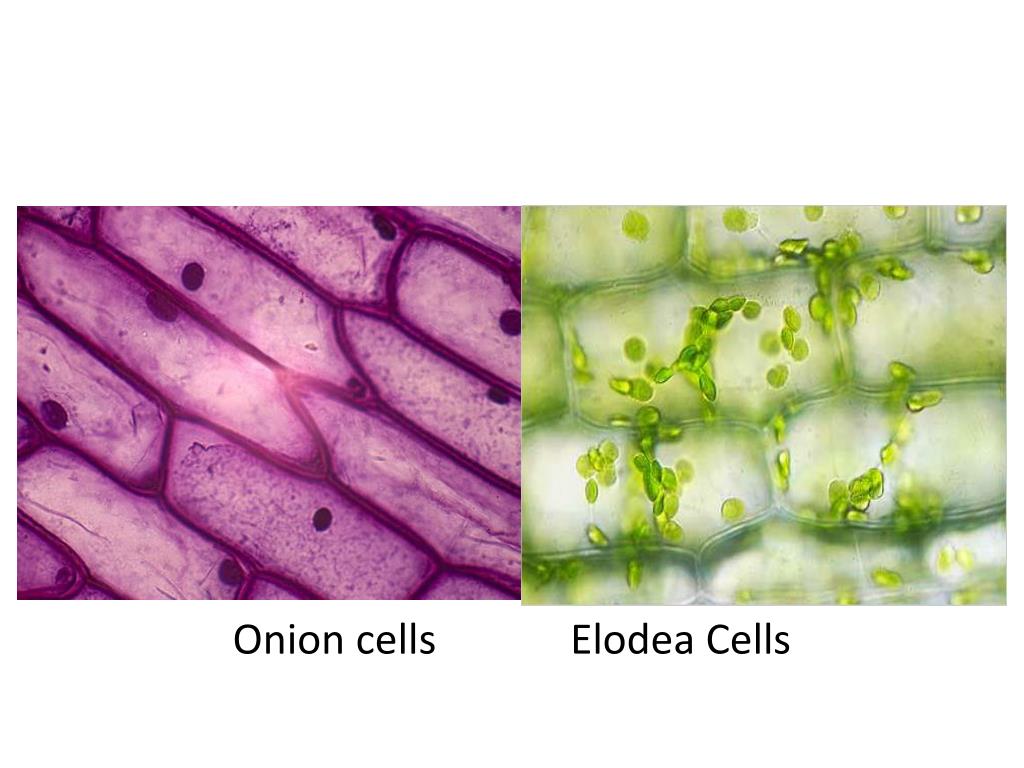
- Onion epidermis: Easy to peel and stain; excellent for observing cell walls and nuclei.
- Elodea or Hydrilla leaves: Naturally green with visible chloroplasts; great for live observation.
- Potato scrapings: Reveal starch storage after iodine staining.
- Aloe vera cross-sections: Show layered tissue and chloroplast distribution.
- Moss leaves: Simple structure with high chloroplast density.
Avoid thick or opaque tissues unless sectioned thinly. A clean, flat sample ensures light passes through, enabling sharp imaging under the microscope.
Create a Proper Wet Mount Slide
A wet mount preserves cell shape and allows real-time observation. Follow these steps:
- Place a drop of water on a clean slide.
- Lay your specimen (e.g., peeled onion membrane) in the water.
- Gently lower a cover slip at an angle to prevent air bubbles.
- For staining, add a drop of iodine solution beside the cover slip and draw it through with a paper towel.
This method keeps cells hydrated and maintains their natural structure during viewing.
Use Staining to Enhance Visibility
Many plant cell components are colorless and hard to see without contrast. Iodine solution (Lugol’s) is the most effective for educational labs:
- Turns starch grains purple-black in potato cells.
- Enhances the nucleus in onion cells, making it appear dark brown.
- Does not affect chloroplasts, which are naturally visible.
Other stains like methylene blue or safranin may be used in advanced settings but are rarely needed for basic identification.
Identify Key Structures Visible Under Light Microscopy
Cell Walls: The Defining Feature
The cell wall is the most obvious structure in any plant cell under microscope. It appears as a thick, rectangular boundary forming a brick-like or grid-like pattern across the tissue.
- In onion epidermis, cells look like elongated rectangles tightly packed together.
- In leaf tissues (Elodea, moss), the walls create polygonal shapes.
- Made of cellulose, hemicellulose, and pectin, the wall gives plant cells their rigid, boxy shape.
Visible even at low magnification (40x–100x), the cell wall is the outermost layer. Adjust focus up and down to see multiple layers in thicker samples like Aloe vera, demonstrating the 3D stacking of plant tissues.
Pro Tip: The cell wall provides structural support and maintains turgor pressure—when a plant wilts, the walls lose rigidity due to water loss from the vacuole.
Chloroplasts: Green Energy Factories in Action
Chloroplasts are visible only in photosynthetic tissues—like leaves and stems—and appear as small green ovals or circles moving along the cell edges.
- Found in Elodea, moss, and Aloe vera.
- Absent in non-photosynthetic tissues like onion epidermis or potato tuber.
At 100x–400x magnification, you may observe cytoplasmic streaming—the circular movement of chloroplasts around the inner cell wall. This indicates a living, metabolically active cell.
Expert Note: Dense chloroplasts can obscure other structures. If the view is too green and crowded, reduce light intensity to improve contrast.
Nucleus: DNA Hub in Stained Cells
The nucleus—containing DNA—is best seen in iodine-stained onion cells, where it appears as a dark, round spot near the center or side.
- In unstained preparations, it may look like a faint brownish dot.
- In chloroplast-rich cells (e.g., moss), the nucleus is usually invisible without special staining or fluorescence labeling.
Its position is often pushed to the periphery by the large central vacuole, which occupies most of the cell volume.
Central Vacuole: The Invisible Giant
You won’t see the central vacuole as a distinct colored structure, but you can infer its presence from the clear, empty-looking space inside the cell.
- In Elodea, chloroplasts line the edge of this space, outlining the vacuole.
- In onion cells, the vacuole fills the center, with the nucleus suspended within it.
This organelle maintains turgor pressure, keeping the plant rigid. When a plant wilts, the vacuole shrinks due to water loss.
Starch Grains: Energy Storage Revealed by Iodine
In potato cells, the most striking feature post-staining is the purple-black starch grains.
- Stored in organelles called amyloplasts.
- Appear as irregular blobs scattered throughout the cell.
- Confirm the plant’s role in energy storage.
Quick Check: If your potato sample doesn’t turn dark with iodine, it may be oxidized—use a freshly cut slice.
Compare Common Plant Specimens Side by Side
| Specimen | Cell Shape | Cell Walls | Chloroplasts | Nucleus | Vacuole | Starch Grains |
|---|---|---|---|---|---|---|
| Onion Epidermis | Rectangular | Yes | No | Yes (stained) | Yes | No |
| Elodea Leaf | Polygonal | Yes | Yes | Not visible | Yes | No |
| Aloe vera Leaf | Rectangular | Yes | Yes | Not visible | Presumed | No |
| Potato Tuber | Irregular | Yes | No | Not visible | Present | Yes |
| Moss Leaf | Polygonal | Yes | Yes | Not visible | Yes | No |
Each specimen highlights a different function: onion for basic structure, Elodea for photosynthesis, potato for storage, and moss for dense chloroplast packing.
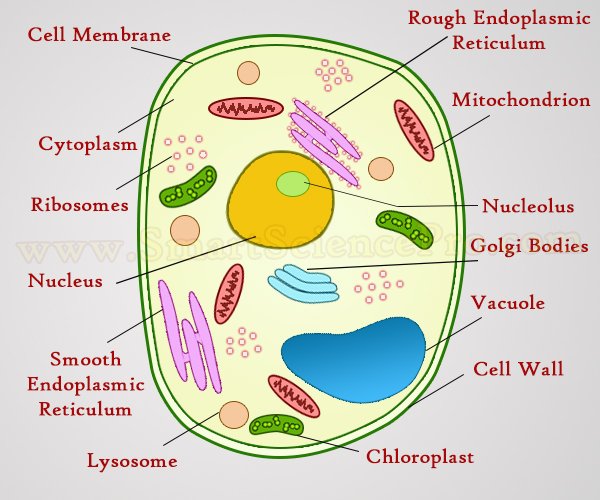
Know What You Can’t See with Standard Microscopy
Cell Membrane Is Hidden Behind the Wall
Despite being essential, the cell membrane lies just inside the cell wall and cannot be resolved with light microscopes. It requires electron microscopy (1000x+ resolution) to visualize.
Common Mistake: Students often label the cell wall as the “cell membrane”—remember, the wall is rigid and external; the membrane is thin and internal.
Ribosomes and Tiny Organelles Are Below Resolution Limit
Structures smaller than 200 nanometers—like ribosomes, mitochondria, and Golgi bodies—are invisible under standard light microscopes.
- Fluorescence or confocal microscopy is needed to tag and view them.
- In school labs, these are shown in diagrams but not observed directly.
Optimize Your Microscopy Technique
Adjust Magnification Step by Step
Use a compound light microscope with objective lenses:
- 4x or 10x: Locate the specimen and view overall tissue pattern.
- 40x: See individual cells clearly.
- 100x (oil immersion): Rarely used unless studying mitosis.
Always start at low power and focus up to avoid crushing the slide.
Estimate Cell Size Accurately
To measure plant cells:
- Use a stage micrometer to calibrate the field of view.
- At 100x, the field diameter is ~1.6 mm.
- Count how many cells fit across the diameter.
- Divide total width by number of cells.
Example: 8 onion cells across 1.6 mm = ~200 μm per cell.
Avoid Common Preparation Errors
- Air bubbles: Tilt cover slip properly.
- Overlapping tissue: Flatten gently with a probe.
- Excess stain: Wick away with paper towel.
- Dry slides: Add water before sealing.
Explore Advanced Discoveries Beyond the Classroom
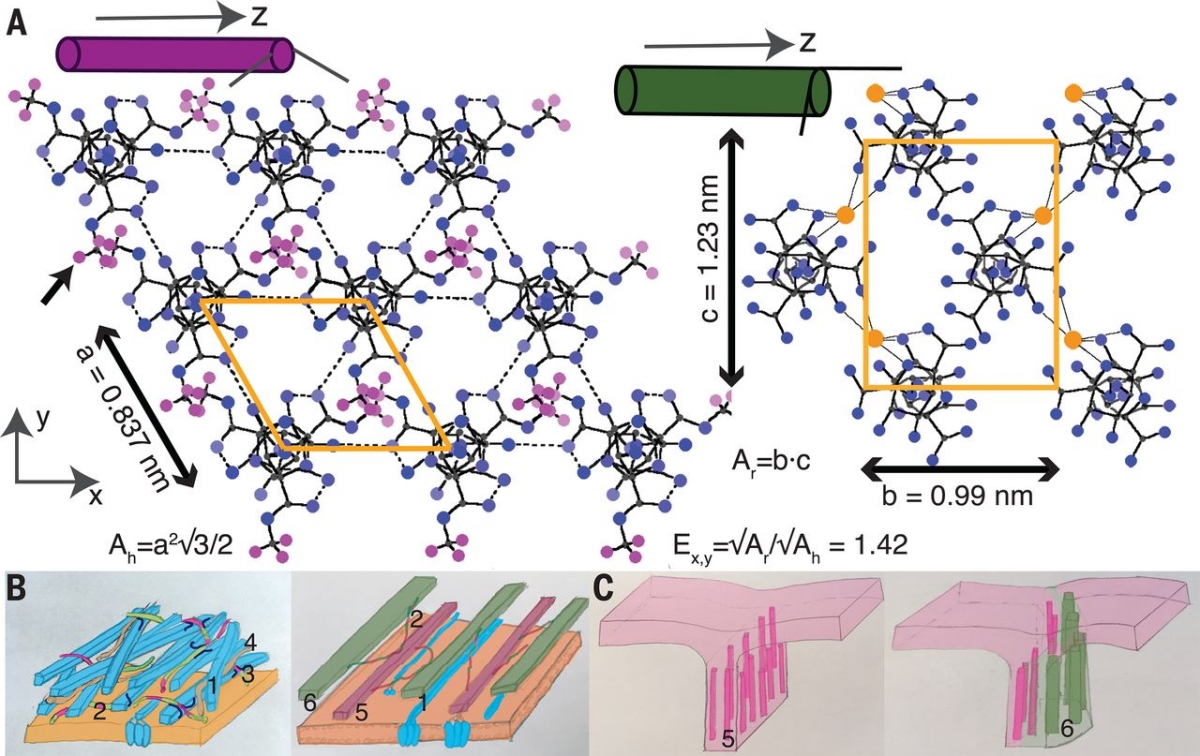
Research labs use cryo-SEM and confocal microscopy to uncover new structures:
- Pectin nanofilaments—1,000x thinner than hair—aligned in cell walls.
- ABACUS biosensors track plant hormone movement in real time.
- Saxifraga plants produce vaterite, a rare calcium carbonate, inspiring drug delivery systems.
These findings link plant cell biology to sustainable materials and bio-inspired technology.
Troubleshoot Common Viewing Issues
- No clear boundaries? Check focus and reduce light for better contrast.
- Everything green and blurry? Reduce illumination or use thinner samples.
- Stain not working? Use fresh iodine and a newly cut specimen.
Best Practices for Accurate Observation
Sketch What You Actually See
Drawing improves attention to detail. Label only visible features—not textbook ideals.
Pro Tip: Compare your sketch to real photomicrographs, not cartoons, to avoid misconceptions.
Compare Plant and Animal Cells
Use cheek cell slides alongside onion cells:
| Feature | Plant Cell | Animal Cell |
|---|---|---|
| Cell Wall | Present | Absent |
| Chloroplasts | In green tissues | Never |
| Vacuole | Large central | Small or absent |
| Shape | Rectangular | Round/irregular |
This contrast reinforces functional adaptations.
Final Note: Observing a plant cell under microscope is more than a lab exercise—it’s a window into how plants grow, store energy, and maintain structure. While light microscopy has limits, proper technique reveals the core components: cell walls, chloroplasts, nuclei (in clear cells), vacuoles, and starch grains. From onion skins to alpine flora, each specimen tells a story of specialization. By mastering what you can and cannot see, you build not just lab skills—but scientific thinking.