You’re peering through the eyepieces, but your specimen looks blurry, flat, or unevenly lit—despite using a high-magnification objective. The culprit? A misadjusted or mismatched condenser microscope. This small component beneath the stage plays an outsized role in image quality. It doesn’t magnify, but it ensures that light reaches your sample efficiently, directly affecting resolution, contrast, and clarity.
The condenser microscope function is to collect and focus light from the source into a precise cone that uniformly illuminates the specimen. Without proper condenser alignment, even the best objectives can’t deliver their full performance. Whether you’re in a teaching lab or a research facility, mastering condenser use unlocks sharper images, better contrast, and reliable results.
In this guide, you’ll learn how condensers work, the different types available, how to adjust them correctly, and why they’re essential for advanced techniques like phase contrast and darkfield. By the end, you’ll know exactly how to match your condenser to your objective and achieve optimal illumination every time.
Focus and Concentrate Light Efficiently
The core role of any condenser is to gather and focus light onto the specimen plane. In transmitted-light microscopy, light from the source (LED, halogen, etc.) spreads out in all directions. The condenser captures this divergent light and redirects it into a tight, cone-shaped beam that passes through the sample before entering the objective lens.
This focused illumination ensures that the maximum amount of useful light interacts with the specimen. Without this control, light would scatter unevenly—reducing usable signal and increasing glare. A well-functioning condenser acts like a spotlight director, ensuring every photon contributes to image formation rather than washing out detail.
Why Uniform Illumination Matters
Without a condenser, illumination would be patchy—bright in the center, dim at the edges. A properly functioning condenser ensures:
– Even brightness across the entire field
– No hotspots or shadows
– Maximum light efficiency for dim samples
This uniformity is critical for both visual observation and photomicrography. Uneven lighting can mimic artifacts or obscure fine details, especially in quantitative or diagnostic work.
For example, in hematology or pathology, inconsistent lighting might make cells appear unevenly stained or create false gradients, leading to misinterpretation. In time-lapse imaging, drifting illumination can mimic biological changes when none exist.
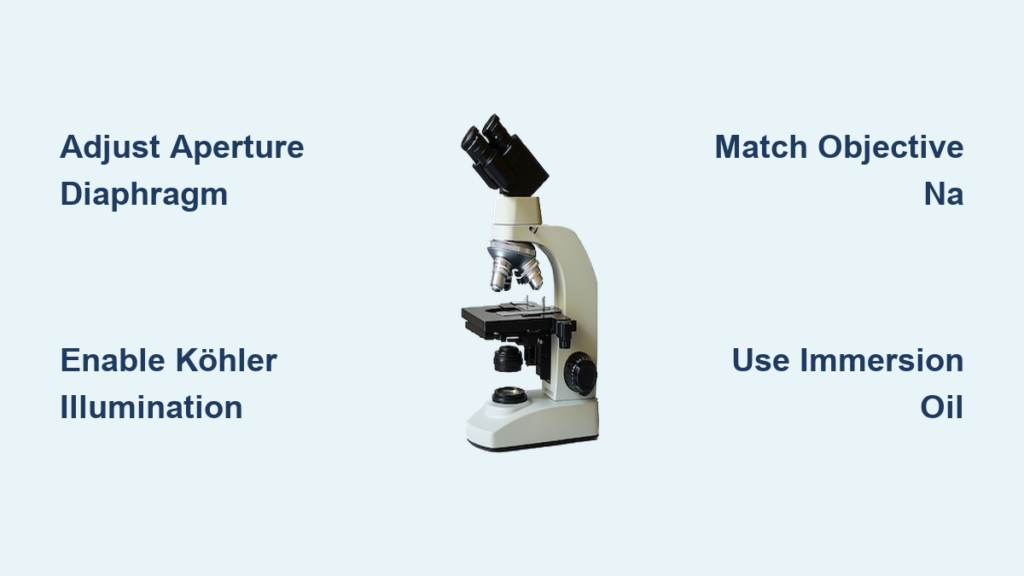
Match the Objective’s Numerical Aperture
The condenser must project a cone of light that matches the numerical aperture (NA) of the objective. NA determines how much light an objective can gather—and thus, its resolving power.
Rule: Condenser NA ≥ Objective NA
If the condenser’s NA is too low, resolution drops. If it’s too high without proper adjustment, glare increases. For best results, set the condenser’s aperture diaphragm to 70–80% of the objective’s NA—a sweet spot balancing resolution and contrast.
For instance, a 40x objective with NA 0.65 requires a condenser capable of at least that NA. Using a basic dry condenser with NA 0.80 achieves this, but only if properly adjusted. Failing to do so wastes the objective’s potential.
Enable Köhler Illumination for Sharp Images
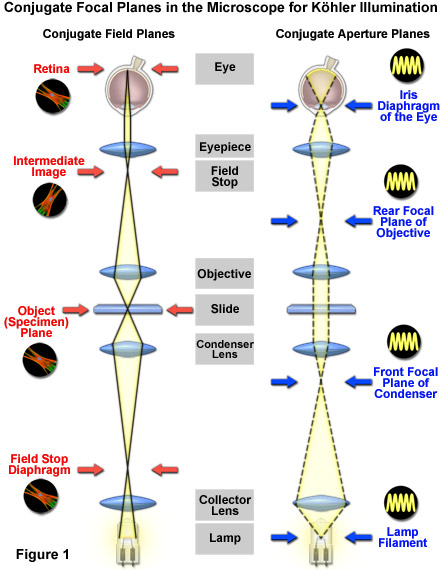
Köhler illumination is the gold standard in microscopy, and the condenser is central to its success. This technique delivers even, glare-free lighting by aligning optical planes precisely.
Steps to Achieve Köhler Illumination
- Close the field diaphragm until its image appears in the field of view.
- Focus the condenser using the rack-and-pinion knob so the diaphragm edges are sharp.
- Center the condenser so the shadow is centered.
- Open the field diaphragm just beyond the field edge to reduce stray light.
- Adjust the aperture diaphragm for desired contrast (70–90% of objective NA).
When done right, the specimen is evenly lit, with no image of the light source visible.
Visual Cues for Correct Setup
- Field diaphragm: Sharp, crisp edges when focused
- Aperture diaphragm: Affects contrast and depth, not field size
- Stray light: Minimized when field diaphragm is properly set
Failure to perform Köhler illumination leads to poor resolution, glare, and unreliable data—especially in publication-quality imaging.
Many users skip this step, assuming “brighter is better.” But uncontrolled light reduces contrast and masks subtle features. Köhler ensures only the right light reaches the specimen—maximizing clarity without sacrificing detail.
Control Contrast with the Aperture Diaphragm

One of the most powerful tools on the condenser is the aperture diaphragm—an adjustable iris that controls the angle of the light cone.
How Diaphragm Settings Affect Image Quality
| Setting | Resolution | Contrast | Depth of Field | Risk |
|---|---|---|---|---|
| Wide open | High | Low | Shallow | Glare, halo effects |
| Partially closed (70–80%) | High | Balanced | Moderate | Optimal for most use |
| Nearly closed | Low | High | Deep | Diffraction artifacts |
Closing the diaphragm increases contrast by reducing scattered light, making transparent specimens more visible. But over-closing introduces diffraction halos and blurs fine detail.
Pro Tip: Use the Scale
Many condensers have an NA scale next to the diaphragm knob. Match it to your objective:
– For a 40x, NA 0.65 objective → set condenser to ~0.5 NA (80%)
– For a 100x, NA 1.25 oil objective → set to 1.0–1.25 NA
Always readjust when switching objectives.
Choose the Right Condenser Type

Not all condensers are equal. The type you use should match your application and objective quality.
Abbe Condenser: Most Common, Least Corrected
- Max NA: Up to 1.4 (with oil)
- Correction: None for chromatic or spherical aberration
- Best for: Routine brightfield, teaching labs
- Limitations: Color fringes at edges, soft field stop
Despite its flaws, the Abbe condenser remains popular due to its simplicity and affordability. Use it with oil for objectives above NA 0.95. Many include a flip-top lens for low-magnification objectives (≤10x), allowing wider illumination.
Aplanatic Condenser: Corrects Spherical Aberration
- Focus: Sharp field stop image
- Use case: UV microscopy, fluorescence
- Status: Rarely manufactured today
Improves edge definition but still suffers from chromatic issues.
Achromatic Condenser: Color-Corrected for Clarity
- Corrects: Chromatic aberration (red/blue focus shift)
- Max NA: Up to 0.95 (dry)
- Applications: Photomicrography, hematology
- Limitation: Less geometric precision than aplanatic-achromatic
Ideal when color fidelity matters.
Aplanatic-Achromatic Condenser: Top-Tier Performance
- Corrects: Both spherical and chromatic aberrations
- Lens count: Up to 8 elements
- Max NA: 1.4 (oil immersion)
- Applications: Research, DIC, phase contrast, polarized light
This is the gold standard for high-end microscopy. Matches premium objectives and delivers crisp, color-free images. Labeled “Achr. Apl.” on the housing.
Use Immersion for High-NA Objectives
For objectives with NA >0.95, immersion is mandatory—and that includes the condenser.
Immersion Types and Their Uses
| Type | Max NA | Medium | Best For |
|---|---|---|---|
| Dry | ≤0.95 | Air | Routine work, low-mag |
| Water immersion | Up to 1.2 | Water | Live-cell imaging |
| Oil immersion | Up to 1.4 | Oil | High-res DIC, hematology |
Critical step: Apply immersion oil between the condenser’s top lens and the bottom of the slide. Skipping this limits NA to ~1.0, crippling resolution.
Oil immersion condensers often have sealed front lenses to prevent contamination—making them incompatible with low-power objectives that need wide fields.
Support Advanced Imaging Techniques
Specialized condensers enable contrast methods that reveal invisible structures.
Darkfield Condenser: See Unstained Specimens
- Function: Illuminates at oblique angles
- Result: Specimen glows against a black background
- Types:
- Dry: For 4x–40x objectives
- Oil immersion: For 100x oil objectives
- Note: Universal condensers only support darkfield up to NA ~0.5
Perfect for observing spirochetes, diatoms, or cell edges without staining.
Phase Contrast Condenser: Visualize Transparent Cells
- Contains annuli (rings) that align with phase rings in objectives
- Enables imaging of live, unstained cells (e.g., bacteria, protists)
- Requires turret rotation and centering
Common in universal condensers—just rotate to the correct annulus for your objective (10x, 40x, etc.).
Universal Condenser: One Unit, Multiple Methods
- Rotating turret with inserts for:
- Brightfield
- Phase contrast
- Darkfield (patch stops)
- DIC (Wollaston prisms)
- Hoffman modulation
- Used in clinical and research labs
- Eliminates need to swap condensers
Ensure the correct turret position is aligned—misalignment causes poor contrast.
Polarizing Condenser: For Birefringent Materials
- Labeled “Pol” or red-marked
- Uses strain-free optics to avoid artifacts
- Paired with polarizer and analyzer
- Applications:
- Mineralogy
- Crystal analysis
- Collagen fibers in tissue
Essential for polarized light microscopy.
Adjust Height for Sharp Illumination
The condenser must be focused at the specimen plane—not adjusted with the coarse focus knob.
How to Set Condenser Height
- Close the field diaphragm.
- Use the condenser focus knob (rack-and-pinion) to sharpen the diaphragm’s image.
- Center the condenser if needed.
- Open the field diaphragm to just beyond the field.
If the condenser is too high or too low:
– Illumination becomes uneven
– Resolution drops
– Contrast suffers
Always refocus the condenser when changing objectives—especially between low and high magnification.
Match Condenser to Objective NA
Every objective change requires condenser reevaluation.
Low-Power Objectives (≤10x)
- NA typically 0.25–0.30
- Use swing-out or flip-top lens on Abbe condenser
- Aperture diaphragm less critical—field diaphragm controls illumination
- Avoid using full condenser; it overfills and reduces contrast
High-Power Objectives (40x–100x)
- NA 0.65 to 1.4
- Require fully engaged condenser
- Immersion oil needed for NA >1.0
- Aperture diaphragm must be adjusted precisely
Example:
– Objective: 100x, NA 1.25
– Condenser: Oil immersion, NA 1.4
– Aperture setting: ~1.0–1.25 (match or slightly below)
Mismatching leads to wasted light and subpar images.
Avoid Common Mistakes
Even experienced users make condenser errors.
Top Mistakes and Fixes
| Mistake | Consequence | Solution |
|---|---|---|
| Not using oil with high-NA condenser | Reduced resolution | Apply oil between condenser and slide |
| Closing aperture too far | Diffraction halos, loss of detail | Open to 70–80% of objective NA |
| Using full condenser for 4x objective | Uneven field, glare | Flip out top lens |
| Skipping Köhler setup | Uneven lighting, glare | Perform full alignment |
| Dirty condenser lens | Blurry, low-contrast image | Clean with lens paper and ethanol |
Pro Tip: Clean Regularly
Dust, fingerprints, and dried oil on the condenser lens degrade performance. Wipe gently with lens paper and 70% ethanol. Never use tissues or abrasive cleaners.
Understand Reflected-Light Microscopy Differences
In epi-illumination systems (e.g., fluorescence, confocal, metallurgical), there is no substage condenser.
How Epi-Illumination Works
- Light travels through the objective to the specimen
- Reflected or emitted light returns through the same objective
- Objective acts as both condenser and imaging lens
This design simplifies alignment and is ideal for opaque samples or fluorescence.
However, inserting contrast elements (e.g., phase rings) requires special epi-illuminators or intermediate modules.
Read Condenser Labels Correctly
All condensers are labeled with critical specs.
What the Labels Mean
- NA value: Maximum numerical aperture (e.g., NA 1.4)
- Type: Abbe, Achr. Apl., etc.
- Immersion: “Oil,” “Water,” or none (dry)
- Red mark or “Pol”: Strain-free for polarized light
- Aperture scale: Relative NA settings
- Working distance: Marked on LD condensers (e.g., 50 mm)
Always verify the label before use—especially when switching between techniques.
Maintain and Optimize Long-Term
A well-maintained condenser delivers consistent performance.
Maintenance Tips
- Clean lenses monthly or as needed
- Check centering screws periodically
- Lubricate rack-and-pinion if stiff (use microscope grease)
- Store with dust cover if not in use
- Inspect for oil contamination after immersion use
When to Upgrade
Consider upgrading if you:
– Use high-NA objectives regularly
– Perform photomicrography
– Need phase, DIC, or darkfield
– Notice persistent glare or uneven fields
An aplanatic-achromatic immersion condenser pays off in image quality.
Final Note
The condenser microscope function is foundational to high-quality imaging. It doesn’t magnify, but it enables your objectives to perform as designed. From basic Abbe models to advanced universal systems, the right condenser—properly adjusted—delivers sharp, contrast-rich, and evenly lit images.
Master Köhler illumination, match NA values, use immersion when needed, and select the correct condenser for your technique. Whether you’re a student, clinician, or researcher, understanding and using your condenser correctly transforms your microscopy experience.
Now that you know how to optimize your condenser, revisit your setup—chances are, a few quick adjustments will make a dramatic difference.