
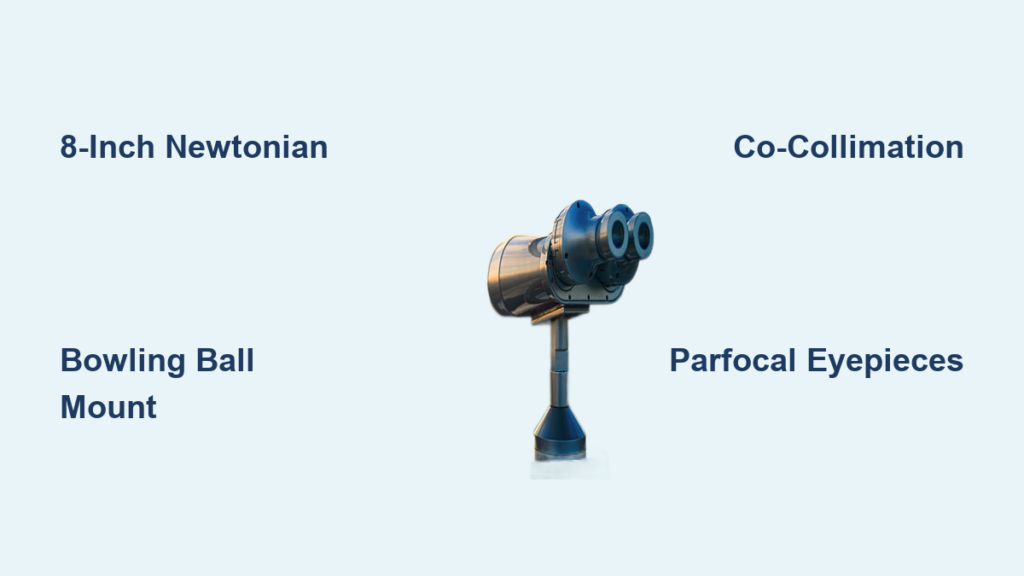
Imagine the Moon’s craters leaping off the eyepiece with 3D depth—no special glasses required. That’s the magic of a binocular telescope (binoscope), where two identical optical tubes deliver immersive, stereoscopic views impossible with standard telescopes. Forget expensive commercial models; this guide cuts through the complexity with battle-tested DIY methods used by amateur astronomers worldwide. You’ll learn to build a stable 8-inch Newtonian binoscope using garage-friendly materials, achieve perfect co-collimation, and unlock jaw-dropping 3D views of Jupiter’s cloud bands within a weekend. Let’s transform raw tubes and mirrors into your personal window to the cosmos.
Skip Costly Mistakes: Pick the Right Binocular Telescope Design
Your optical configuration makes or breaks the build. Forget refractors or Cassegrains for your first attempt—their precise alignment demands will frustrate even experienced makers. An 8-inch f/5 Newtonian binoscope is the only beginner-friendly choice, and here’s why: Parabolic mirrors at this focal ratio gather serious light (204x more than your dark-adapted eye) while keeping tube length manageable at 1,000mm. Crucially, Newtonian components are affordable and forgiving during collimation. A matched pair of 8-inch mirrors costs under $300 online, while refractor objectives of equivalent quality would run $1,500+. Avoid these rookie traps:
– Don’t chase apertures over 10 inches—your mount will vibrate uncontrollably
– Never mix different focal ratios between tubes—you’ll never achieve 3D fusion
– Ignore motorized mounts initially; master manual tracking first
Pro Tip: Source tubes from PVC sonotube (6-inch diameter) or repurpose carbon fiber drone arms. Both resist warping better than wood and cost under $40 total.
Build a $20 Rock-Solid Mount from Garage Junk

Shaky mounts destroy high-magnification viewing—this is where 90% of DIY binoscopes fail. Your structure must handle 30+ pounds of dual tubes without flexing. Forget expensive tripods; build a bowling ball alt-azimuth mount in 20 minutes using materials from your garage:
1. Drill a 2-inch hole through a concrete patio paver (base)
2. Embed a steel pipe nipple into the paver’s hole with epoxy
3. Place a standard bowling ball on the nipple as your bearing surface
4. Bolt your tube assembly’s mounting plate directly to the ball
This system costs $15 for paver + nipple and delivers buttery-smooth motion. For tube alignment:
– Cut two identical aluminum angle brackets (L-shape) as tube cradles
– Space them 12 inches apart on a 1/2-inch plywood base
– Clamp tubes securely with foam-lined U-bolts—never rigid metal-to-glass contact
Critical Check: Lift one tube end by 1 inch. If the other tube dips more than 1/8 inch, reinforce the base with cross-bracing. Any flex here ruins co-collimation.
Why Your Binoscope Fails Without Perfect Co-Collimation
Individual tube collimation is child’s play compared to co-collimation—the secret sauce for 3D views. If your star test shows offset Airy disks (concentric rings), your optical paths aren’t parallel. Fix this in 4 precise steps:
1. Collimate each tube separately using a laser collimator: Center the laser dot on the primary mirror’s center spot, then adjust the secondary until the return beam hits the laser aperture
2. Mount a laser in one focuser and point at a distant wall (100+ feet away)
3. Adjust tube alignment screws until both lasers hit the same spot—this is non-negotiable
4. Star test at 200x magnification: Center Jupiter in left eyepiece. If it’s off-center in the right eyepiece, tweak tube alignment screws in 1/8-turn increments
Warning: Never skip thermal acclimation! Bring your binoscope outside 1 hour before alignment. A 5°C temperature shift can misalign optics by 0.5mm—enough to kill 3D fusion.
Stop Squinting: Fix IPD in 3 Minutes Flat

Interpupillary distance (IPD) mismatch causes eye strain and prevents 3D fusion. Your eyes need optical paths spaced exactly 55-75mm apart. Implement sliding tube mounts with zero backlash:
– Attach two 6-inch aluminum dovetail rails to your base plate
– Mount tube cradles on sliding blocks with spring-loaded set screws
– Mark your IPD on the rails using a ruler against your face
Pro Adjustment: With both eyes open, focus on a distant power line. If it appears as two lines, loosen the set screws and slide tubes until lines merge into one. Lock immediately—never adjust IPD mid-observation.
Choose Eyepieces That Actually Work (No Refocusing!)
Mismatched eyepieces are the #1 reason binoscopes fail. Demand parfocal pairs—identical focal lengths AND optical path lengths:
– Test eyepieces by mounting both in a binoviewer on one telescope
– If you must refocus when switching eyes, they’re not parfocal
– Best budget option: Orion 25mm Sirius Plössls (tested parfocal)
Use helical focusers for independent eye adjustment. Standard rack-and-pinion focusers lack the precision needed—your dominant eye often requires 3-5mm less focus travel. Helical focusers let you dial in this difference while maintaining co-collimation.
Your First 3D Observing Session: Moon to Nebula
Skip planets for your maiden voyage—start with the Moon. Its brightness simplifies focus and reveals 3D effects instantly:
1. At 50x magnification, center the terminator (day/night line)
2. Watch crater walls leap into relief as shadows highlight depth
3. Move to Jupiter: The Galilean moons will appear at different distances from the planet’s disk
Deep-Sky Shortcut: The Orion Nebula (M42) shows 3D structure at 100x. Focus on the Trapezium cluster—the central stars will seem to float above the nebula’s glow. If images won’t fuse, your co-collimation is off by more than 0.1°—recheck step 3 immediately.
Maintain Peak Performance: The 5-Minute Pre-Session Checklist
Binoscopes demand more upkeep than monocular scopes. Spend 5 minutes before every session:
1. Blow dust from mirrors with compressed air (never wipe!)
2. Verify collimation on Polaris at 200x—adjust if star rings are uneven
3. Tighten all tube mounting bolts (vibration loosens them)
4. Check IPD setting matches your current position (sitting vs. standing)
5. Ensure focusers move smoothly—add one drop of telescope grease if sticky
Critical: Never store optics uncovered. A $10 PVC cap per tube prevents dew and dust buildup that ruins contrast. In humid climates, add silica gel packs inside tube caps.
Building a binocular telescope isn’t just assembling parts—it’s crafting an instrument that transforms how you perceive the universe. That moment when Saturn’s rings seem to hover in space, or the Orion Nebula’s gaseous tendrils gain tangible depth, justifies every hour spent aligning tubes and tweaking focusers. Start with the $20 bowling ball mount and 8-inch Newtonian design. Master co-collimation under the stars. Then watch as your DIY binoscope delivers celestial views no single-tube telescope ever could—where the cosmos doesn’t just appear sharper, but truly real. Grab your tools tonight; by this weekend, you could be exploring lunar craters in three dimensions.


