You’re about to dive into a fascinating world of cells and microorganisms—but your microscope shows nothing. No image. No light. Just frustration. Before you assume it’s broken, here’s the truth: most microscopes labeled “not working” are actually fine—they’ve just been misused. Over 80% of issues come from simple user errors, not hardware failure. Whether you’re using a student-grade Explorer 1 or a professional Amscope B490, this guide gives you fast, reliable fixes for every common problem. You’ll learn how to diagnose issues in minutes, avoid costly mistakes, and get back to observing—often without needing repairs.
We’ll break down real symptoms, model-specific quirks, and expert maintenance tips so you can troubleshoot with confidence. No guesswork. No confusing jargon. Just clear, actionable steps that work.
Check Power and Light First
If your view is completely black, don’t jump to conclusions—start with the basics. Many “dead” microscopes simply aren’t getting power or light.
No Light? Verify These Fast
A dark field is usually due to preventable causes:
– Confirm power source: For battery-powered models like the Explorer 1, insert four fresh AA batteries with correct polarity. Old or corroded batteries are a leading cause of failure.
– Inspect the battery compartment: Corrosion can block electrical contact. Clean with a cotton swab and baking soda solution if needed.
– Test the switch and brightness dial: Turn the rheostat up. If it clicks but no light appears, the LED or bulb may be burnt out.
– Check metal contact tabs: In some models, a loose or bent tab prevents the circuit from closing. Gently bend it toward the battery to restore connection.
– Look for ambient mirror position: On the Explorer 1, the light turns off automatically when the ambient mirror faces upward. Flip it down to restore illumination.
Pro Tip: Always plug in or replace batteries before assuming the microscope is broken. A dim or flickering light often means weak power, not a faulty unit.
Start at Lowest Magnification
Jumping straight to high power is the #1 cause of focus failure and objective crashes.
Why 4x Objective Is Your Best Friend
Always begin with the 4x or 10x objective:
– Rotate the turret until it clicks into place.
– Look through the eyepiece and slowly turn the coarse focus knob downward.
– Once you see a faint image, switch to fine focus for clarity.
Warning: Never lower the stage while looking through the eyepiece at high magnification. You risk crashing the objective into the slide—replacing a damaged lens costs hundreds.
Still No Image? Try This
If you see nothing:
– Ensure the slide is right-side up—the specimen must face the objective.
– Center the slide over the light aperture.
– Open the field diaphragm—if closed, it blocks all light.
– Raise the condenser to its highest position.
Clean and Inspect Optics
Dirty lenses are the top reason for blurry, dim, or distorted images.
Clean Lenses the Right Way
Use only lens paper or a microfiber cloth:
– Wipe eyepieces, objectives, and the condenser top lens gently.
– Remove oil residue from dry objectives (e.g., 40x) with lens cleaner.
– Never use tissue, shirt fabric, or alcohol unless specified—these can scratch anti-reflective coatings.
Expert Note: Fungus inside lenses appears as web-like patterns and requires professional cleaning. Store your microscope in a dry, dust-free environment to prevent it.
Fix Blurry or Out-of-Focus Images
Blur isn’t always a focus issue—it could be mechanical or optical.
Refocus After Every Magnification Change
Even if your microscope is parfocal, refocus is required:
– After switching from 10x to 40x, use fine focus to sharpen the image.
– Depth of field shrinks at higher magnifications—exact focus matters.
Is the Slide Properly Placed?
- Use a standard 1 mm slide with a 0.17 mm coverslip.
- If the coverslip is too thick, high-power objectives can’t focus.
- Secure the slide with stage clips—movement ruins focus.
Prevent Objective Crashes

A smashed slide means costly repairs. Avoid it with proper technique.
Disable Stage Height Lock
On models like the Amscope B490:
– A lever on the left side locks the stage height.
– If stuck in “up” position, the 40x or 100x objective can’t reach the slide.
– Push the lever down toward the metal peg to unlock.
Never force the objective into the slide. If it won’t focus, check the lock first.
Oil Immersion: Do It Right
For 100x objectives:
– Apply immersion oil directly to the slide.
– Rotate the oil objective into place—do not use dry.
– After use, clean oil from the lens with lens paper and cleaner.
Mistake Alert: Getting oil on a 40x dry objective ruins image quality. Clean it immediately.
Diagnose Trinocular and Camera Issues
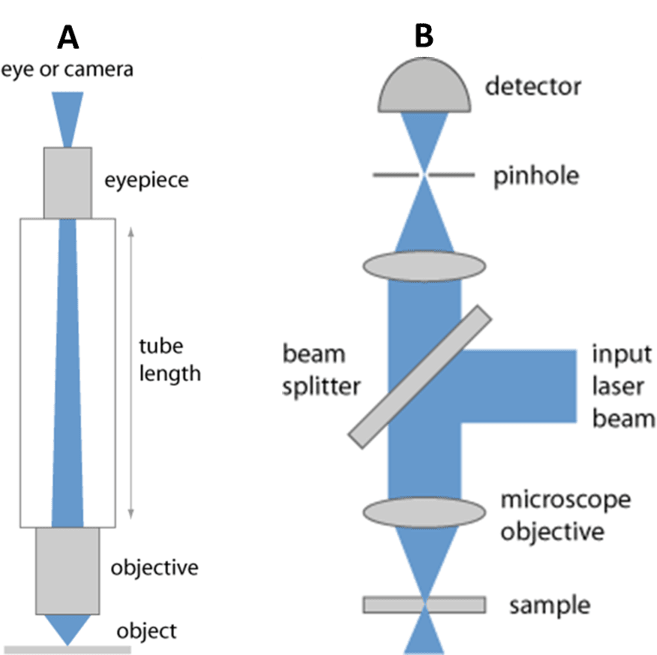
If your camera shows black or out-of-focus images, the problem is usually in the light path.
Beam Splitter Controls Light Path
On trinocular microscopes:
– Pull out the beam splitter pin to send light to the camera.
– Push it in to return light to the eyepieces.
– If the camera port stays black, ensure the pin is fully engaged.
Calibrate Camera Focus
Even with sharp eyepiece focus, the camera may be blurry:
– Set both eyepieces to the zero diopter mark.
– Focus using the eyepieces.
– Adjust the C-mount focus ring on the camera adapter until the image sharpens.
Myth Busting: You cannot see through the top port with your eyes. It’s an output for cameras only.
Solve Stage Drift and Focus Drift
If the image slowly goes out of focus, the tension mechanism needs adjustment.
Tighten Coarse Focus Tension
Locate the tension adjustment knob near the coarse focus:
– Turn clockwise to tighten (prevents drift).
– Turn counter-clockwise to loosen (if too stiff).
On some models, hold one focus knob and turn the other to adjust.
⚠️ Never force stuck gears. If the stage won’t move, debris or dried lubricant may be the cause—seek professional repair.
Replace Bulb or LED
When no amount of troubleshooting restores light, replace the source.
Step-by-Step LED Replacement
For Explorer 1 and similar LED models:
1. Power off and remove batteries.
2. Unscrew the light assembly.
3. Remove the old 5mm LED (usually red or white).
4. Insert a new LED, ensuring correct polarity.
5. Reassemble and test.
Caution: If the LED still doesn’t light, check for broken wires or a faulty circuit.
Align Condenser for Clear Images
Poor illumination causes uneven brightness and glare.
Set Up Köhler Illumination (Quick Version)
- Raise condenser to the top.
- Close the field diaphragm slightly.
- Focus the edge of the diaphragm using the condenser focus knob.
- Center it with condenser centering screws.
- Open the diaphragm until it just fills the view.
This delivers even, sharp lighting—critical for high-magnification work.
Troubleshoot Turret and Mechanical Issues
A stuck nosepiece or wobbly stage disrupts workflow.
Free a Stuck Turret
If objectives won’t rotate:
– Clean around the nosepiece—dust or oil can jam it.
– Gently rotate—do not force.
– If still stuck, do not disassemble. Consult a technician.
Ensure Objectives Are Fully Seated
Each objective must click into place:
– Misaligned objectives cause blurry or double images.
– Rotate until you feel resistance and hear the click.
Model-Specific Fixes
Different microscopes have unique quirks. Know yours.
Explorer 1 900 Power Microscope
- Batteries: Use four AA; replace if dim.
- Focus window: Less than ¼ turn—adjust slowly.
- Magnification: Always go 40x → 100x → 900x. Never jump to 900x first.
- Maintenance: Store dry, clean lenses with microfiber cloth.
Amscope B490 Compound Microscope
- Stage height lock: Push lever down to unlock.
- Objective crash prevention: Focus at 4x first, raise condenser, open iris.
- No force rule: If something won’t move, stop—don’t risk damage.
Trinocular Microscopes
- Beam splitter: Must be pulled out for camera use.
- C-mount: Adjust focus ring after eyepiece focus.
- User error: Top port is not an eyepiece—attach a camera.
Perform Preventative Maintenance
Avoid problems before they start.
Weekly Cleaning Routine
- Wipe eyepieces and objectives with lens paper.
- Check battery compartment for corrosion.
- Blow dust off stage and condenser.
Monthly Checks
- Test tension and adjust if needed.
- Verify condenser alignment.
- Inspect cords and switches for wear.
Storage Tips
- Cover the microscope when not in use.
- Store in a low-humidity area to prevent mold.
- Remove batteries during long-term storage.
When to Call a Professional
Some issues can’t be fixed at home.
Seek Repair If:
- Gears are stripped or jammed.
- Internal fungus is visible through lenses.
- Electrical issues like sparking or burning smell occur.
- Objective lenses are scratched or misaligned.
- Bulb replacement fails to restore light.
Final Note: Never disassemble the head or base. Internal optics require factory calibration.
Final Verification Checklist
Before declaring your microscope broken, run through this list:
✅ Light is on and bright
✅ Slide is right-side up and centered
✅ Started at 4x objective
✅ Coarse and fine focus used correctly
✅ Lenses are clean and dry
✅ Condenser is raised and centered
✅ Eyepieces are clean and locked
✅ Tension is adjusted (no drift)
✅ Beam splitter set for correct output
✅ Power source confirmed (batteries, outlet)
If all boxes are checked and it still doesn’t work, professional service is needed.
Microscope not working? Now you know: most fixes are simple, fast, and free. By following this guide, you’ve likely restored your microscope to full function. Remember: proper technique prevents 90% of issues. Keep this checklist handy, perform regular maintenance, and your microscope will deliver clear, reliable results for years.