Peering at a snowflake under a microscope transforms a fleeting winter moment into a revelation. What appears as a tiny white speck to the naked eye unfolds into an intricate, six-sided masterpiece of ice—each one shaped by the invisible forces of temperature, humidity, and molecular physics. These microscopic ice crystals are not just beautiful; they are scientific records of their journey through the sky. When magnified, snowflakes expose the precise way water molecules arrange themselves in a hexagonal lattice, forming delicate branches, hollow columns, and fractal-like patterns that no two ever replicate exactly.
For scientists, educators, and curious observers, viewing snowflakes under a microscope offers more than wonder—it provides real data. From classroom experiments with simple dissecting scopes to cryogenic electron microscopes capturing nanoscale textures, the tools vary, but the goal remains the same: to decode the hidden structure of snow. In this guide, you’ll learn how to observe snowflakes yourself, understand what you’re seeing, and explore the science behind those breathtaking images that circulate every winter.
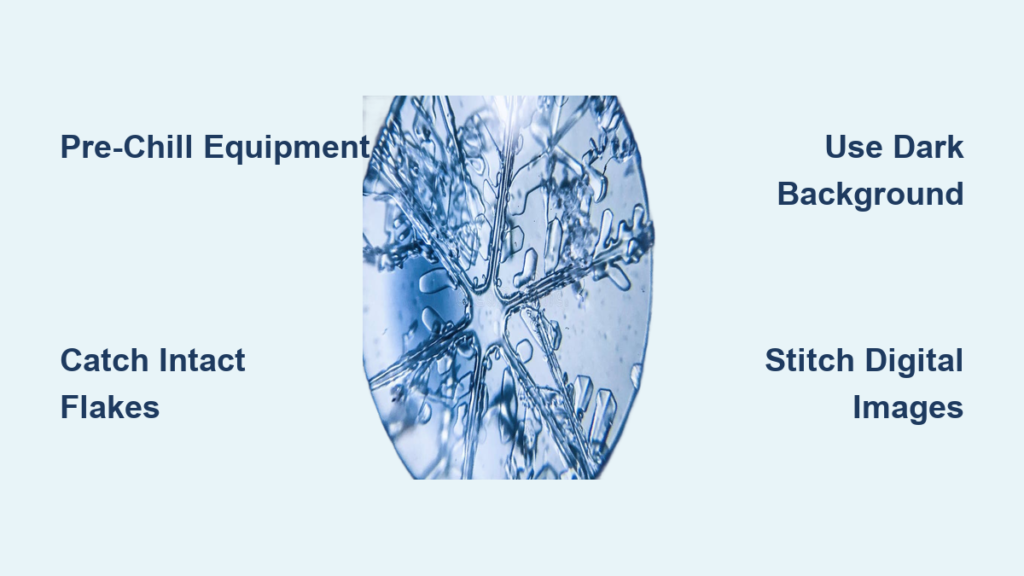
How to Capture and View Snowflakes Under a Microscope

Prepare Equipment in Advance to Prevent Melting
Success starts before the first flake falls. Any warm surface—your hands, a room-temperature slide, or even your breath—can melt a snowflake instantly. To preserve delicate structures, pre-chill all equipment outdoors for at least 10 minutes. This includes your microscope, glass slides, tweezers, and collection surface.
Use black foam board or dark construction paper as a collection surface. The dark background enhances contrast, making transparent ice crystals easier to see. Hold the paper upright with gloved hands to minimize heat transfer and avoid disturbing falling flakes with warm air currents.
Catch Intact Snowflakes Using Gentle Tools
Timing and technique are crucial. Wait for fresh, dry snow during calm weather. Wind damages fragile dendrites (the branching arms), while wet snow clumps together and obscures detail. Gently catch individual flakes on the black surface, then transfer them using a soft-bristled paintbrush—never metal tweezers or fingers, which generate static and heat.
Place each flake onto a pre-chilled microscope slide and move quickly to the scope. Begin observation immediately at 10x–20x magnification on a dissecting microscope, which provides sufficient depth of field to see the full structure.
Capture and Stitch Digital Images for Full-View Analysis
To preserve your findings, attach a digital microscope camera or smartphone adapter. Many modern scopes support USB imaging, allowing real-time viewing on a laptop. Due to the limited field of view, you’ll likely only see fragments of the snowflake at a time.
For a complete picture, use software like ImageJ or Photoshop to stitch overlapping frames into a composite image. This technique, borrowed from astrophotography, reveals the full symmetry and branching complexity that a single shot cannot capture.
“None of the images show the entire crystal—only fragments.”
— Amateur Microscopist, Homeschool Lab
Cryo-SEM: Revealing Snowflake Structures at the Nanoscale
Why Optical Microscopes Can’t Show True Detail
Standard optical microscopes are limited by the wavelength of visible light, capping resolution at around 200–400 nanometers. While they reveal overall shape and symmetry, they miss micro-ridges, step edges, and secondary branching. For true structural clarity, scientists use cryogenic scanning electron microscopy (cryo-SEM).
This advanced method exposes features invisible to optical systems, such as hollow columns, surface terraces, and grain boundaries—details critical for understanding snow’s physical behavior.
Preserving Structure with Liquid Nitrogen Freezing
To prevent melting or sublimation, snowflakes are plunged directly into liquid nitrogen at -196°C. This ultra-rapid freezing locks the crystal in place, preserving its original form. The sample is then transferred under vacuum to a cryo-stage inside the SEM chamber, where it remains stable for high-resolution imaging.
“They don’t melt when frozen. Cryogenic SEM allows imaging of fresh, intact snowflakes before they degrade.”
— Scientific Clarification
Such work is conducted only in specialized facilities, like the Beltsville Agricultural Research Center, where controlled environments ensure data accuracy.
Nanoscale Textures and Growth Patterns Revealed
Cryo-SEM achieves nanometer-scale resolution, unveiling textures that tell the story of a snowflake’s formation. You can see:
– Surface steps indicating layer-by-layer growth
– Micro-branches sprouting from main arms
– Twinning, where two crystals fuse
– Stacked plates growing vertically
These details help researchers understand how snow reflects sunlight, compacts over time, and interacts with atmospheric conditions—key inputs for climate models.
What You’re Actually Seeing: Symmetry, Branching, and Molecular Order

The Hexagonal Core: A Blueprint from Water Molecules
Every snowflake shares a defining trait: six-fold symmetry. This arises from the way water molecules (H₂O) bond in a hexagonal lattice as they freeze. The 120° angle between hydrogen bonds naturally forms a six-sided structure. Even when arms grow unevenly due to atmospheric fluctuations, the core symmetry persists—a molecular fingerprint of water’s geometry.
Dendritic Growth: How Star-Shaped Flakes Form
The iconic “star” snowflakes develop under specific conditions:
– Temperature: Between -12°C and -16°C
– Humidity: High (supersaturated air)
– Wind: Calm
Under these conditions, dendritic branching occurs—arms extend from the six corners in fractal-like patterns. Small changes in temperature or moisture during descent cause variations, making complex flakes nearly unique.
Not all snowflakes are stars. Simpler forms include:
– Plates (flat hexagons)
– Columns (hexagonal rods)
– Needles (long, thin crystals)
– Irregular aggregates (clumped or broken pieces)
Microstructural Features Visible Under High Magnification
With cryo-SEM, additional details emerge:
– Hollow columns: Central voids within prismatic crystals
– Twinning: Two crystals fused together
– Stacked plates: Multiple layers growing on top
– Surface steps and terraces: Evidence of layer-by-layer growth
“You can see all sorts of structures that would’ve been difficult to impossible to make out with optical light.”
— Pseudoboss11
These microfeatures influence snowpack strength, albedo, and melt rate—critical for hydrology and climate science.
Are Colored Snowflake Images Real? Debunking the Myth
SEM Images Are Naturally Black and White
Scanning electron microscopes detect electron emissions, not visible light. Therefore, all raw images are grayscale. The vibrant colors in popular snowflake photos are false-colored—digitally added to highlight structural differences.
Why Scientists Use False Coloring
Color is applied to:
– Distinguish branch tips from core regions
– Improve clarity for teaching and public outreach
– Enhance visual impact without altering data
These hues are arbitrary—they don’t represent real pigments or temperatures. Like colorized Hubble images, they serve both science and storytelling.
“The vibrant colors seen in this image are pseudo-colored or false-colored—a computer-generated enhancement used to highlight different features.”
— Imaging Explanation
Always check captions. Reputable sources will note when color has been added.
What Snowflake Shapes Reveal About the Atmosphere

Crystal Morphology as an Atmospheric Recorder
Snowflake shape acts as a natural data logger. By analyzing form, scientists can infer:
– Temperature history during formation
– Humidity levels in cloud layers
– Wind shear or turbulence that fractured arms
For example:
– Thin plates form near -2°C
– Columns dominate around -5°C
– Dendrites peak between -12°C and -16°C
– Needles appear near -5°C to -10°C
This helps validate weather models and reconstruct microclimatic events.
Educational Uses: Teaching STEM Through Snow
Simple Microscope Labs for Students
Observing snowflakes is a powerful STEM activity combining physics, chemistry, and observation.
Materials Needed:
- Black construction paper
- Soft-bristled paintbrush
- Dissecting microscope (10x–40x)
- Digital camera or phone adapter
Steps:
- Pre-chill all materials.
- Catch flakes on black paper.
- Transfer gently to slide.
- Observe and photograph.
- Sketch or analyze symmetry.
“It takes patience and skill (and freshly fallen snow!), but once you get the hang of it, you won’t want to stop!”
— Homeschool Microscope Lesson Guide
Students learn about states of matter, symmetry, and experimental design—while experiencing real discovery.
Debunking Common Snowflake Myths
- “Electron microscopes show color” → False. SEM produces grayscale; color is added later.
- “All snowflakes are completely unique” → Mostly true for complex flakes, but simple forms (like plates) can repeat.
- “Snowflakes melt too fast to study” → False with cryogenic freezing.
- “You need a lab to see snowflakes” → False. Basic symmetry is visible with a cold dissecting scope.
“I’ve developed a new hobby—snowflake hunting!”
— Enthusiast, Upstate NY
Final Thoughts: Science Meets Wonder
Snowflakes under a microscope are more than pretty pictures—they are frozen data points, revealing the hidden order of nature. From Wilson Bentley’s first photomicrographs to today’s false-colored electron images, our ability to see deeper transforms curiosity into insight. Whether you’re a scientist or a child with a magnifier, every snowflake reminds us: beauty and complexity exist at every scale.
“Despite some criticism about aesthetics or scientific rigor, this image exemplifies how technology reveals hidden wonders in everyday phenomena. From the vastness of space to the tiniest snowflake, beauty and complexity exist at every scale.”
— Final Reflection